PayerMax Merchant Platform Operation Guide
1. Onboarding, Signing and Agreement Confirmation
- PayerMax's business team will complete customer onboarding in the background and enter the super administrator's information (please contact PayerMax's business team if you need to modify the administrator).
- After receiving the email, the super administrator can enter the platform according to the email guidelines and confirm the agreement.
- Agreement confirmation is available in two ways: online and offline:
- Offline: After PayerMax's business team completes the agreement with you offline, it will be uploaded to the background; no further operation is required on your part on the platform, and you can use the platform directly after activation.
- Online: You need to log in to the merchant platform and complete the agreement confirmation before using the platform normally.
| Step 1 | |
| Step 2 |
- Agreements completed via online signing can be queried through Contract Management (only the super administrator has this permission).
2. Asset Overview
On the homepage of the PayerMax Merchant Platform, you can query the total asset amount you have permission to access (all currencies are converted to USD at the real-time exchange rate); you can click on the detailed amount to enter the corresponding management page.
| Amount Type | Amount Description | Function Permission Control | Data Permission Control |
|---|---|---|---|
| Available Balance | Corresponds to the amount in the funding account opened for you by PayerMax. Funds can be used for transfer, currency exchange, withdrawal, and payment. | The user needs to have the permission to query the funding account (otherwise, this amount item will not be displayed) | Display Amount = Real-time balance of the user's authorized fund accounts (If no account is authorized, display "-"; if accounts are authorized but the balance is 0, display "0" normally) |
| Pending Settlement | For merchants with acquirer services enabled, Unsettled Amount = Amount to be settled that has not reached the settlement date + Frozen amount that has reached the settlement date but not successfully credited | The user needs to have the permission for settlement management (otherwise, this amount item will not be displayed) | Display Amount = Pending settlement amount of the user's authorized merchant accounts (If no pending settlement account exists, display "-"; if there are pending settlement accounts but the amount is 0, display "0" normally) |
| Dispute Hold Amount | For merchants with acquirer services enabled, Risk Control Frozen Amount = Amount frozen by PayerMax due to disputes arising from acquirer transactions | The user needs to have the permission to query disputes (otherwise, this amount item will not be displayed) | Display Amount = Dispute hold amount of the user's authorized merchant accounts (If no hold account exists, display "-"; if there are hold accounts but the amount is 0, display "0" normally) |
| Margin Amount | For merchants with acquirer services enabled, Risk Control Margin = Margin amount collected by PayerMax (including fixed margin and revolving margin) | The user needs to have the permission to query margin (otherwise, this amount item will not be displayed) | Display Amount = Deposit amount of the user's authorized merchant accounts (If no deposit account exists, display "-"; if there are deposit accounts but the deposit amount is 0, display "0" normally) |
Note:
- The final total asset amount = Summary of the amount data that the user has permission to access; if the user has no functional permissions for all 4 amount items, the total asset amount field on the homepage will not be displayed at all;
- For more information about permissions, you can refer to the chapters of Platform Function Permissions and Platform Usage Data Permissions.
3. Fund Accounts
3.1 Usage Instructions
You can open multiple merchant IDs for business operations and independently create fund accounts. You can freely select the transaction account for different businesses under each merchant ID (and this relationship can be modified on the platform by yourself).
3.2 Operation Instructions
3.2.1 Fund Account Query
Through → , you can query all fund accounts (multi-currency) opened in PayerMax.
The Account Management homepage allows you to manage all fund accounts with PayerMax. The account rules are as follows:
Account Number: 12 digits;
Account Name: The English registered name of the company;
Account Alias: Customizable by you.
3.2.2 Modify Account Alias
Through → , you can customize the alias information (the alias will be displayed alongside the account wherever it appears on the merchant platform to help you identify the account).
The display standard for fund accounts in use is: Account Alias/Account Number, as shown in the figure below:
3.2.3 Add Account Currency
Through → → , you can add the required currencies to the fund account.
| Step 1 | |
| Step 2 |
Currencies can be added to the account in two ways:
Actively add through this function;
No active addition required, the currency account will be automatically opened when funds are received in the relevant currency during transactions.
If the currency you want to open is not in the list, please contact your account manager to discuss the specific scenario.
3.2.4 Account Transaction/Balance Query
| Function | Page | Description |
| Total Account Balance Overview | Available balance of all funds | |
| Transaction Records | Includes top up, transfer, withdrawal and exchange transaction records | |
| Income and Expense Details | Transaction records of all fund accounts(Including but not limited to fund transactions, settlements, withdrawals, disputes, etc.) | |
| End-of-Day Balance | Supports query of closing balance in two time zones: UTC+0 and UTC+8 |
3.2.5 Open a New Fund Account
- This operation is not mandatory and is only for your fund isolation needs;
- The account opener and super administrator have default permissions for the account. You can check the box to assign permissions to other users (or establish the relationship through Account Authorization Management later).
| Step 1 | |
| Step 2 | |
| Step 3 | |
| Step 4 |
3.2.6 Fund Account Authorization
Important Reminder:
This operation is mandatory.
| Step 1 | |
| Step 2 | |
| Step 3 |
To modify the authorization relationship, click the Edit button to complete the operation;
You can set up an approval workflow for editing authorization relationships through the Approval Center. If not enabled, the edit will take effect immediately after submission; if enabled, the edit will wait for the approver's review after submission (via the Approval Center).
3.3 Permission Instructions
The Funds Account module is divided into Function Permissions and Account Data Permissions:
Function Permissions: Controlled by the ADMIN through User/Role Management. For example, User A can only query but not transact, User B can perform all operations (including queries), and User C has no access to this module at all. The administrator can assign permissions as needed;
Account Data Permissions: Suppose you have opened a total of 10 fund accounts, but you want User A to only query/use 4 of them and User B to use all. You can establish the permission relationship between users and fund accounts through the Fund Account Authorization Management function (the super administrator can grant this management permission to users).
4. User Management
Only customers who need to use the merchant platform need to focus on this module; customers with pure API integration do not need to pay special attention.
4.1 Operation Instructions
Permission Note: Only the ADMIN has the permission to add/edit in this module; other users can be assigned query permissions as needed.
4.1.1 Role Management
4.1.1.1 Create a Custom Role
Through → → , you can enter the role list and click the button to add a custom role.
| Step 1 | |
| Step 2 | |
| Step 3 |
After checking the required permissions for the role, click to complete the creation of the custom role.
4.1.1.2 View Role Details
Through → → , you can enter the role list and click the role you want to view to enter the details page.
4.1.1.3 Edit Role
Important Reminder:
Default roles cannot be modified, while custom roles can be modified. However, any modification will take immediate effect for all users assigned to the role.
| Step 1 | |
| Step 2 | |
| Step 3 |  |
4.1.2 User Management
4.1.2.1 Add a User
Through → , you can enter the user list to query all users under the merchant. Click to start the process (only the ADMIN has the permission to add users). After the addition is completed, the user will receive an email and complete the activation process according to the guidelines to log in and use the merchant platform.
| Step 1 | |
| Step 2 | 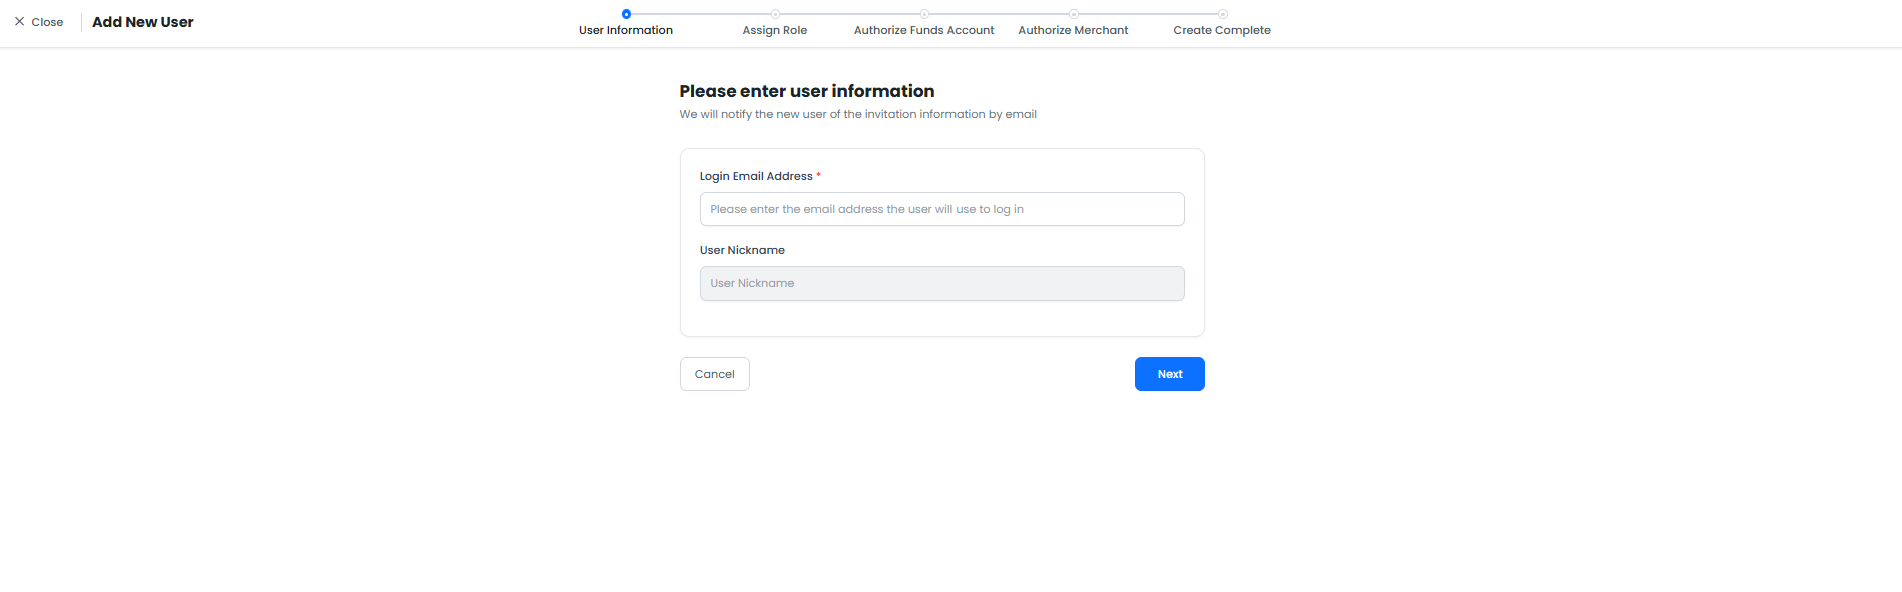 |
| Step 3 | |
| Step 4 | |
| Step 5 |
4.1.2.2 Modify User
ADMIN information can only be modified by the business manager. Other user information (including user details, roles, authorization relationships, etc.) can be modified by the super administrator on the merchant platform.
4.2 User Permission Control
User permissions are controlled by three factors:
Role: Determines the functions available on the merchant platform.
Fund Account Authorization Relationship: On the basis of having function permissions, determines whether the user can query/manage/use the account.
Merchant ID Authorization Relationship: On the basis of having function permissions, determines whether the user can query/use the merchant ID.
The ADMIN has all function, fund account and merchant ID permissions by default (one merchant has only one super administrator); the permissions of other users depend on the actual assignment.
5. Approval Center
Function Positioning of Approval Center: If the merchant needs secondary review for certain functions, it will be uniformly managed through the Approval Center (Only for the merchant platform; no approval can be set for transactions initiated via API).
5.1 Approval Workflow Support Rules
Note:
A maximum of one initiator and one approver is supported at present.
| Serial No. | Approver Type | Specific Enumeration | Allow Self-Approval | Final Effect |
|---|---|---|---|---|
| 1.1 | Assigned Users | Select from existing users on the merchant platform, multiple users supported | Yes | - Initiated by User A - All assigned approvers can review (regardless of business permission status) |
| 1.2 | Assigned Users | Select from existing users on the merchant platform, multiple users supported | No | - Initiated by User A - If User A is the only approver, the initiation fails and submission is not allowed - If there are other approvers besides User A, the initiation succeeds and all approvers except A can review - If User A is not in the approver list, the initiation succeeds and all approvers can review |
| 2.1 | Assigned Roles | Select from existing roles on the merchant platform, multiple roles supported | Yes | - Initiated by User A - All users corresponding to the assigned roles can review (regardless of business permission status) - The current users of the roles are taken |
| 2.2 | Assigned Roles | Select from existing roles on the merchant platform, multiple roles supported | No | - Initiated by User A - If User A is the only user under the approved roles, the initiation fails and submission is not allowed - If there are other users under the approved roles besides User A, the initiation succeeds and all users under the approved roles except A can review - If User A is not under the approved roles, the initiation succeeds and all approvers can review |
5.2 Operation Instructions
4.2.1 Approval Workflow Settings
| Function | Page |
| Approval Switch | |
| Approver Settings |  |
5.2.2 Approval Operation
Approval can be accessed through the following two entrances:
| Approval Entrance | Page |
| Pending Tasks in Homepage | |
| Left-Side Menu |
6. Fund Transactions (Top Up, Transfer, Withdrawal, Exchange)
6.1 Top Up
6.1.1 PayerMax Top up Account Query
6.1.1.1 Non-VA Method: Account Query + Submit Voucher
| Step 1 | |
| Step 2 | |
| Step 3 | You need to transfer funds to the receiving account offline. |
| Step 4 (Method 1: Log in and submit deposit voucher after successful transfer) | |
| Step 4 (Method 2: Submit voucher here) | |
| Step 5 | After submitting the voucher, please wait for internal processing. The deposit transaction order status of "Success" indicates that the funds have been credited. |
6.1.1.2 VA Method: Query and Open a VA Account
Note:
- A VA deposit account can only receive funds when its status is "Activated";
- The final fund account for fund crediting is subject to the one bound to the VA account;
- VA functionality is evaluated and determined by PayerMax and cannot be controlled by the customer.
| Step 1 | |
| Step 2 | |
| Step 3 | |
| Step 4 (Return to the deposit page after creation) | |
| Step 5 | You need to transfer funds to the VA account offline, then wait for automatic processing by the PayerMax system. The deposit order status of "Success" indicates that the funds have been credited. |
6.1.2 Obtain Fund Request Form
Usage Scenario: This function is available if the merchant needs a voucher for internal fund application before making a transfer.
| Step 1 | |
| Step 2 | |
| Step 3 |
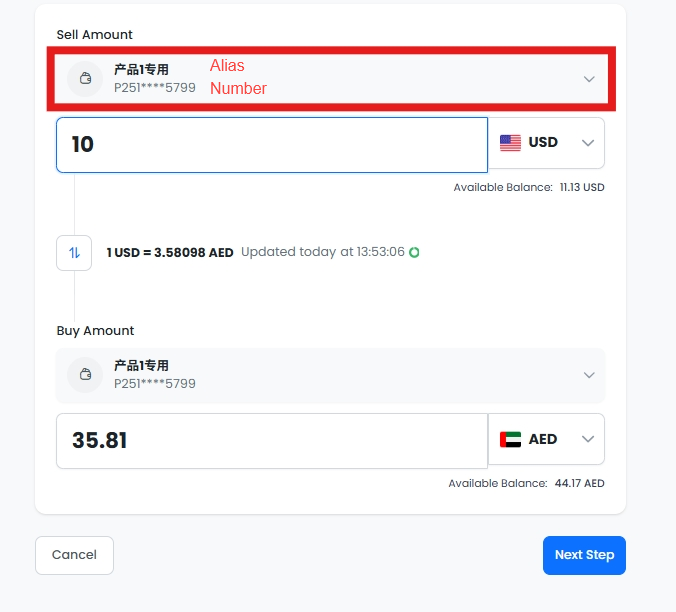
6.2 Currency Exchange
Supports currency exchange between different currencies across multiple fund accounts.
| Step 1 | |
| Step 2 |
6.3 Transfer
Usage Scenario: This function is only required when multiple fund accounts are involved; it cannot be used with a single fund account (for different currencies under a single fund account, currency exchange can be used).
| Step 1 | |
| Step 2 (Scenario 1: Cross-account transfer in the same currency) | |
| Step 2 (Scenario 2: Cross-account transfer in different currencies) |
6.4 Withdrawal
Note:
- Approval workflow settings are supported for withdrawals, and the system has approval disabled by default;
- If enabled, after the withdrawal application is submitted, the approver can complete the review in the Approval Center. The final withdrawal amount is calculated based on the exchange rate/fee at the time of approval.
| Step 1 | |
| Step 2 (Scenario 1: Withdrawal in the same currency) | |
| Step 2 (Scenario 2: Withdrawal in different currencies) |
6.5 Transaction Notification Settings
For fund transactions (top up, transfer, withdrawal, exchange), if you want to receive email notifications when the transaction reaches a final status, you can configure it through Notification Management (including transactions initiated on the merchant platform and via API).
7. Acquiring Product
You need to activate the acquiring service with PayerMax (please contact our business manager if needed) to use this module.
After activating the service, user permissions for the Acquiring Products module are divided into Function Permissions and Merchant ID Data Permissions:
Function Permissions: Controlled by the ADMIN through user role permissions. For example, User A can only query orders, User B can use all functions under this module, and User C cannot see this module at all. The administrator can assign permissions as needed;
Merchant ID Data Permissions: Suppose you have 5 merchant IDs cooperating with us for acquiring business, User A can view transactions of some merchant IDs, and User B can view transactions of all merchant IDs. You need to complete the permission assignment through → (only the ADMIN has this permission).
7.1 Order Query
Log in to the merchant platform: Go to the → page to view the order status. Click the record to view detailed order information.
Time and Time Zone Logic:
When querying orders on the page: Based on the time zone selected in the global view.
When exporting: The time zone can be selected by yourself.
7.2 Refund Management
7.2.1 Initiate a Refund
Initiate a refund on the merchant platform: Go to the → page, search for the transaction order to be refunded, enter the order details page, and click the button.
Note:
- Manual refund initiation on the merchant platform has no callback notification by default. Please contact our contact person to enable this function if needed;
- All refund approvals are completed uniformly through the Approval Center.
| Step 1 | |
| Step 2 |
7.2.2 Refund Approval
For refunds initiated through the Merchant Platform, merchants can independently control whether to enable approval. The management of approval and specific approval operations are uniformly completed via the .
7.2.3 Refund Query
| Step 1 | |
| Step 2 (Click Details to view detailed refund information) |
7.3 Pay by Link
Currently, PayerMax allows merchants to create one‑time payment links and generate QR codes via the Merchant Management Console (MMC). The path is: → → . Follow the on‑screen instructions to enter order information and generate the link.
When entering order information:
Order Amount=Unit Price×Quantity;Order Description: Displayed to users on the link page; can be product details or payment purpose;Link Remarks: Not displayed to users; returned to merchants via callback, corresponding to the API fieldlinkDescription.
| Step 1 (Create Link) | 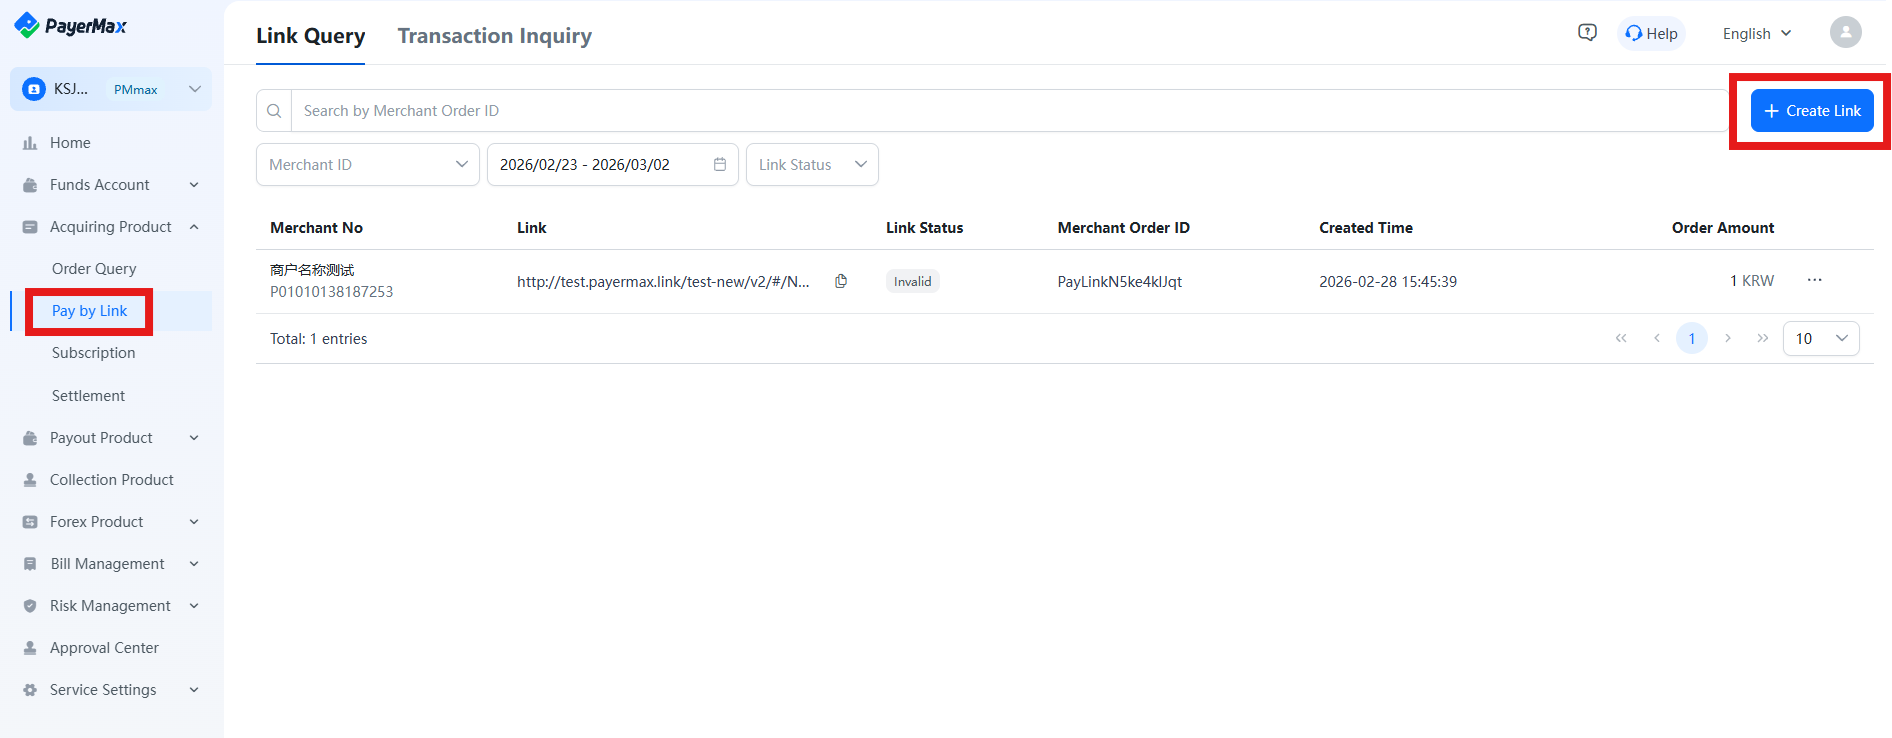 |
| Step 2 (Enter order info: acquiring country/region, order amount, order description, link validity, etc.) | 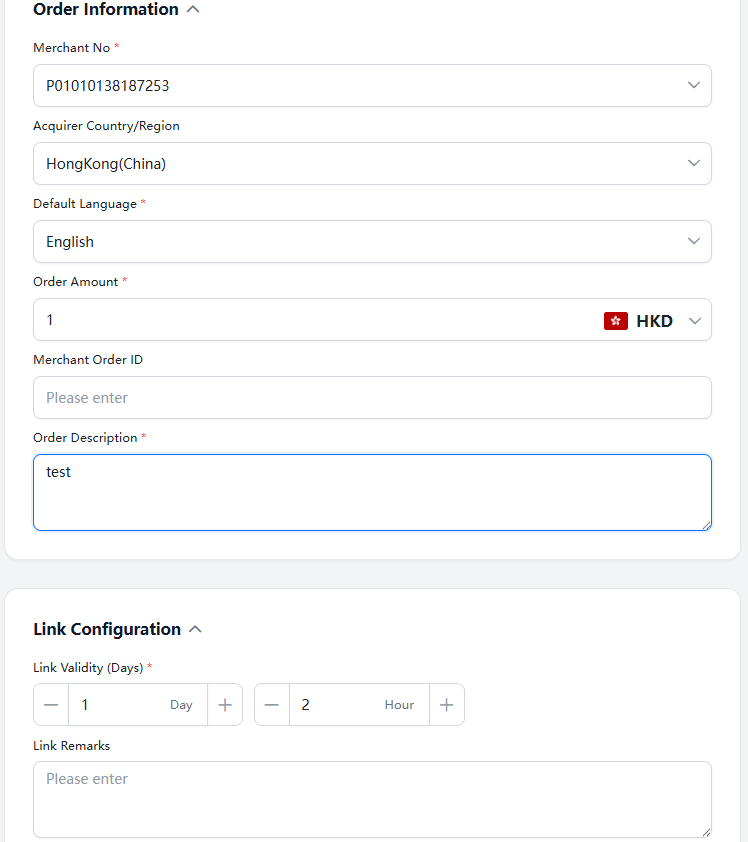 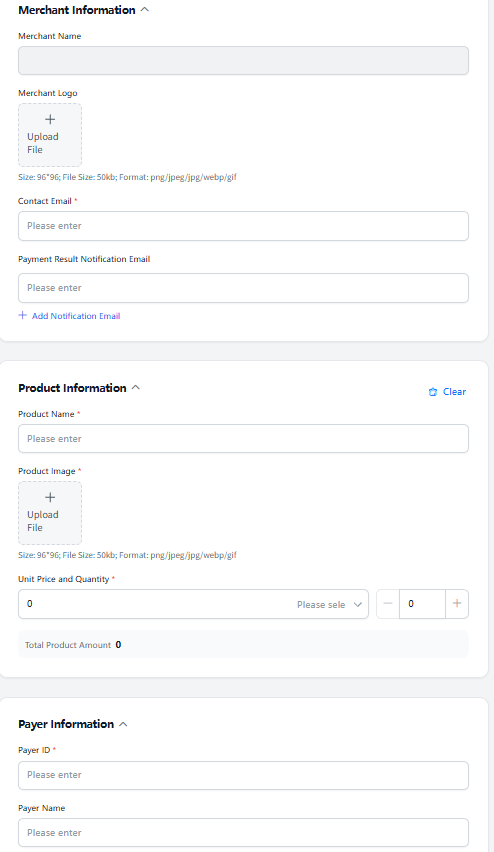 |
| Step 3 (Generate Link/QR Code) | 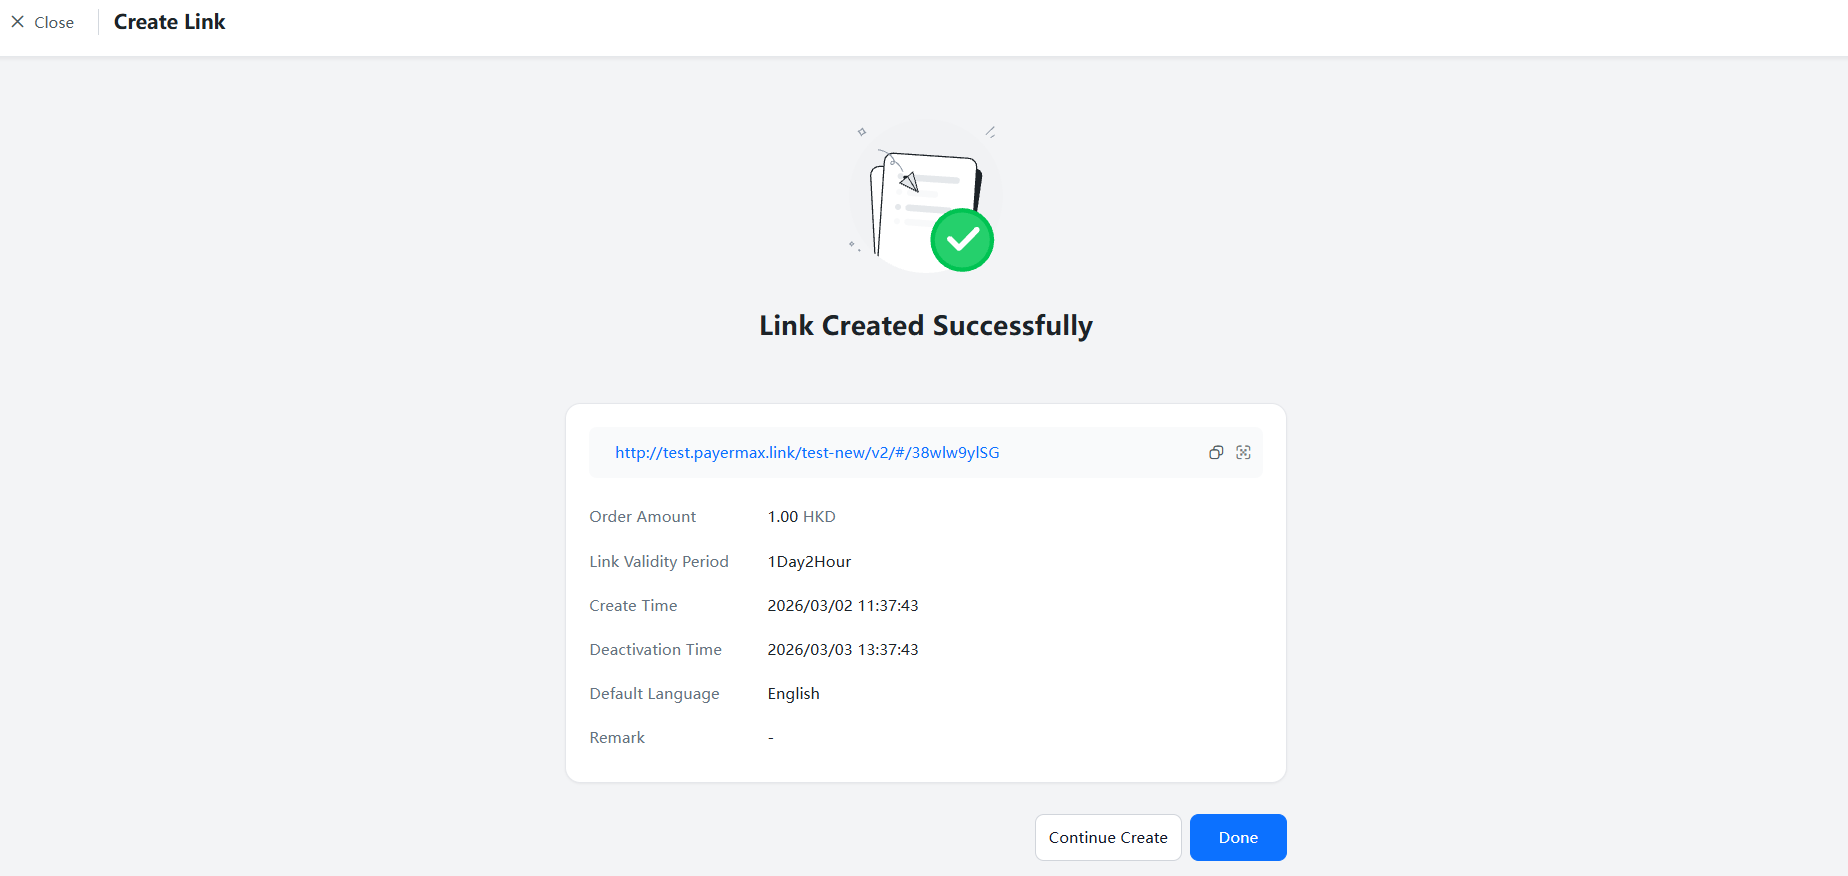 |
| Step 4 | Send to user to complete payment |
7.4 Settlement Management
After the completion of an acquiring transaction, a settlement statement will be generated according to the settlement cycle (funds are credited to the authorized balance account, and can then be withdrawn through Payout or withdrawal); if the settlement cycle has not been reached, the amount will be counted as pending settlement. Therefore, the merchant platform provides you with the functions of Settled Management (settlement statement query and download) and Pending Settlement Query.
7.4.1 Settled Settlement
Status Description:
Funded: Indicates that the funds have been normally settled to the authorized fund account and the settlement process is completed.
Uncredited: Hover to view the specific reason; this situation may occur in the following two business scenarios:
Settlement Suspended: Funds settlement is suspended due to PayerMax's risk control reasons; please contact our customer service if you have any questions.
Fund Account Unauthorized: You need to complete the authorization as soon as possible according to the guidelines (if you do not have permission, please contact the authorized person in your company). PayerMax will automatically credit the funds after successful authorization.
Actual Settlement Amount Formula:
No FX Lock:
Settlement Amount=Total Settleable Amount in the Summary Cycle*Settlement Date Exchange Rate (if applicable)Actual Settlement Amount=Settlement Amount-Deduction Amount (if there are negative settlement statements in the same cycle)
FX Lock:
Settlement Amount=Per-transaction Clearing Amount*Transaction Date Locked Exchange RateActual Settlement Amount=Settlement Amount-Deduction Amount (if there are negative settlement statements in the same cycle)
Click the record to view details (including total amount by transaction type, currency exchange information, credited fund account information, etc.).
Export: The Settlement Management module supports the export of single settlement statement data and details; if you need settlement statement data for a period of time, you can export it through the Bill Management module.
7.4.2 Pending Settlement
Displays the total pending settlement amount that has not reached the settlement cycle.
8. Payout Product
Note
You need to activate the payout service on PayerMax (contact our business manager if needed) to access this module.
After activating the service, user permissions for the Payout Products module are divided into Function Permissions and Merchant ID Data Permissions:
- Function Permissions: Controlled by the super administrator through user role settings. For example, User A can only query orders, User B has access to all functions under this module, and User C cannot view the module at all. The administrator can assign permissions as needed.
- Merchant ID Data Permissions: Suppose you have 5 merchant IDs cooperating with us for the payout service. User A can view transactions of some merchant IDs, while User B can view transactions of all merchant IDs. You need to complete permission assignment via → (only available to super administrators).
8.1 Payout
The supported payout methods on the Merchant Platform include: Single Payout and Bulk Payout.
8.1.1 Single Payout
8.1.1.1 Initiate a Single Payout
Log in to the Merchant Platform, go to the → page. To make a payout to a single payee, click .
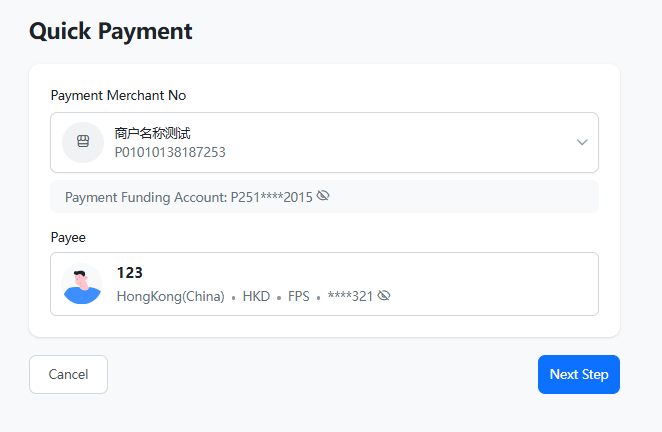
You can also initiate a single payout via the entry.
- Go to the payout page, fill in the key information, and click .
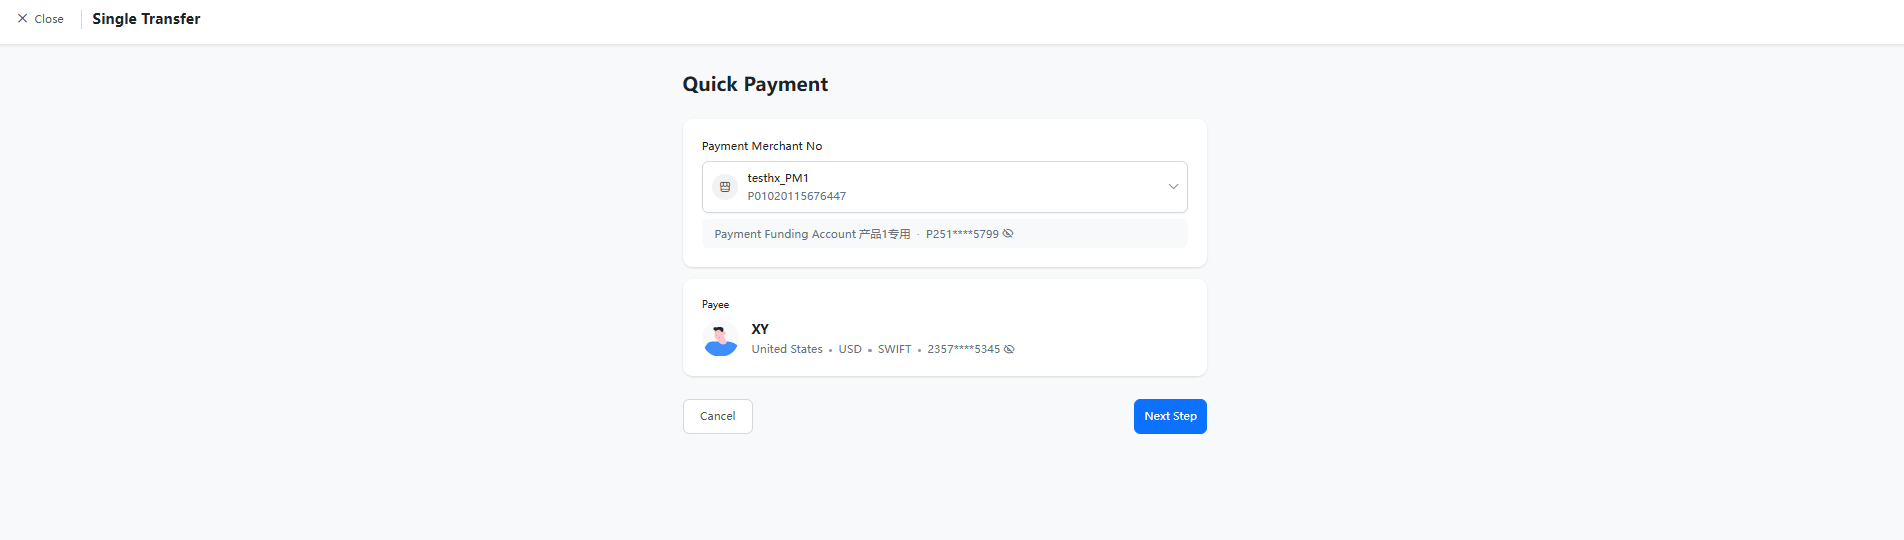
Select Payout Merchant ID: Choose a merchant ID with active payout contract and accessible permissions.
Payout Fund Account: Determined by the authorization relationship. Complete the authorization as guided if not yet done (contact a user with appropriate permissions to log in and complete it if you have no access), otherwise the payout cannot be initiated.
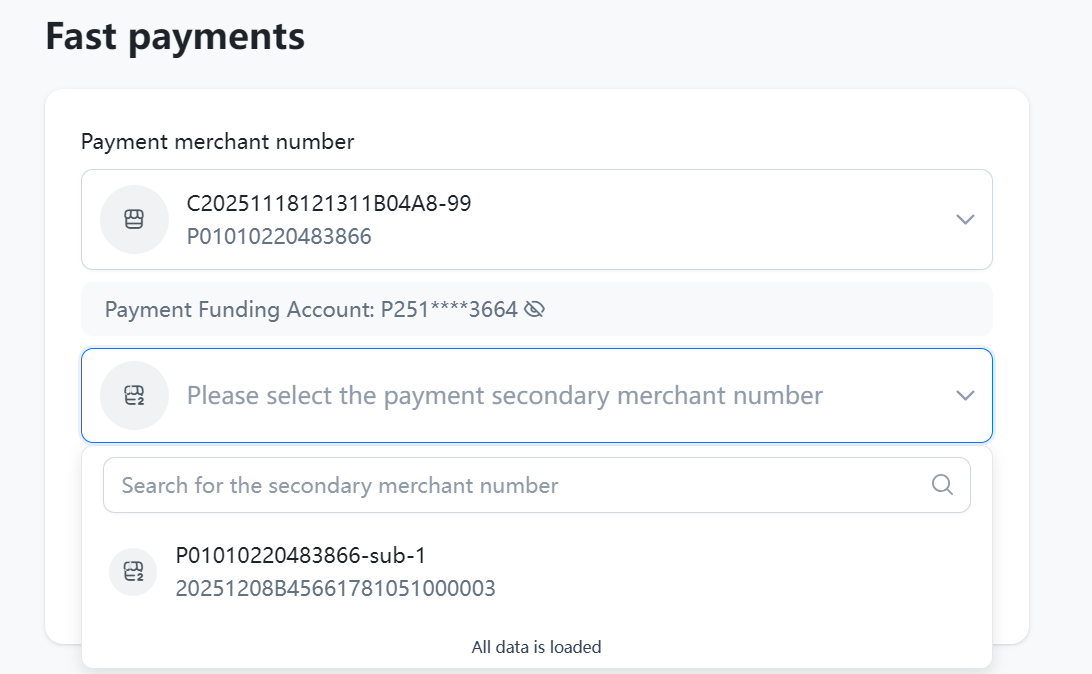
Platform merchants and institutional merchants need to select the corresponding sub-merchant ID.
Select Payee:
Select directly if the payee has been added and saved as a frequent payee.
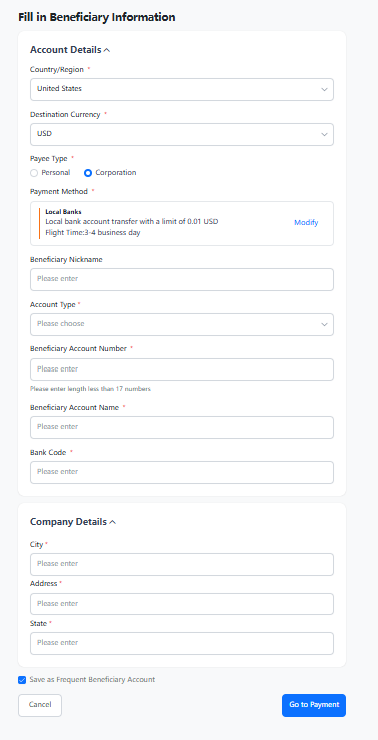
Add a new payee if no record exists or the payout is to a new recipient:
Enter the country/region, receiving currency and payee type, then select the payment method;
For SWIFT payouts, fill in the payee's account number, name and bank code;
Optionally save the payee as a frequent payee account, then click Next to proceed.
Note
If accessing via the Payee Accounts entry, simply select the merchant ID and click Next.
Fill in payout information and create a payout transaction.
Currency:
Debit Currency: Select a currency account with available balance under the authorized fund account.
Receiving Currency: Displays the payee's account currency and cannot be modified.
Amount:
- Debit Amount refers to the actual amount deducted from the merchant's fund account balance. The receiving amount (the actual amount the payee receives) will be displayed below after entering the debit amount. Merchants can also enter the receiving amount to reverse-calculate the debit amount.
Follow the prompts to confirm the information and complete the payout creation.
8.1.1.2 Payout Approval
| Step 1 (Open Approval Page) | 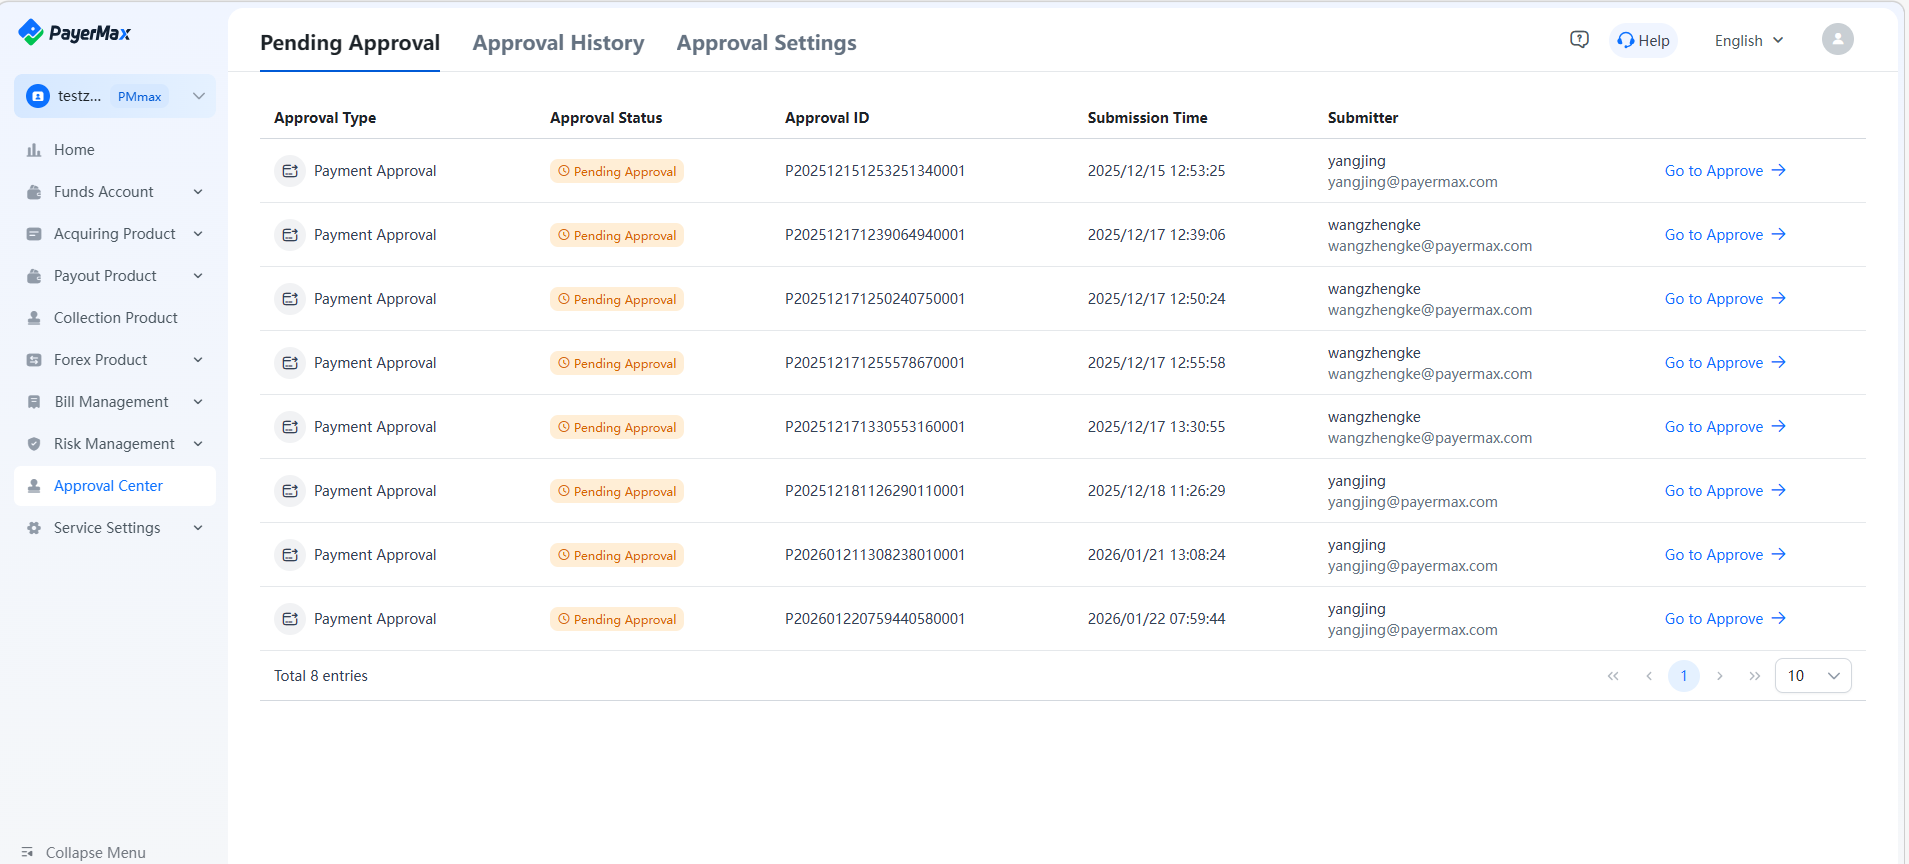 |
| Step 2 (View Details & Approve) | 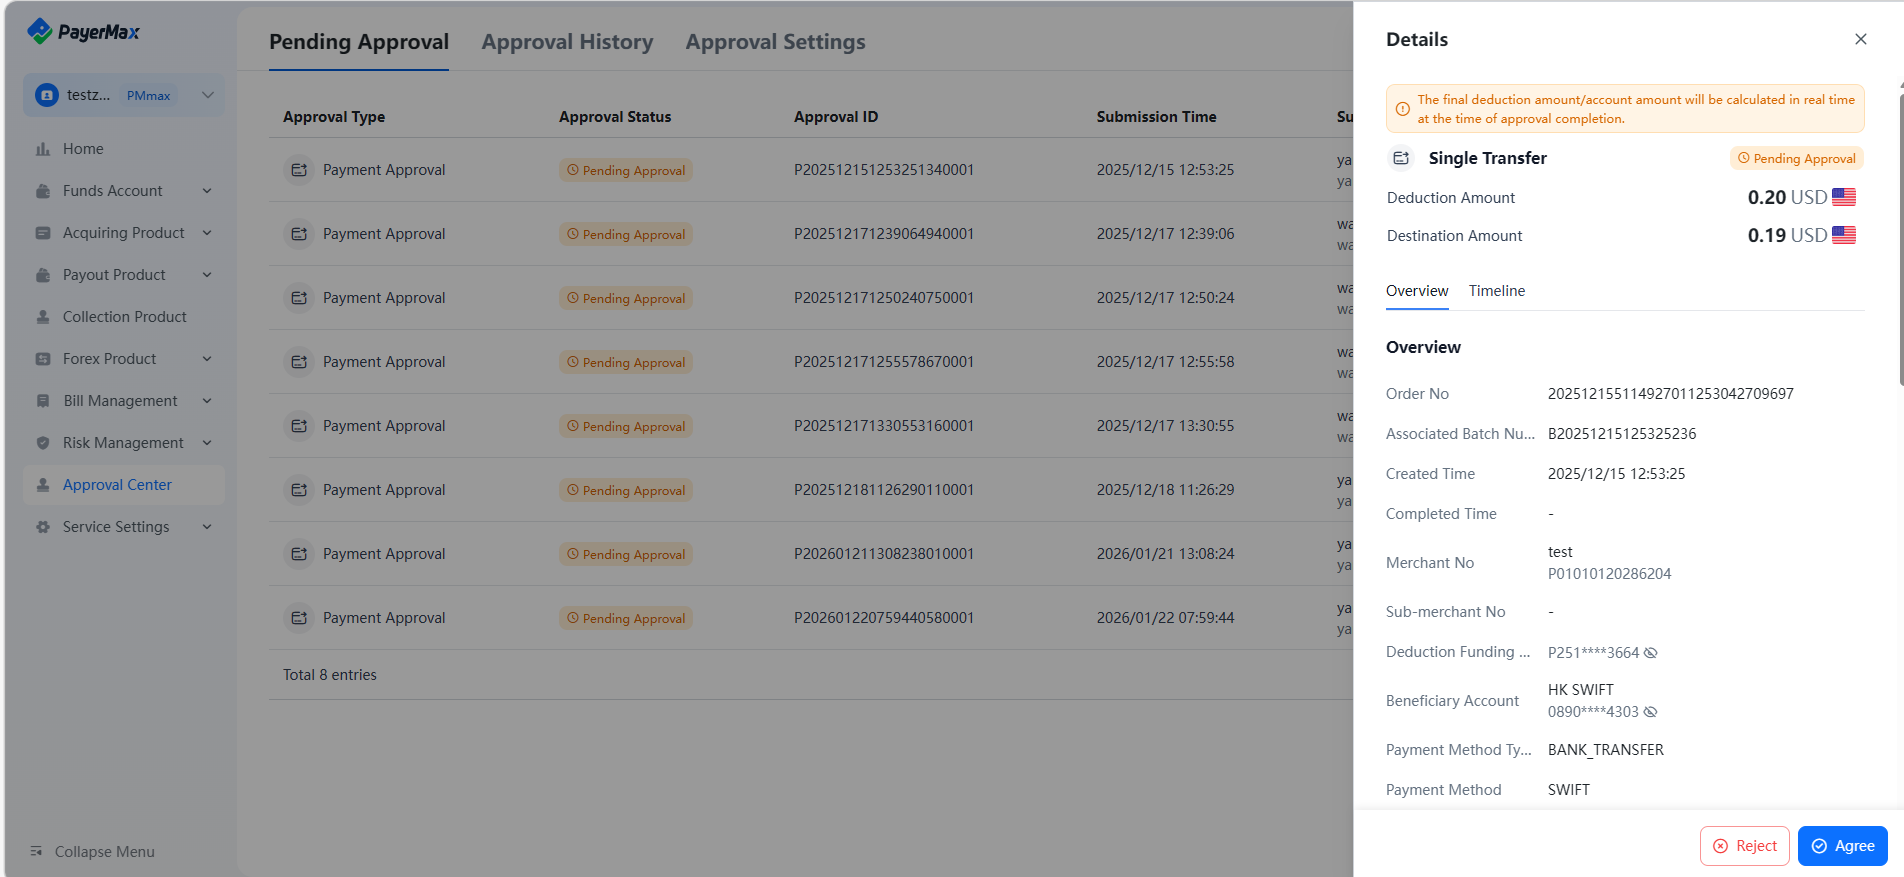 |
8.1.1.3 Payout Query
On the Payout Management page, open Payout and click Single Query to view the status of initiated payout transactions. Corresponding operations can be performed for transactions with status of Pending Supplementary Materials or Pending Approval.
Click a payout order entry to enter the payout details page and view the timeline and transaction information.
8.1.1.4 Payout Proof
Merchants can actively download payout proof for single payouts on the platform and send them to payees as proof of the transaction. The proof can be received via email after download.
8.1.1.5 Transaction Export
8.1.2 Batch Payout
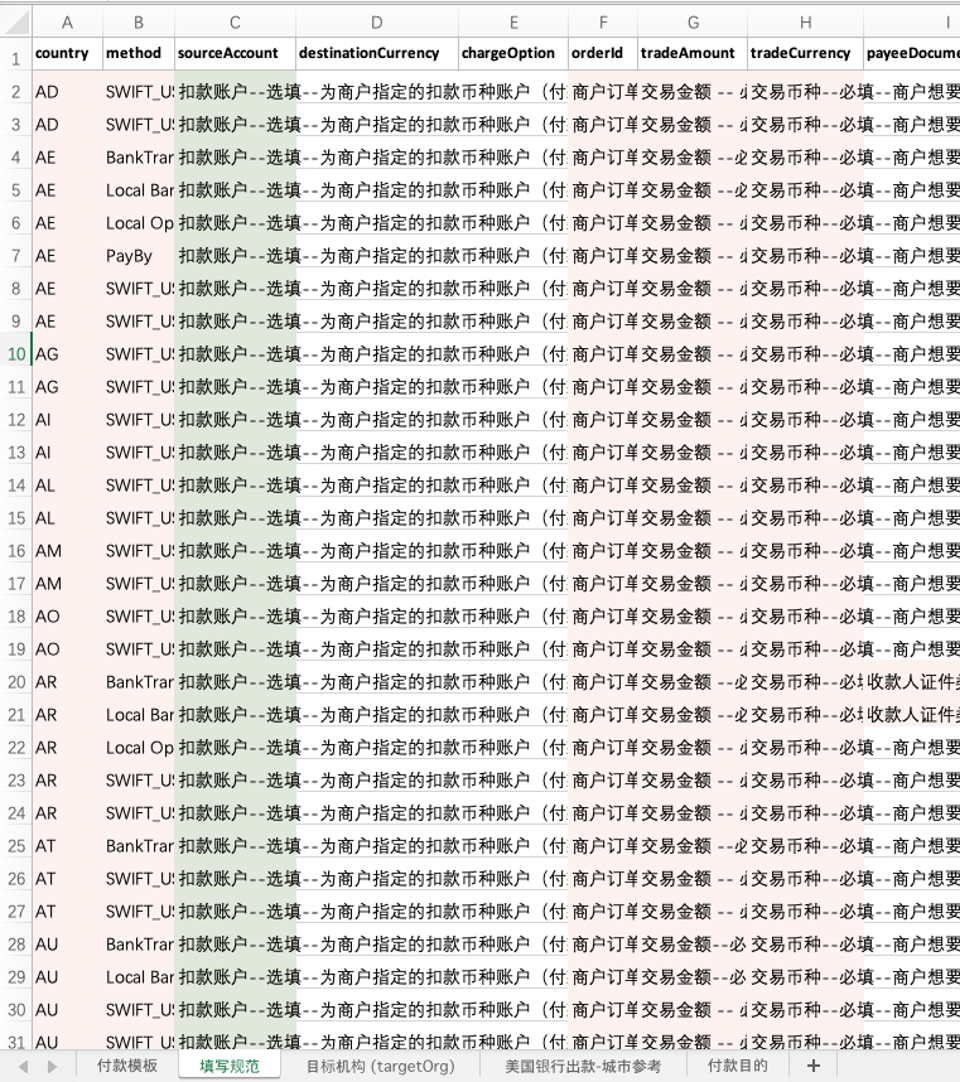
Before initiating a bulk payout, merchants need to log in to the PayerMax Merchant Platform, click View Template in the bulk file payout process, select the required payment method, and download the corresponding template to collect the payee and transaction information as required by PayerMax.
PayerMax provides all required information in the template (pink for mandatory fields, green for optional fields), format requirements and examples. Please fill in the information as instructed.
8.1.2.1 Initiate a Batch Payout
Log in to the Merchant Platform, go to the → page, and click to start the bulk payout process.
Create a payout batch.
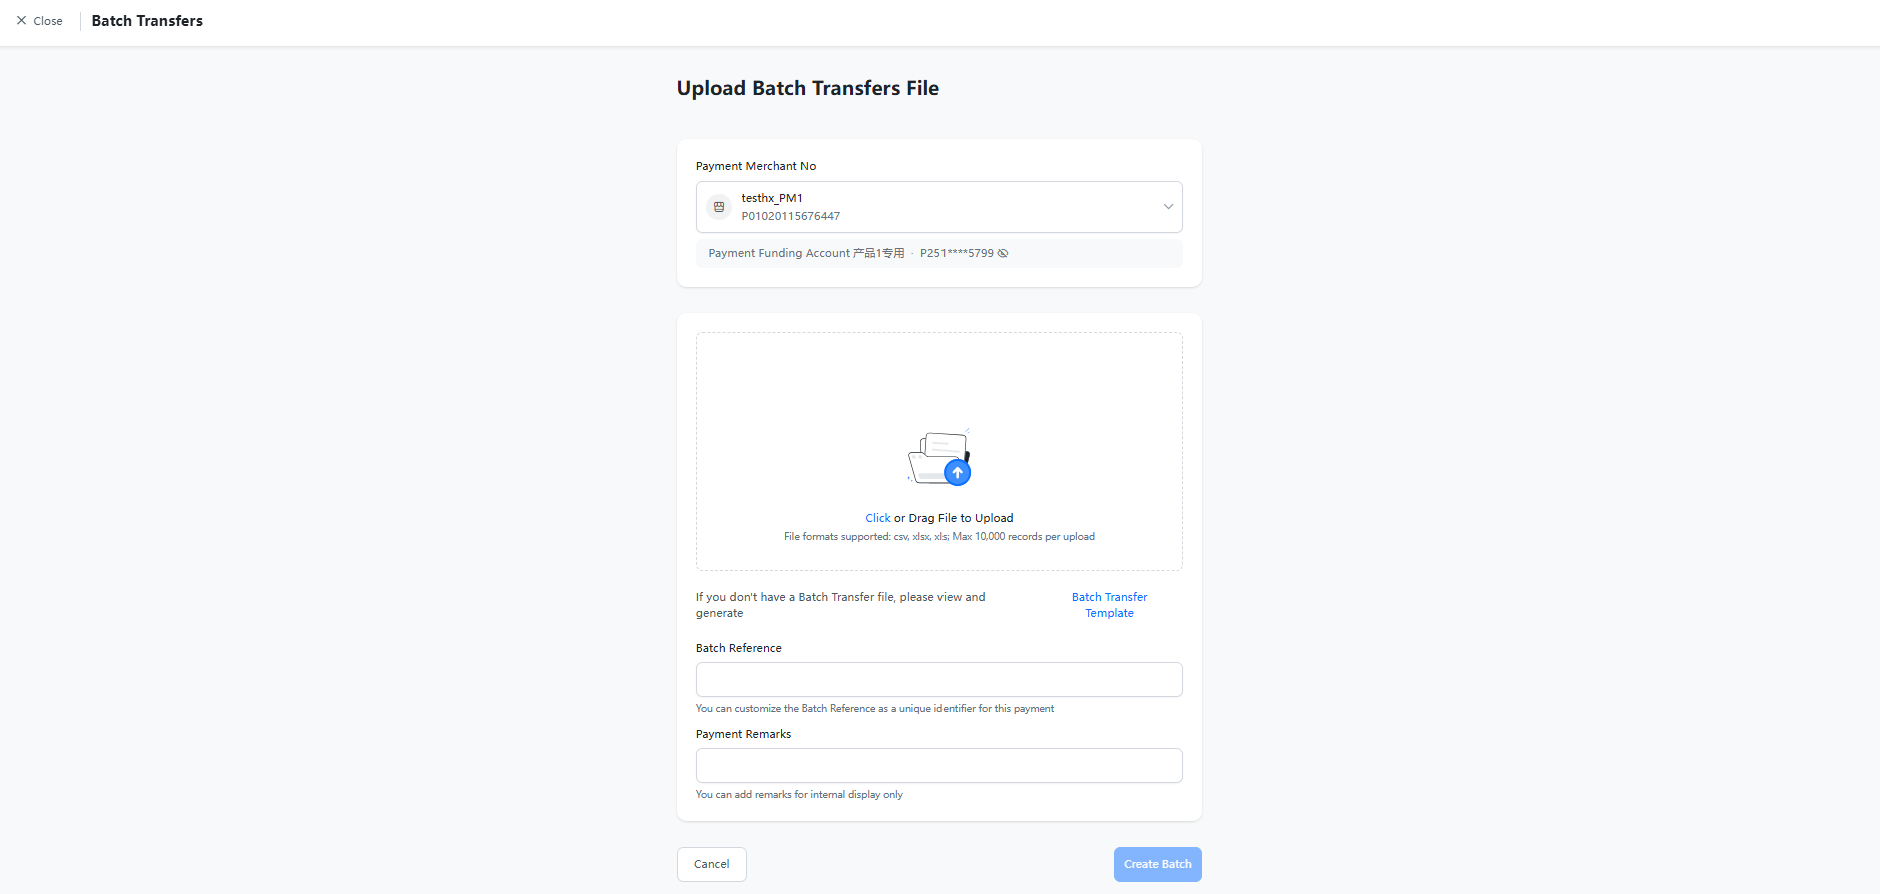
Select Payout Merchant ID: Choose a merchant ID with active payout contract and accessible permissions;
Payout Fund Account: Determined by the authorization relationship. Complete the authorization as guided if not yet done (contact a user with appropriate permissions to log in and complete it if you have no access), otherwise the payout cannot be initiated;
Click Batch Transfer Template to obtain the template (see next step);
After filling in all payee and payout information as required by the template, upload the completed template;
Customize a unique batch number for approval and query retrieval (duplicate batch numbers will trigger system errors);
Customize payout remarks for internal reviewer reference;
Click Create Batch to finish creation.
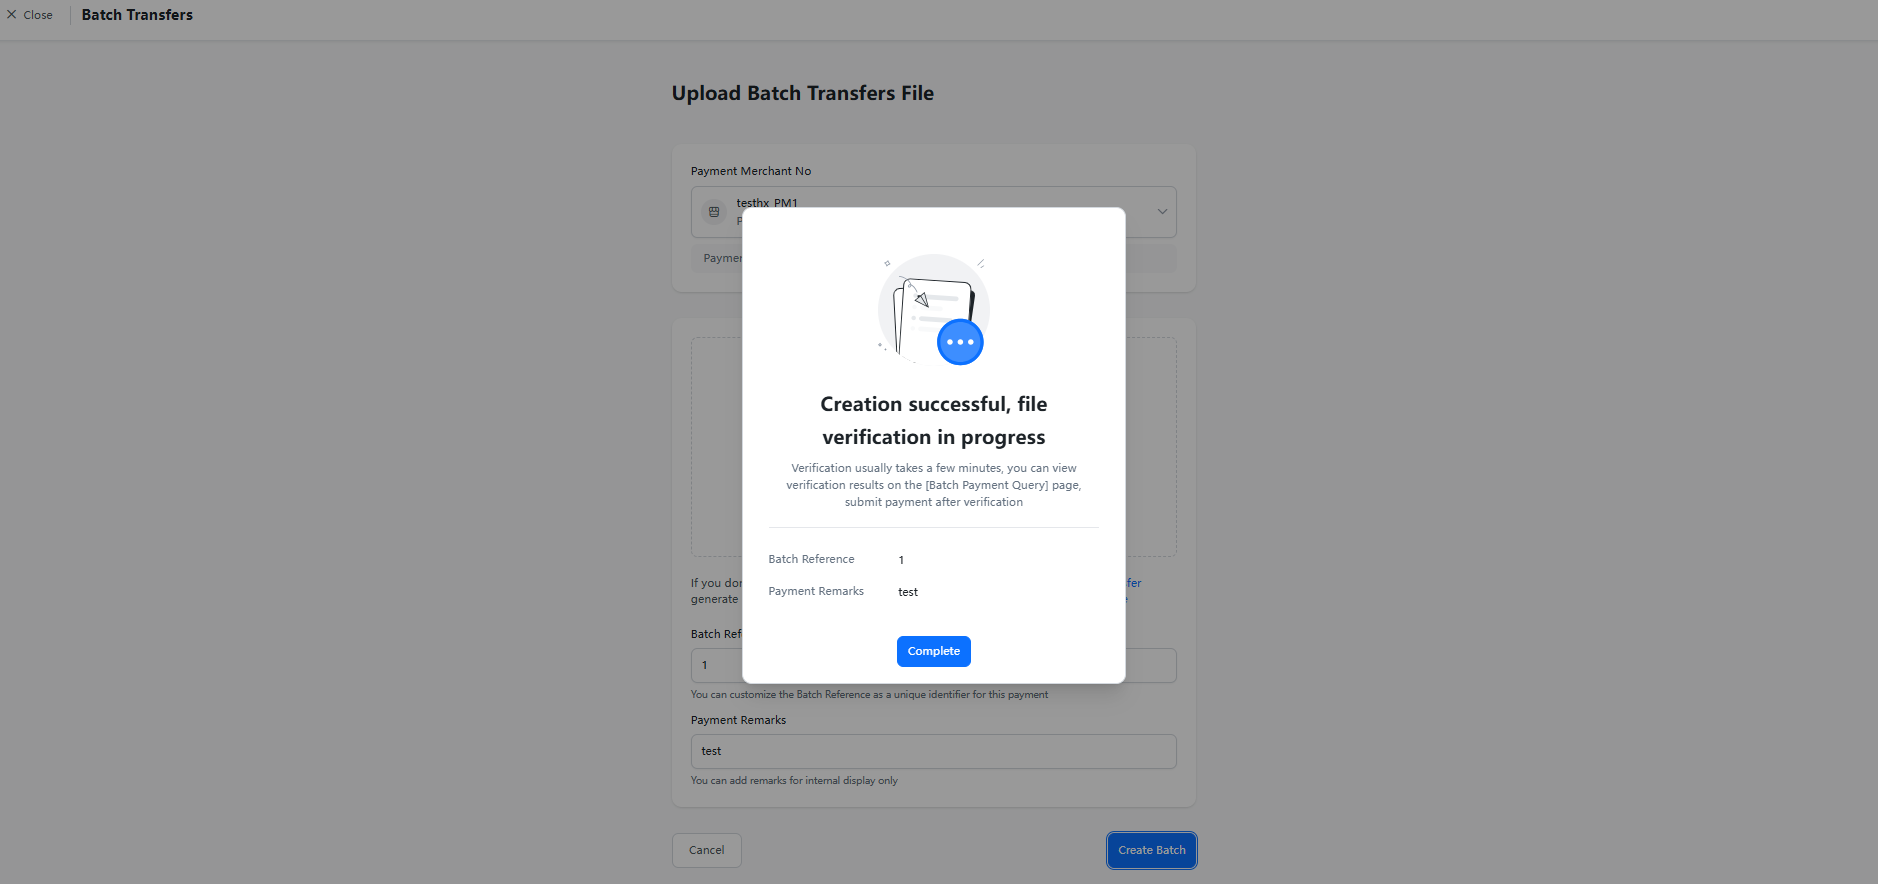
Batch Transfer query and submit payout. After creating the batch, return to the Payout page and click Batch Transfer Query to view the verification status of the batch. When the status is Verification Completed, click the batch entry to access batch details, check the approved orders, and submit the verified transactions in the batch if no errors are found. Clicking will skip transactions with parsing failures.
- Submit payouts for the verified records in the file.
After successful submission, view the overview and transaction details via the details page. The final transaction result is subject to the status in the details.
- Alternatively, click the button in the batch details.
- For data with parsing failures, download the reason for failure, modify the data and re-upload.
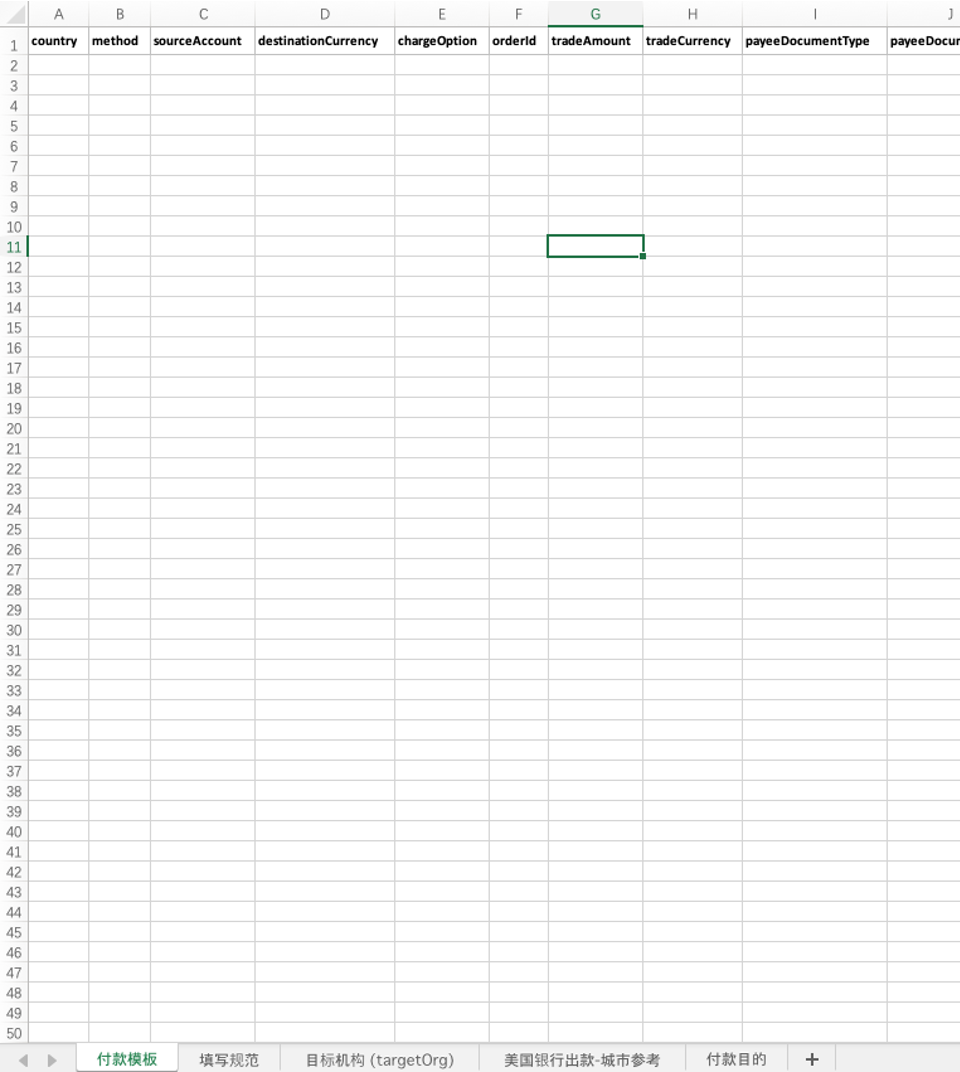
8.1.2.2 Generate Payout Template
Merchants can generate a template containing only payee information fields for a specific country as needed;
Merchants can also directly download a blank template with all fields
The Disbursement Template sheet in the blank template only contains the header;
For the information and rules required for each payment method, refer to the Fill in rule sheet and enter the payee information in the corresponding fields. Pink for mandatory fields, green for optional fields;
Enter information for only one payee per row in the template. The system will verify the data after upload, and the results will be displayed on the Bulk Query page.
8.1.2.3 Status Description
Batch Status: View the processing status of all batches on the Bulk Query page:
Created: Batch uploaded successfully, pending verification by PayerMax;
Verification Completed: PayerMax verification completed. View details of verified and unverified transactions. After verification, if all or part of the transactions are verified, submit the batch (only verified transactions will be processed). Unsubmitted batches will not be processed;
Pending Approval: Pending approval by the designated internal reviewer. Transactions will be processed only after approval (reviewers can complete batch approval via the Approval Center);
Processing: Transactions are being processed, and some orders in the batch have not reached a final status;
Processing Successful: All single orders in the batch have reached a final status: Success/Failed/Refunded.
- Order Status: Click a specific batch to view the status of each payout in the batch.
| Status Enumeration | Status Description | Available Operations |
|---|---|---|
| Pending Approval | The batch is pending internal approval and has not been processed | Delete |
| Pending Recharge | Insufficient merchant balance to process the transaction, recharge required | / |
| Processing | Transaction is being processed and has not reached a final status | / |
| Pending Supplementary Materials | Transaction triggered risk control rules; supporting documents required | Submit Documents |
| Materials Under Review | PayerMax has received the documents and is conducting the review | / |
| Successful | Accepted by the channel (actual receipt subject to bank confirmation) | Download Voucher |
| Failed | Payout approval rejected; view the rejection reason on the payout details page | Download Voucher |
| Refunded | Successfully processed transactions are finally refunded by the receiving institution and updated to failed (refunded) | Download Voucher |
8.1.2.4 Payout Proof
Merchants can actively download payout proof for batch payouts on the platform and send them to payees as proof of the transaction (the voucher can be received via email after download).
In addition, the platform supports automatically sending vouchers to payees (enable the setting and enter the payee's notification email in the file).
8.1.2.5 Batch Transaction Export
Go to the → page, search and enter the details page of the batch to be exported, and click the button to export the selected transaction information in the batch.
8.2 Recipients
This function allows you to manage all frequent payees, including query, edit, delete and quickly initiate single payouts. Payees added and saved as frequent payees during the single payout process can also be managed via this function.
9. Collection Product
Note
You need to activate the payment service on PayerMax (contact our business manager if needed) to access this module.
After activating the service, user permissions for the Payment Products module are divided into Function Permissions and Merchant ID Data Permissions:
Function Permissions: Controlled by the super administrator through user role settings. For example, User A can only query orders, User B has access to all functions under this module, and User C cannot view the module at all. The administrator can assign permissions as needed.
Merchant ID Data Permissions: Suppose you have 5 merchant IDs cooperating with us for the payment service. User A can view transactions of some merchant IDs, while User B can view transactions of all merchant IDs. You need to complete permission assignment via → (only available to ADMIN).
9.1 VA Payment Account
Log in to the Merchant Platform and go to the → page to view the list of activated VA payment accounts.
Note
Only accounts with Activated status can receive payments normally; accounts with Pending Activation or Closed status cannot receive payments.
Click to add your first or additional VA payment accounts.
Bind Merchant No: Choose a merchant ID with accessible permissions.
Payee Currency: Currency of the VA account (the available options are subject to your contract).
Payment Country/Region: Country where the VA account is located.
Bank: Institution where the VA account is held; select the desired institution if multiple options are available.
Scene: Select as needed.
VA Account Name: Customizable if supported by the bank; this name will be used as account information when the payer makes a transfer.
VA Account Alias: Only for internal use on the PayerMax platform and not displayed to banks or payers.
Merchants can click on the details page to copy the account information and provide it to payers offline as the "payee" for transfers.
9.2 VA Collection Transactions
9.2.1 Collection Order Management
After providing the VA collection account information to the payer as described above:
The payer completes the offline transfer;
PayerMax receives the VA payment notification from the bank, verifies and credits the funds. Merchants can view the order status via → .
Credited: Funds have been normally credited to the authorized fund account, and the transaction is completed.
Pending Authorization: The fund account for the business is not authorized, and PayerMax cannot process the credit. A reminder will be sent to complete the authorization as soon as possible.
Processing: Intermediate status from finding the credit account to successful actual credit:
- Usually pending for a long time due to risk control review. You can follow up on whether additional materials are needed by selecting options.
Failed: Although the bank received the funds successfully, the credit to the PayerMax fund account failed. We will communicate with you to refund the funds to the payer.
9.2.2 Risk Control Materials Submission
If a payment transaction triggers our risk control rules and the review is not passed, supporting materials may be required. Merchants can submit supplementary materials for the corresponding payment order on the Merchant Platform;
Merchants submit risk control materials based on the payer type (not required if risk control is passed) and select the corresponding option for
PersonalorCompanypayers;After submitting the supplementary materials, the risk control team will re-review the transaction (until a final status is reached: successful credit or fund refund for failed credit). View the local payment receipt result via → .
9.2.3 Collection Service Notifications
To receive collection transaction results and risk control materials submission notifications via email, set the recipient email in advance on the Merchant Platform.
10. Forex Product
10.1 Forex Transactions
PayerMax currently provides exchange rate inquiry and free currency exchange services for customers. For other foreign exchange risk hedging services, contact your business manager. The logic of free currency exchange has been introduced in the above modules; this section focuses on exchange rate inquiry.
10.2 Foreign Exchange Rate Inquiry
To query exchange rates for different business products, go to → on the Merchant Platform. The rates are categorized into Free Exchange Rate, Payin Product Rate and Payout Product Rate.
10.2.1 Free Exchange Rate
Permission Logic: Free exchange rates are not distinguished by merchant ID. Users with function permissions for free currency exchange rates can view the specific data.
Exchange Rate Quotation: 1 [Base Currency] =? [Quote Currency].
The supported currency pairs for free exchange rate inquiry are the currency combinations supported by PayerMax fund accounts, including interbank trading rates (e.g., EUR/AED).
Free exchange rates are not distinguished by merchant ID and apply to currency exchange between different fund accounts.
10.2.2 Payin/Payout Product Rate
You need to activate the acquiring/payout business on PayerMax (please contact our business manager if needed) to query the exchange rates for the corresponding products.
After the business is activated, the specific permission description for users is divided into Function Permissions and Merchant ID Data Permissions:
Function Permissions: Controlled by the super administrator through user role permissions. For example, User A can only query acquiring exchange rates, User B can query all exchange rates, and User C has no access to this module at all. The administrator can assign permissions as needed.
Merchant ID Data Permissions: Suppose you have a total of 5 merchant IDs cooperating with us on the acquiring/payout business. User A can view exchange rates for some of the merchant IDs, and User B can view exchange rates for all merchant IDs. You need to complete the permission assignment via → (only the super administrator can perform this operation).
When querying exchange rates for acquiring/payout products, you need to select the merchant ID accurately.
The currency pairs supported for acquiring and payout product exchange rates are the full range of currency combinations supported within the PayerMax system. If you only want to focus on the exchange rates of currency pairs corresponding to the countries where your signed products are available, you can check the box for .
11. Risk Management
The PayerMax Merchant Platform provides risk control list configuration, as well as dispute management, defense and chargeback alert services based on disputed transactions.
11.1 Risk Control List Configuration (Including Blacklist and Whitelist)
11.1.1 Acquiring Blacklist
Merchants can manage and block end consumers via → to prohibit their transactions:
- Overview: This page allows merchants to customize blacklist interception functions on the platform and view order interception status.
- Blacklist Configuration: Support merchants to upload or edit 5 types of interception information: User ID, Card Number (first 6 & last 4 digits), IP, Card BIN Country, Card BIN.
| Step 1 | |
| Step 2 | 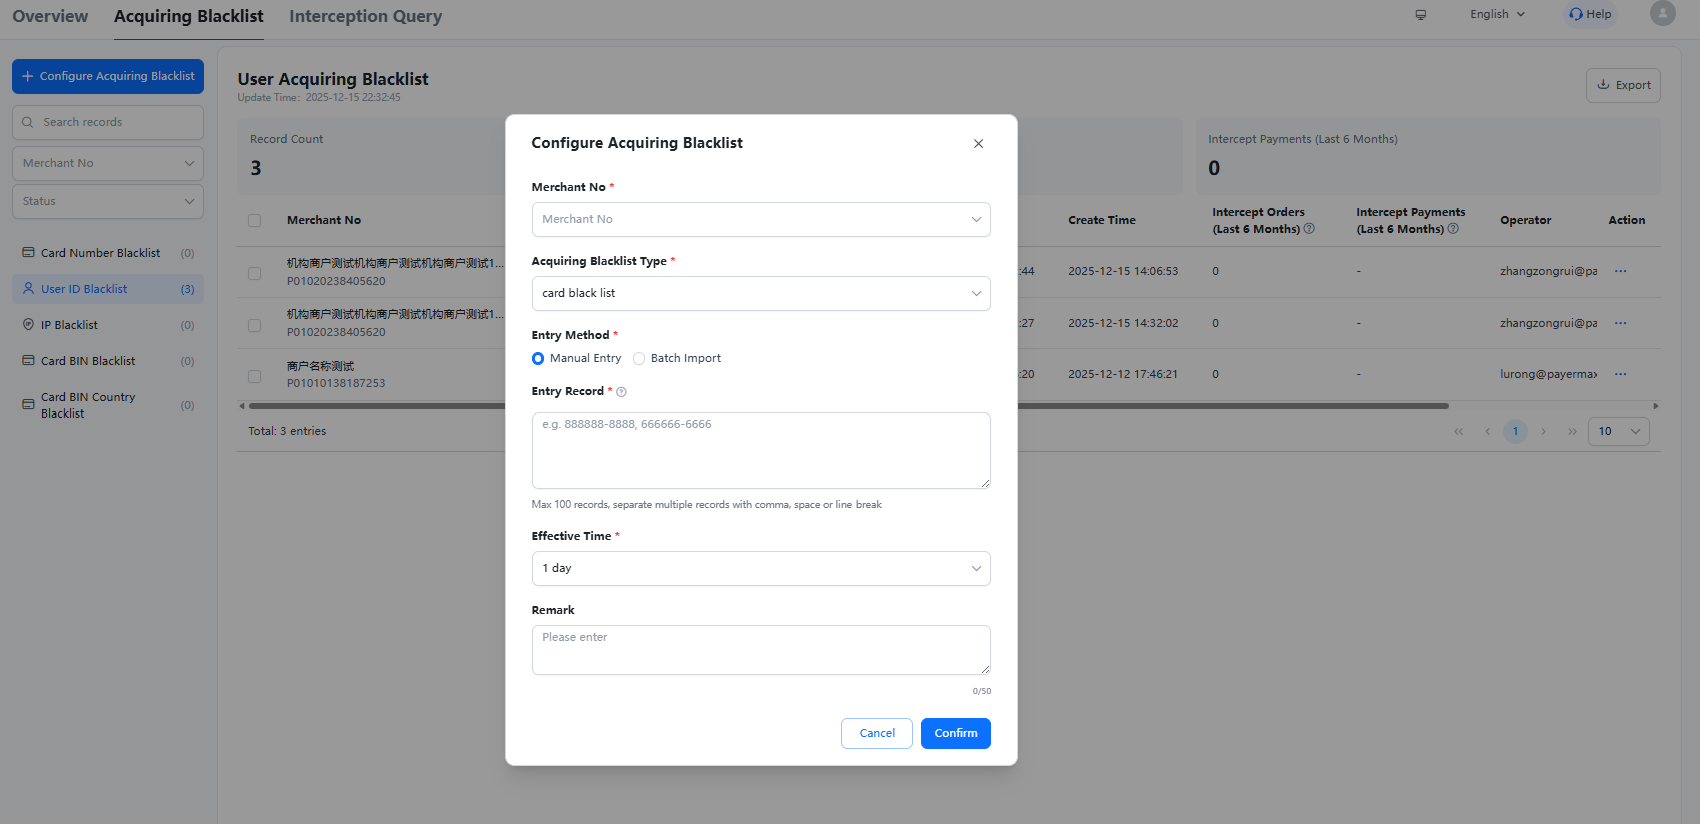 |
- Interception Query: View specific interception records, with filters for Merchant Order ID, Order Status, Country, etc.
11.1.2 Acquiring Whitelist Management
If you have activated the payment collection service and want to avoid interception of transactions from specific users, configure the whitelist with only Card Number or User ID.
This function is not open to all customers by default. Contact your PayerMax business manager or risk control specialist if needed.
Acquiring Whitelist Overview
Acquiring Whitelist Configuration: After merchants upload the configuration on this page, it needs to be reviewed and approved by the PayerMax risk control operation team to take effect.
| Step 1 | |
| Step 2 |
11.1.3 VA Collection Whitelist
If you have activated the collection service and want to enable fast fund credit to PayerMax after bank receipt, add payers to the whitelist in advance via this function. After merchants upload the configuration on this page, it needs to be reviewed and approved by the PayerMax risk control operation team to take effect.
11.2 Dispute Managment
11.2.1 Dispute Overview/Search
Log in to the Merchant Platform, go to → to view the dispute overview and dispute orders.
Dispute Overview
Dispute Query
PayerMax also allows merchants to proactively configure callback URLs in the Merchant Platform to receive dispute transaction notifications. For details, please refer to the chapter Development Parameters - Edit Callback Address.
11.2.2 Dispute Management
For cases pending response to document requests, merchants can handle them independently (upload supporting documents) or apply for platform defense.
Merchant Self-handling
Required Dispute Documents: (The document list is included in the dispute email, usually including the following)
User Information (user registration information such as name, UID, phone number, email, IP, etc.);
Order Receipt (transaction content, quantity, payment amount, payment currency, user name, etc.);
Consumption Information (detailed recharge and consumption records of the user with no previous disputes, as well as the recharge and consumption records of this transaction);
Delivery Records (if applicable) (logistics documents, etc.);
Communication Records (if applicable) (records of communication with the user, etc.);
Any other documents proving that your company has provided goods/services in a timely and truthful manner.
The required documents vary based on the reason for the dispute. For details, see the body of the dispute email.
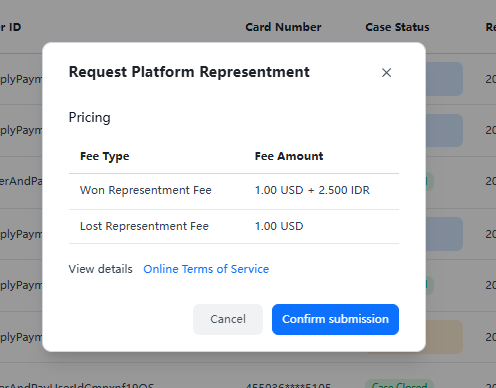
Request Platform Representment: After applying by order, the PayerMax risk control team will communicate with you offline.
11.2.3 Dispute Hold Amount Query
Query funds hold due to disputes via this function.
11.3 Chargeback Alert
For information on the activation, supported payment methods and fees of the chargeback alert function, contact your PayerMax business manager or risk control specialist.
11.3.1 Chargeback Alert Order Query
Log in to the Merchant Platform, click → . An initialization page will be displayed if the chargeback alert function is not activated;
After activating the chargeback alert function, merchants can view chargeback alert orders:
- Support search by Platform Order ID, Platform Refund ID, Alert ID, User ID, and filter by Refund Status, Refund Handler, Country/Region and Time.
11.3.2 Refund Application
Click the button to quickly filter alert orders with refunds pending merchant processing;
Submit the refund request for orders that are pending refunds.
| Step 1 | |
| Step 2 | 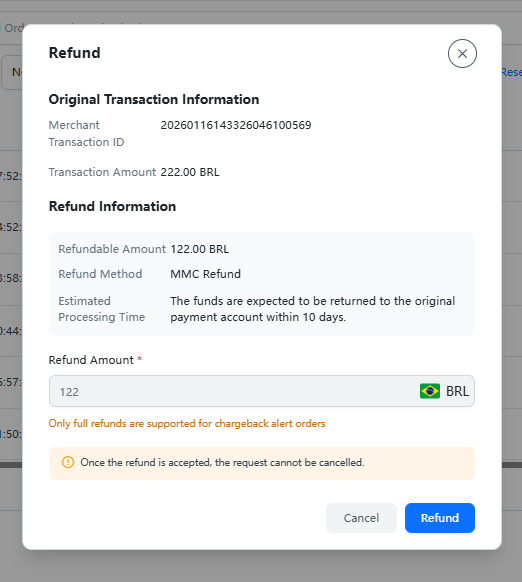 |
11.4 Margin
If PayerMax charges a margin from you, query the current margin amount (including fixed margin and revolving margin) on the Merchant Platform.
Fixed Margin
Revolving Margin
12. Merchant Reconciliation (Bill Management)
To help you reconcile transaction and fund information, PayerMax provides Transaction Report (Payin and Payout), Settlement Report and Funds Report (Fund Account Changes). You can reconcile with your internal ledgers by combining these bills.
12.1 Reconciliation Bill Acquisition
PayerMax offers two ways to obtain various reconciliation bills:
Method 1: Manually download statements via the PayerMax Merchant Backend. You may also set up scheduled statements to be automatically sent by email on a recurring basis upon expiration.
Method 2: Retrieve statements via SFTP. Set up scheduled statements, and ZIP packages of statements will be automatically sent to a specified directory on a recurring basis upon expiration.
Method 3: Receive statements by email. Set up scheduled statements, and ZIP packages of statements will be automatically sent to designated recipients on a recurring basis upon expiration.
Method 4: Retrieve statements via API. Set up scheduled statements, and the system will automatically call the interface to pull the generated statement URLs on a regular basis.
Note:
To ensure the data accuracy of bills, we have added bill inspection and automatic reconciliation capabilities. The latest bill generation time is 14:00 (UTC+8) (14:00 UTC+8 = 06:00 UTC+0).
Automatic Bill Parsing Integration Instructions: PayerMax is increasingly handling a wide variety of business types, inevitably requiring the addition of fields to bills to differentiate between them. Therefore, we provide a bill header setting function. To ensure that adding fields to bills does not affect merchants' daily reconciliation after developing automated bill reconciliation, merchants must manually modify the bill header using the MMC bill settings function as needed.
12.1.1 Obtain Reconciliation Bills on the Merchant Platform
Bill Download Application: Go to → on the Merchant Platform to download the following bills by customizing the time range and time zone: Settlement Report, Funds Report, Payin Transaction Report, Payout Transaction Report. Bills for the
past 2 yearsare available for download, with a maximum time range of180 daysper download.Bill Generation and Download: View the generated bill files on the list page and click Download to save the compressed package to your local device.
12.1.2 Set Up Scheduled Statement Generation Tasks and Notification Methods
- Set Up Scheduled Statements:
In the Merchant Platform, go to → → . Select the statement type you wish to receive on a schedule, set the cycle, and choose the notification method.
| Step 1 | 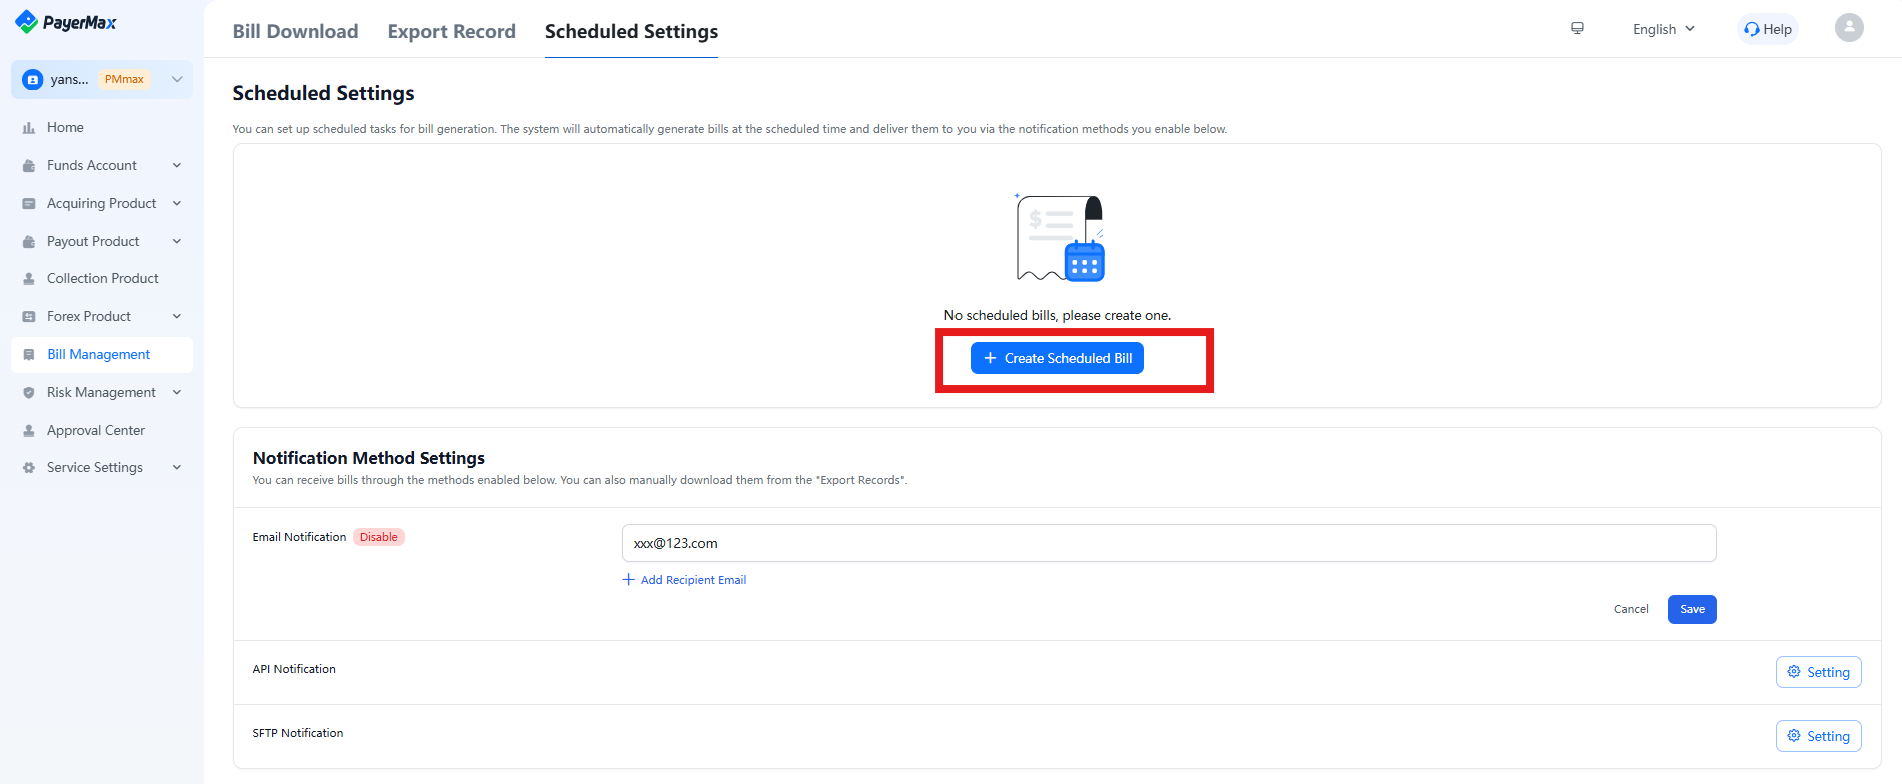 |
| Step 2 | 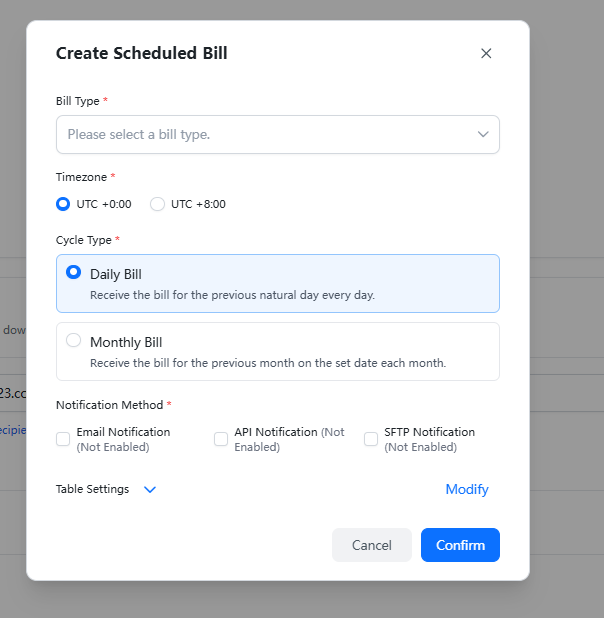 |
- Set Up Notification Methods: In the Merchant Platform, go to → → → . Configure your preferred delivery method for scheduled statements (Email, SFTP, API). Push notifications are enabled by default on the Merchant Platform; no separate setup is required.Once the scheduled statement task and notification method are configured, the system will automatically push statements according to the set cycle, method, and destination.
| Step 1 | 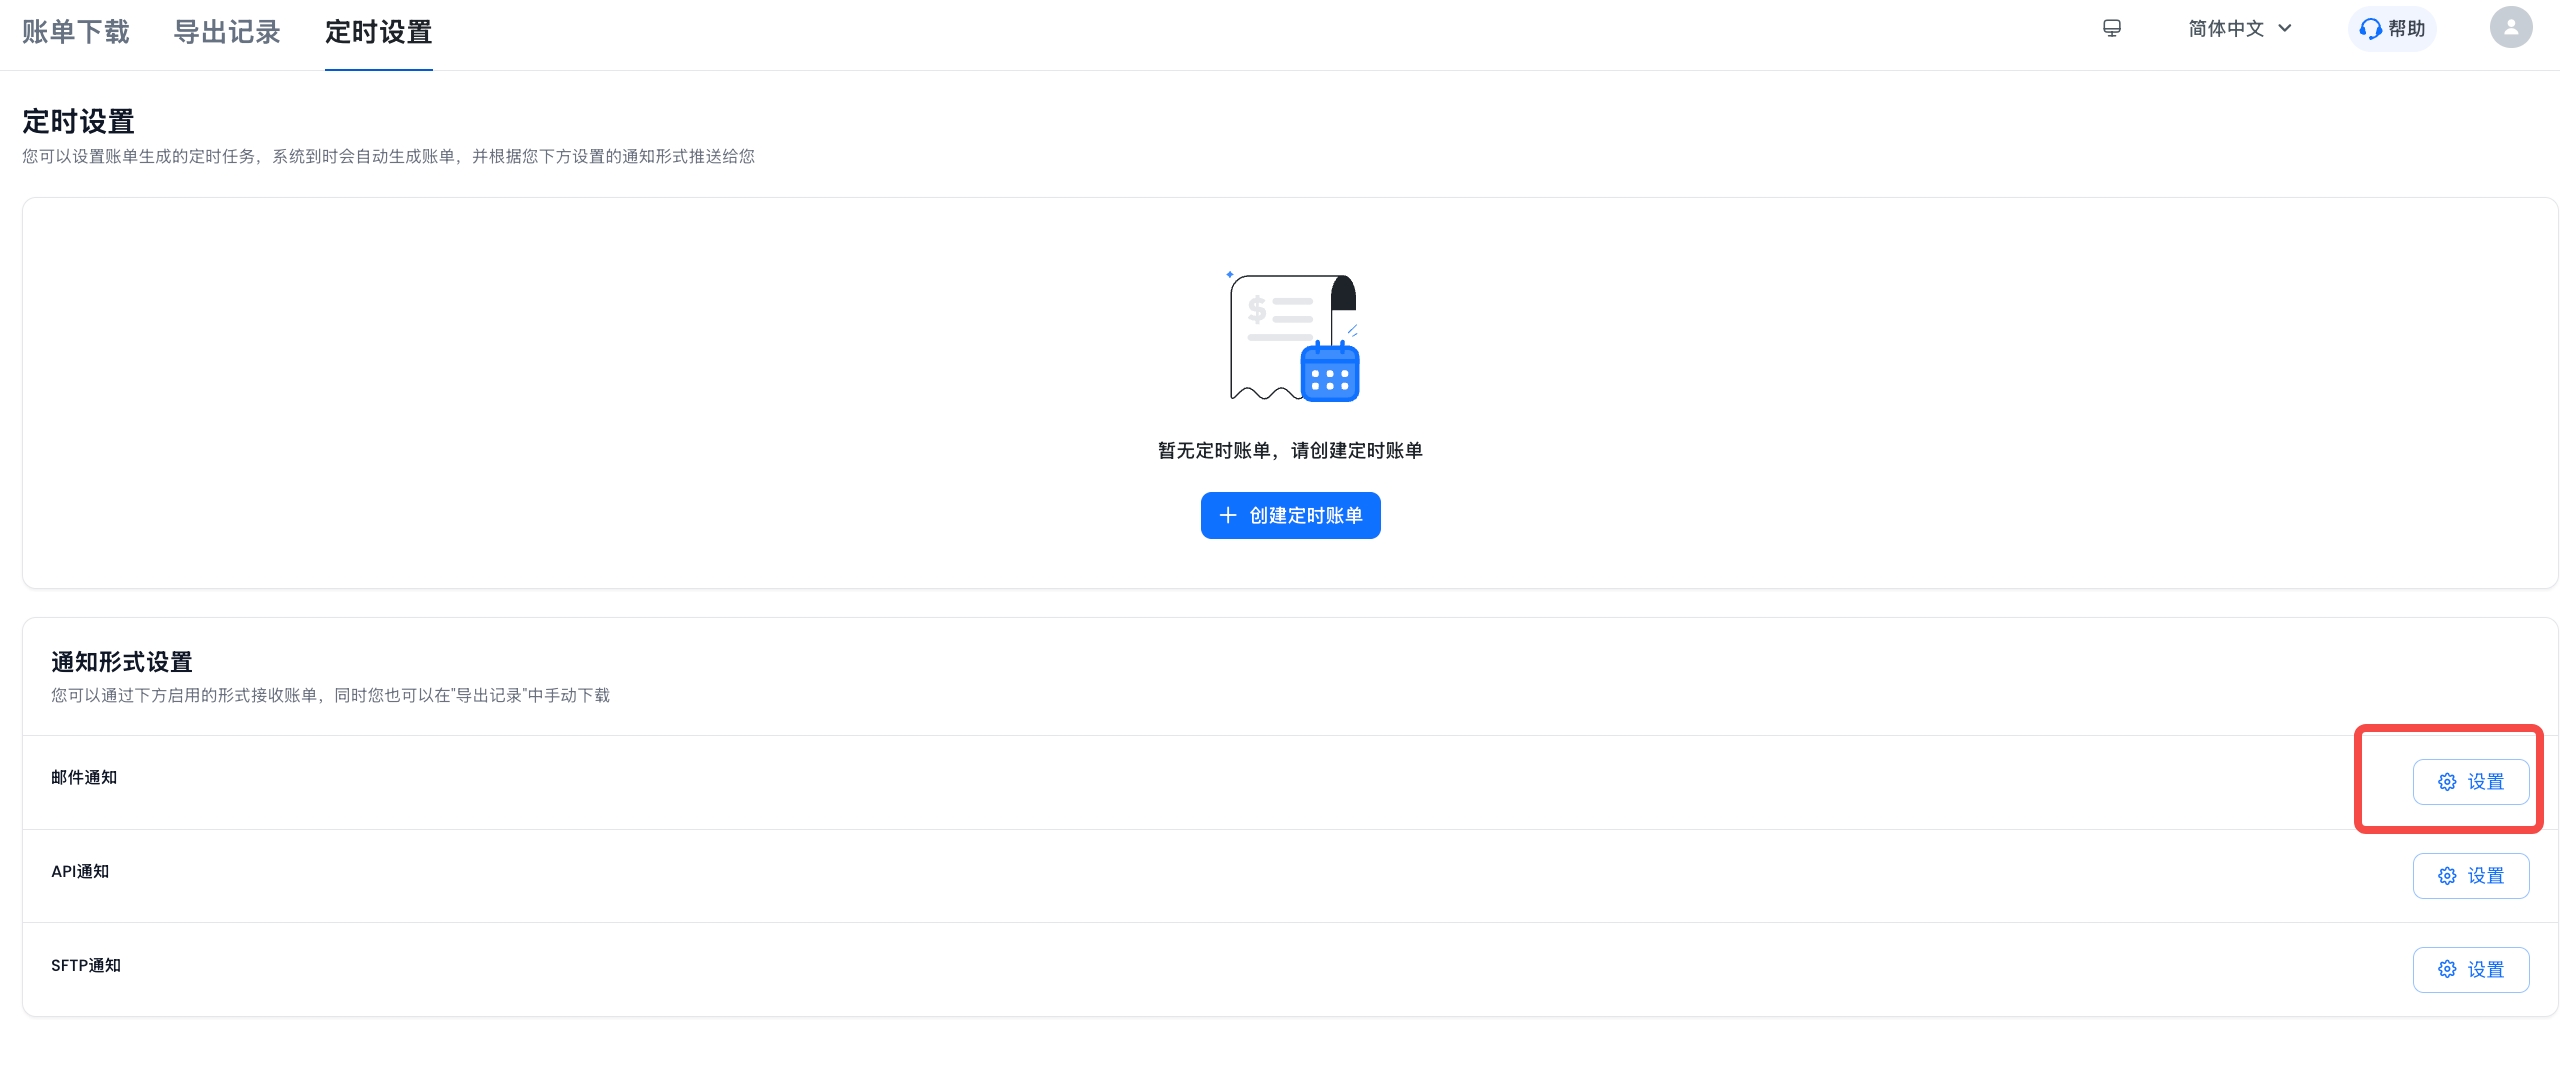 |
| Step 2 | 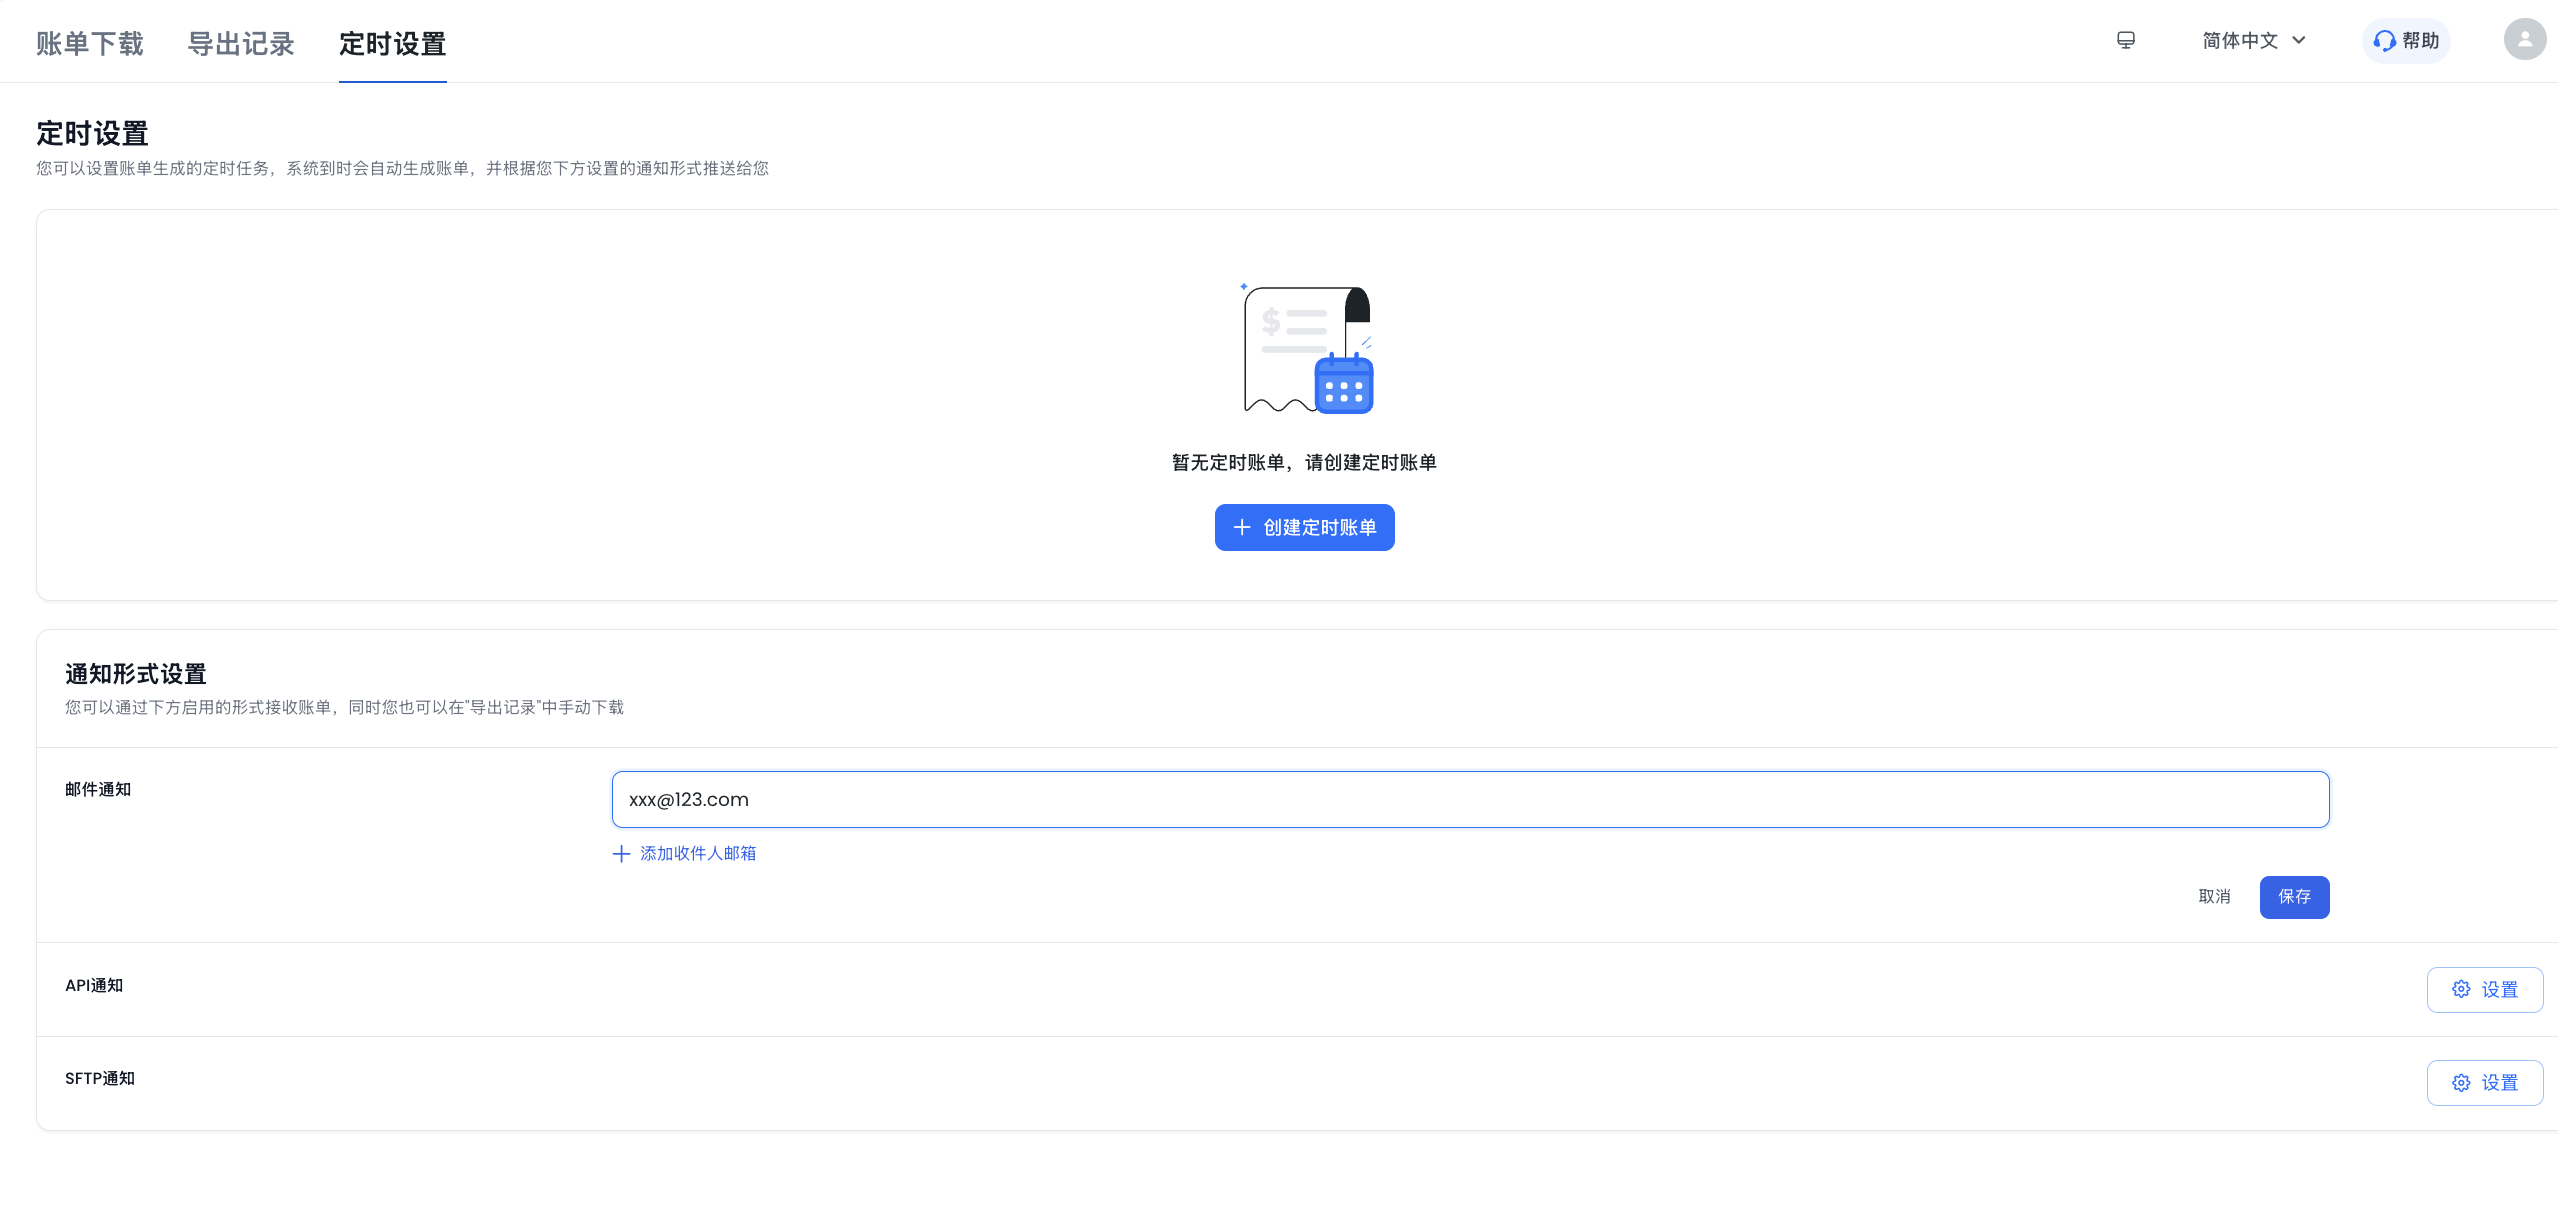 |
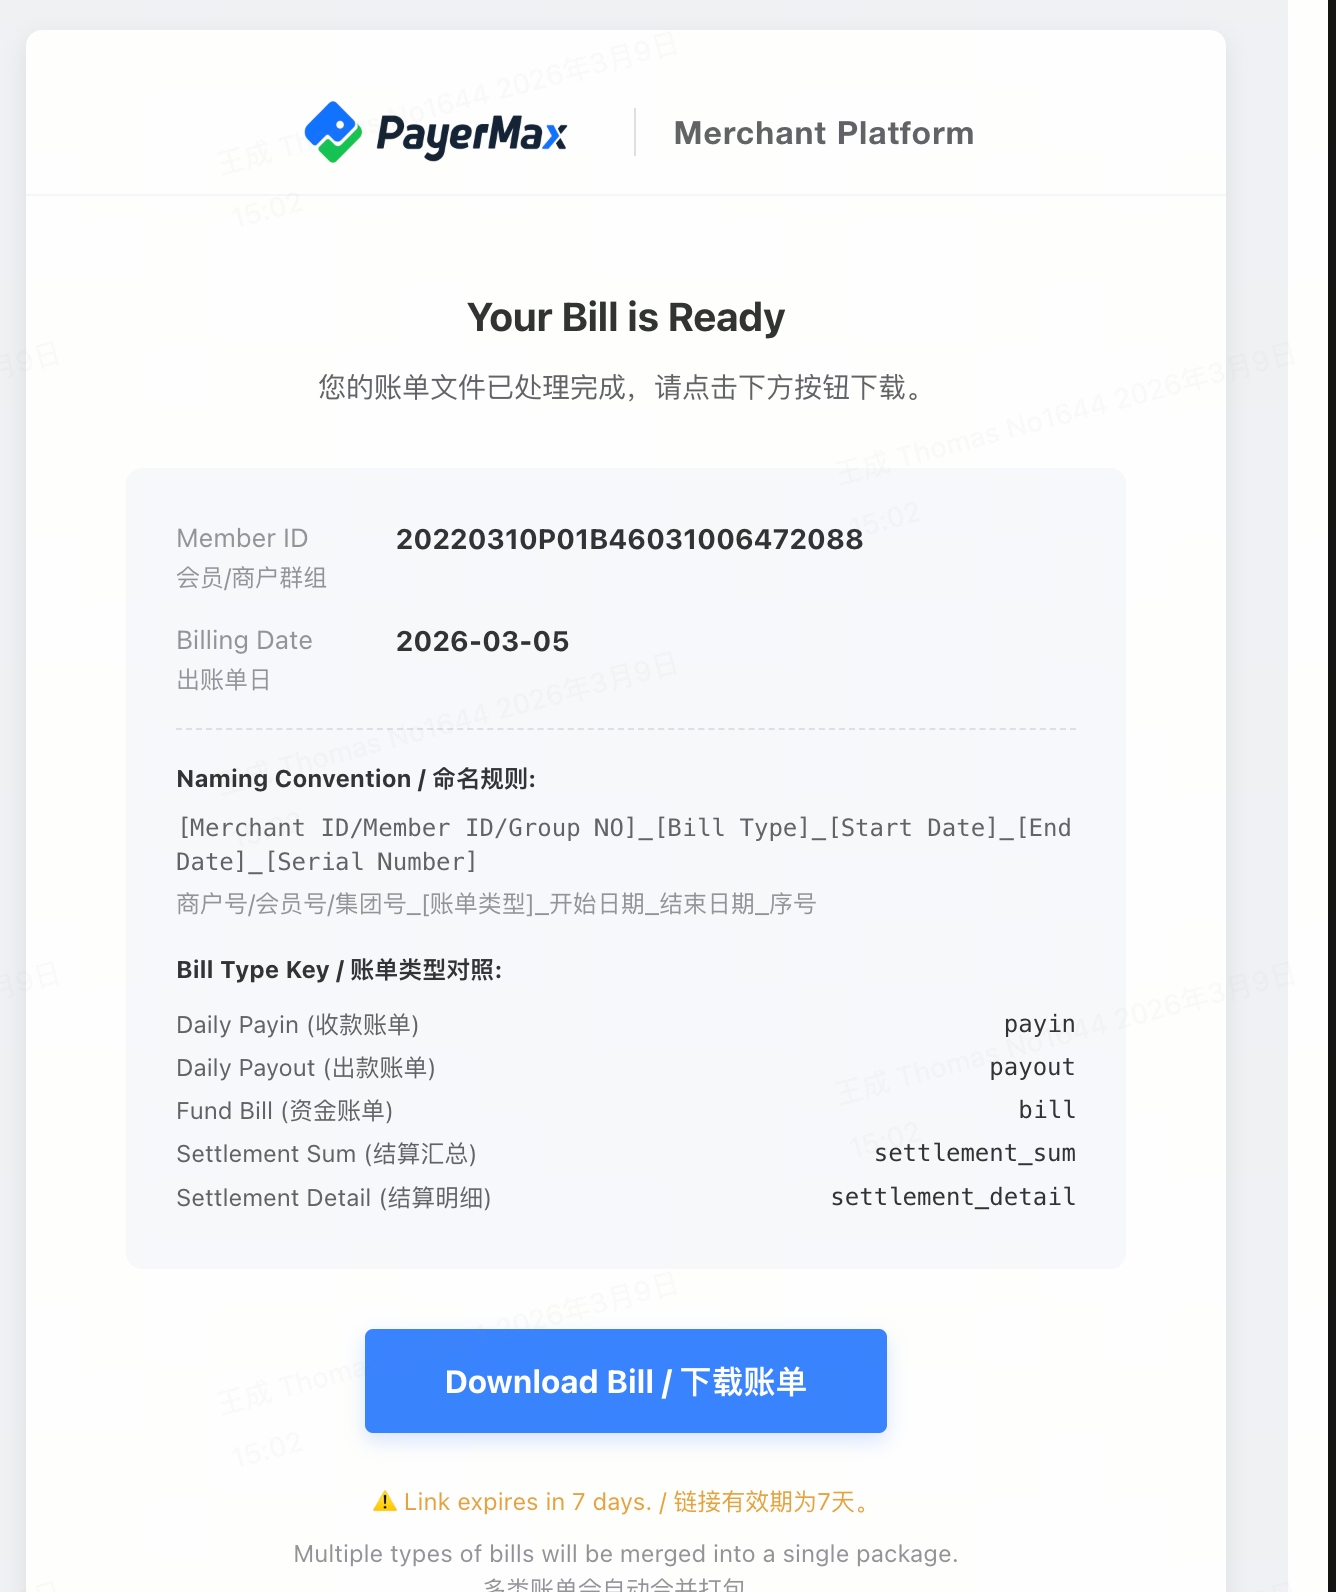
12.1.3 Retrieve Statements via Email
Statements are automatically generated based on your scheduled settings and sent to the designated merchant recipient email address according to the email notification configuration.
12.1.4 Obtain Bills via SFTP
To obtain bills via SFTP, follow the application and acquisition process below:
12.2 Bill Table Settings
In the above bill acquisition processes (manual and scheduled on the Merchant Platform), PayerMax supports merchants to customize bill headers for convenient reconciliation.
Operation Instructions: Log in to the Merchant Platform, go to → to customize the headers of all bills. The bill header settings apply to bills downloaded on the Merchant Platform or obtained via SFTP.
Standard Bills: PayerMax provides default standard bills. Merchants can delete/add standard header fields (except mandatory fields) via the bill header setting function;
Custom Bills: For new business scenarios, merchants can add/delete extended header fields via the bill header setting function. Custom bills allow personalized customization by adding or deleting extended header fields according to specific business needs.
Note:
- All merchant IDs under your contract with PayerMax will use the same header settings; please operate with caution;
- PayerMax supports custom settings for all bills, including Funds Report (Fund Detail Bills, End-of-Day Balance Bills), Payin Transaction Report (Payin Transaction Detail Bills), Payout Transaction Report (Payout Transaction Detail Bills) and Settlement Report (Settlement Detail Bills, Settlement Summary Bills).
| Step 1 | |
| Step 2 | 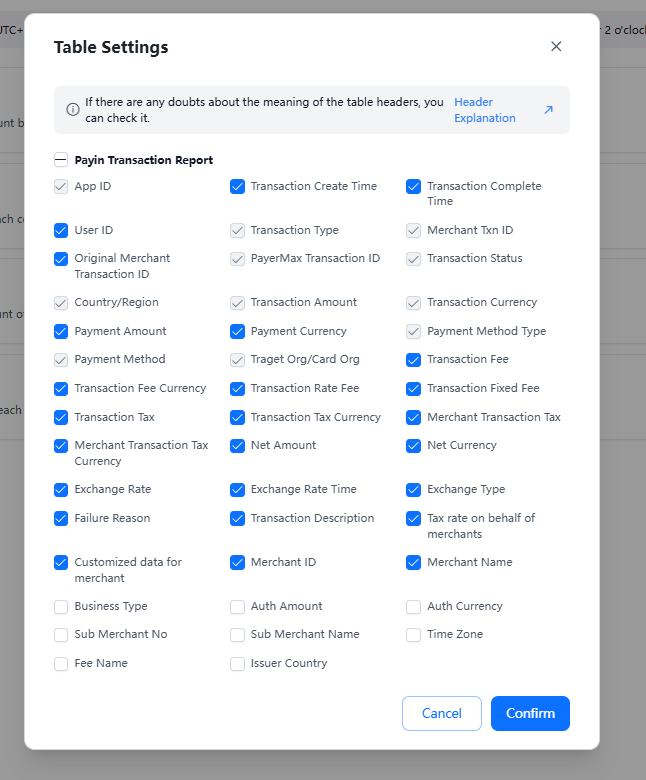 |
12.3 Statement Acquisition
12.3.1 Invoice Acquisition
VAT invoices are automatically sent to the Merchant Center (MMC) on a monthly basis and can be downloaded from the merchant platform by navigating to → → .
12.3.2 Business Certificate Acquisition
Business Voucher include payment collection fee Voucher, payout fee Voucher, settlement proofs, and top-up proofs.
These are automatically sent to the Merchant Center (MMC) on a monthly basis and can be downloaded from the merchant platform by navigating to → → .
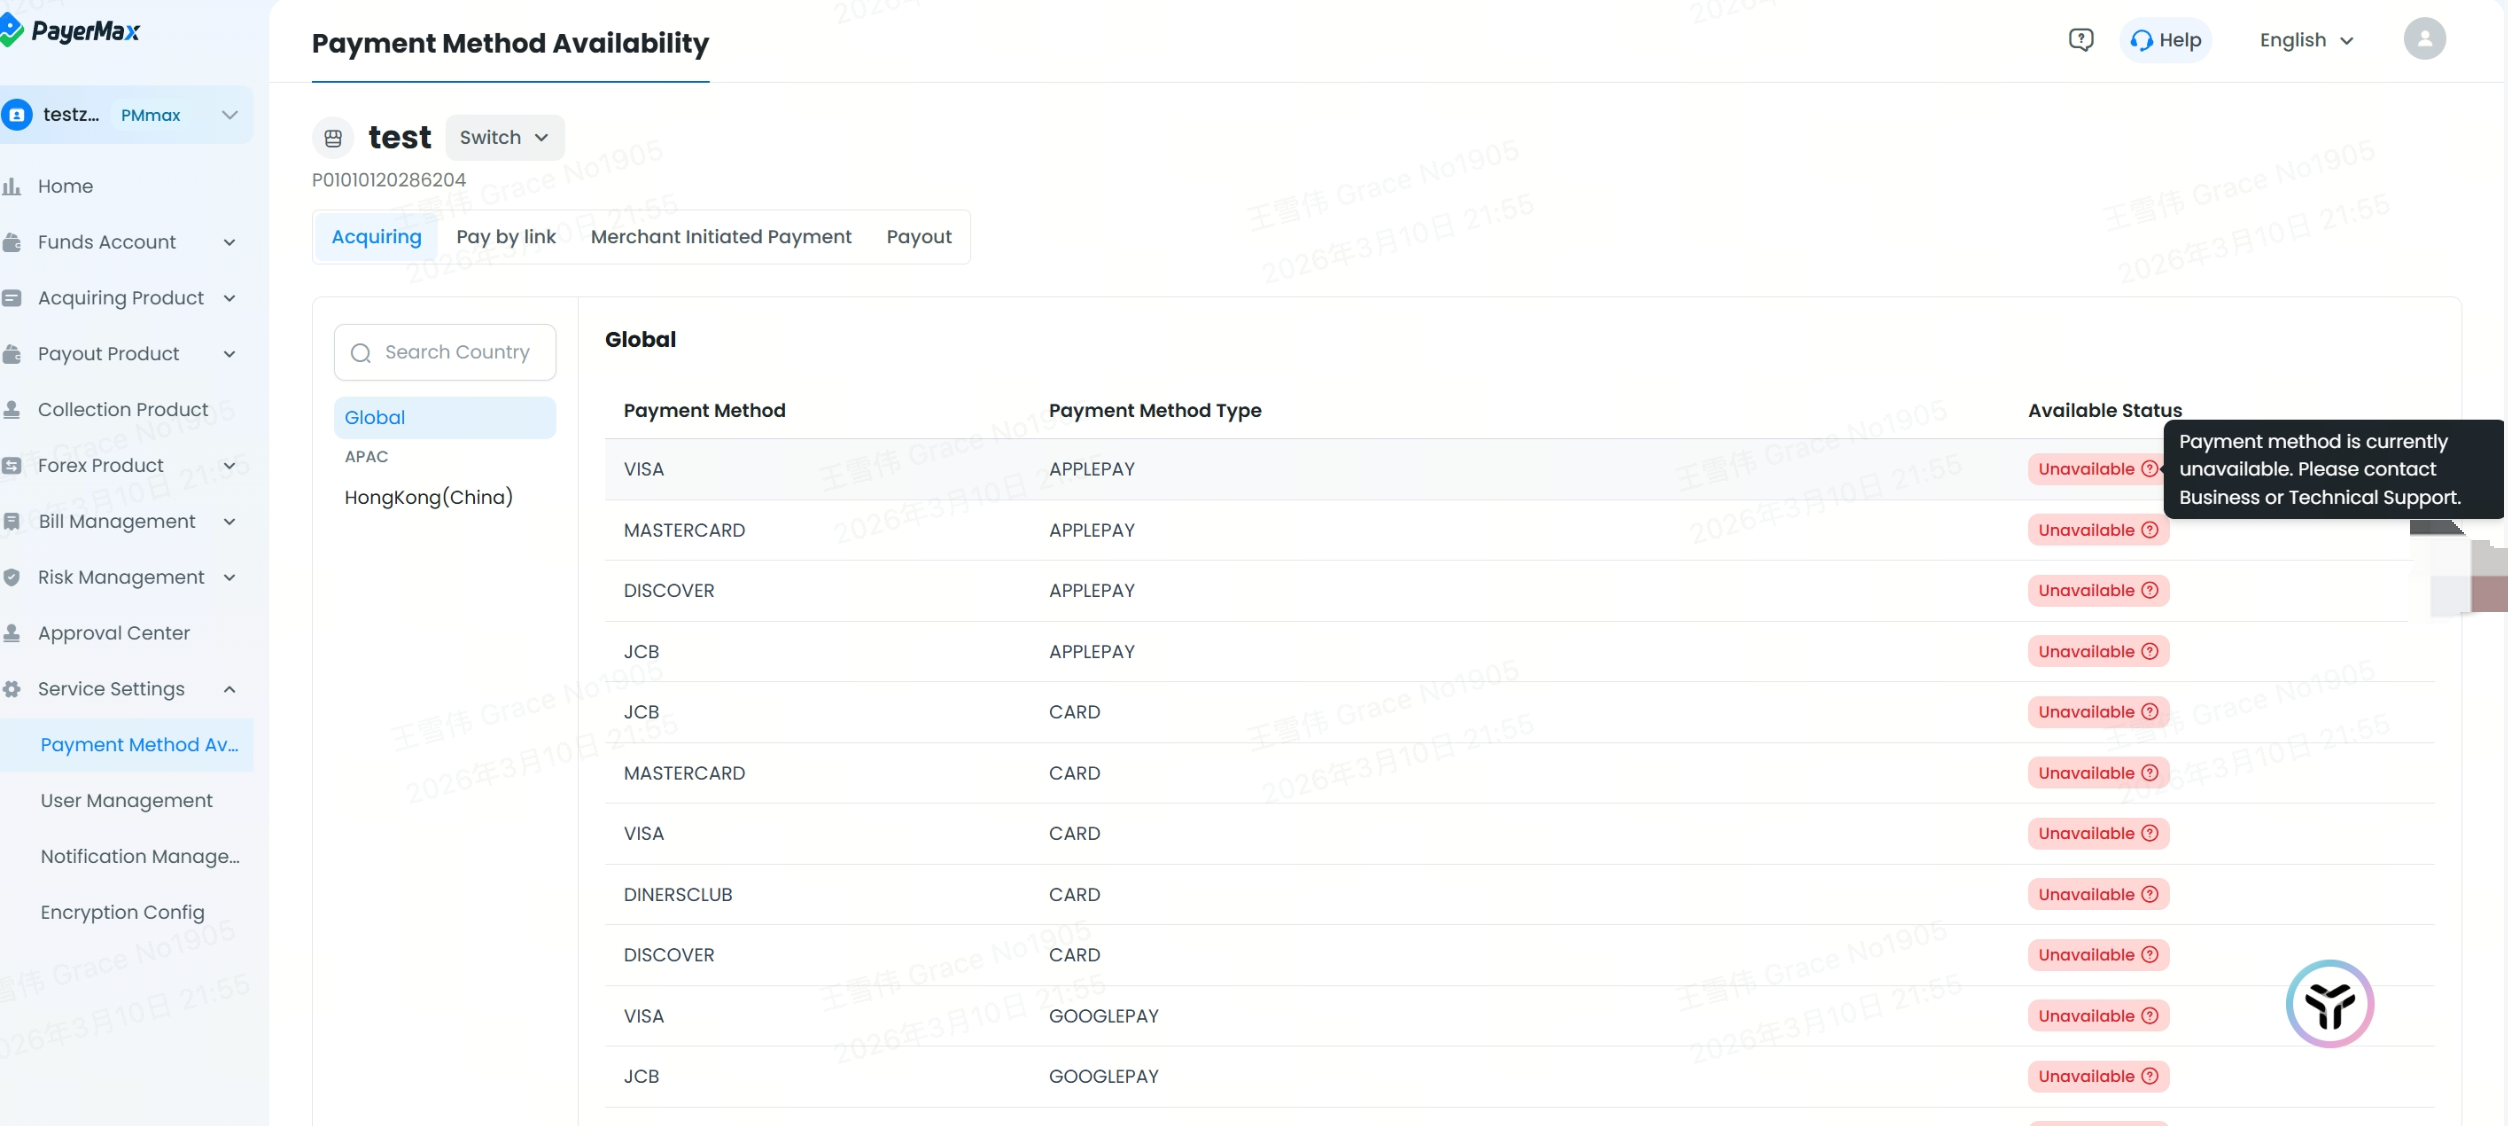
13. Payment Method Availability
To check the availability of payment methods, go to the menu: → . You can view the status of each payment method here. At the top, you can switch between merchant IDs under the current member account that have activated contracts. Within the scope of payment methods enabled in the contracts, you may view the availability status of different payment methods. For unavailable methods, the reason will be displayed.
14. Customer Center
14.1 Merchant Basic Information
Provides customer information, electronic contract information, and bank account inquiries; it also supports fund account and user authorization management for Merchant IDs (MID).
| Step 1: Basic information inquiry | |
| Step 2: Inquiry of Merchant ID (MID) authorization details | |
| Step 3 (Optional: Authorize fund accounts for the merchant via the list page) | |
| Step 4 (Optional: Authorize users for the merchant via the list page) |
14.2 Product Rate Information
| Step 1: Enter the product rate information page | |
| Step 2: Click on merchant information to enter the details page | Note: For global card payment methods, you can view the fee details for different currencies by clicking "More Fees". |
14.3 Bank Account Information
Click the tab above to switch to Bank Account Information.
15. Development Parameters
This module should be focused on only by customers who need to use API integration; customers who solely use the merchant backend do not need to pay special attention.
15.1 Key Creation/Link Merchant ID
15.1.1 First Merchant ID
The system automatically creates product keys and applies them to the first merchant ID.
15.1.2 Non-First Merchant ID
| Step 1 (Merchant ID Integration Verification) | |
| Step 2 (Confirm Association Plan) | PayerMax provides two association plans: 1. Link all merchant IDs to the same key (under this plan, customers do not need to actively create keys); 2. Create a new key and establish a one-to-one association between the merchant ID and the key. PayerMax recommends Plan 2 to avoid affecting other merchant IDs when modifying configurations such as callbacks for one merchant ID. |
| Step 3 (Create Business Product Key) | |
| Step 4 (Link Integration Information) | A pop-up displays all key information under the member account. Customers can link as needed (Note: Once linked, it cannot be unbound. Please proceed with caution).  |
15.2 Key Usage
| Step 1 (View Key Details) | |
| Step 2 | Configure the public and private keys into your system as needed. |
Note:
For API integration related to fund accounts (account balance inquiry, currency exchange, transfer, withdrawal), only keys with this identifier can be used.
15.3 Edit Key
For merchant public keys, if changes are required due to your company's needs, they can be edited through the platform.
Special Reminder:
Changes take effect immediately and may impact live transactions. Please proceed with caution.
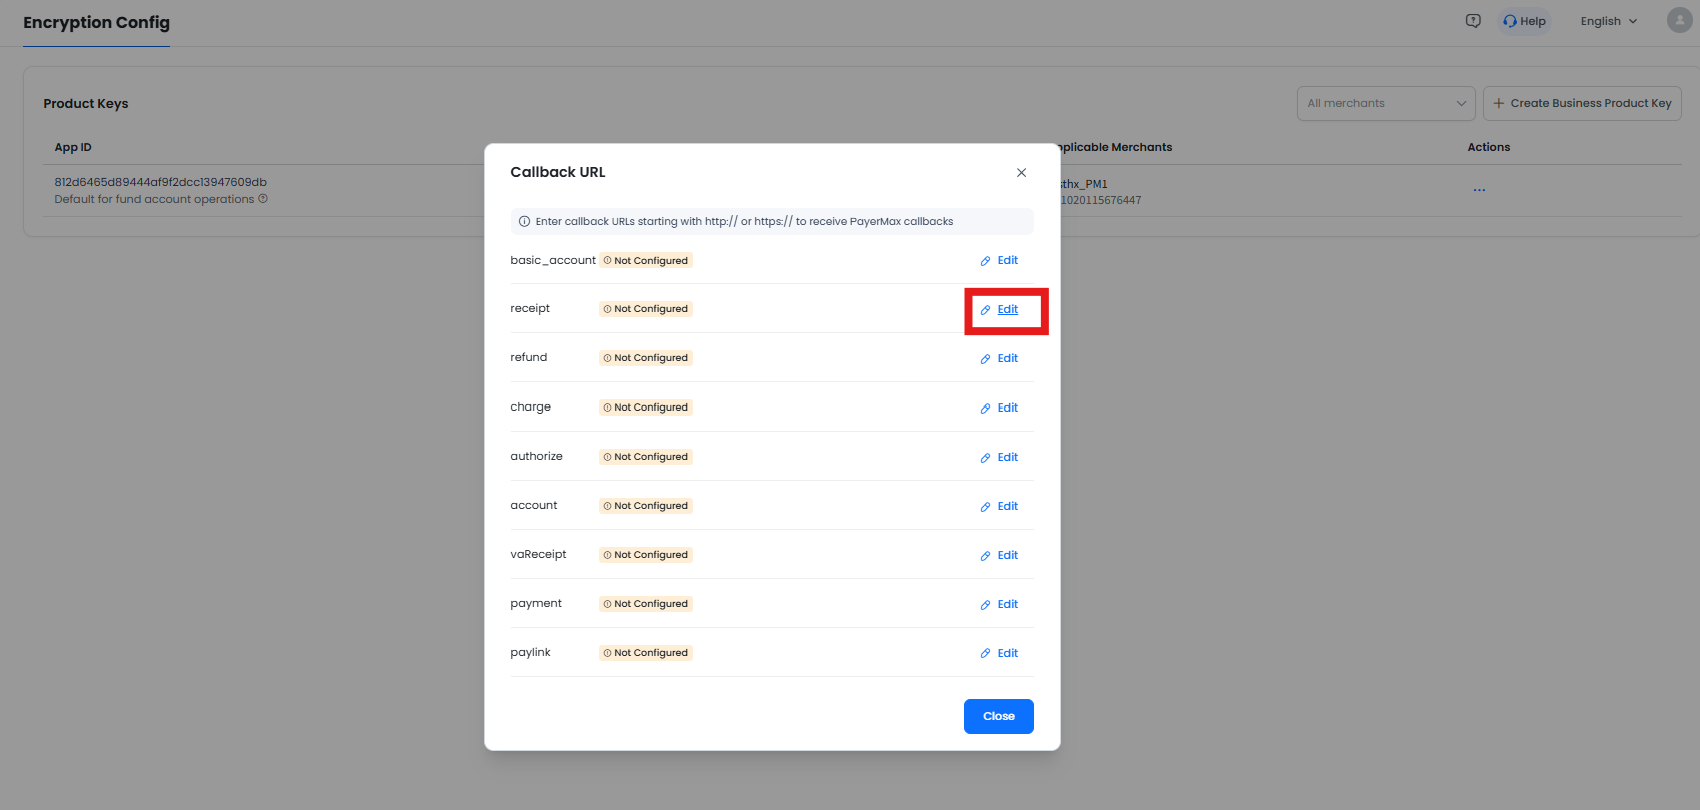
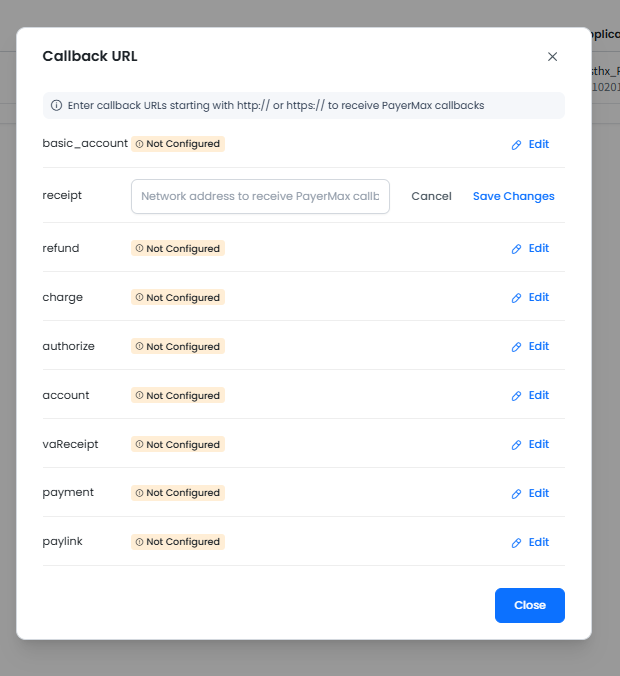
15.4 Edit Callback Address
You can configure the required callback notification addresses for each key (if a callback address is provided in the API call, it will take precedence; if not, the configuration here will be used).
16. Required Actions for New Merchant IDs (MID)
| Step 1: Complete development parameter configuration (Mandatory for API scenarios) | |
| Step 2: Complete Merchant ID (MID) fund account authorization (Very important, Mandatory) | Entry 1: Entry 2: |
| Step 3: Complete Merchant ID (MID) user authorization (Required if users need to access the MMC; can be ignored for pure API clients) | Entry 1: Entry 2: |
| Step 4: Transaction notifications for new Merchant IDs (Optional) |
17. Customer Ticket
For questions about orders or the use of the Merchant Platform, go to the work order submission page via the customer service assistant in the upper right corner and enter your questions for consultation (accessible via the Help button in the upper right corner on any page).
18. Platform Function Permission Mapping
User permission assignment for the Merchant Platform is managed by the ADMIN through role settings. All function permissions in the system can be queried as follows:
The permission mapping logic between function permission points and page functions is explained by module below (the ADMIN has all permissions by default and cannot be modified).
18.1 Fund Account
PayerMax provides fund account services for all business cooperations. The specific user permission control is as follows:
18.1.1 Inquiry Type
Functions to be assigned to users: including fund account information, balance, transaction records, and end-of-day balance
Corresponding permission points:
18.1.2 Open a New Fund Account
Functions to be assigned to users: open a new fund account, or add a currency type, modify the nickname/purpose for an existing account
Corresponding permission points:
18.1.3 Fund Account Authorization
Functions to be assigned to users: authorize fund accounts (including authorizing users and businesses).
Corresponding permission points:
In addition to activating the above permission points, users need to note the following to complete the authorization:
18.1.4 Initiate Fund Transactions (Top up, Transfer, Withdrawal, Currency Exchange)
Functions to be assigned to users: initiate fund transactions.
Corresponding permission points (only part of the transaction permissions can be activated):
18.1.5 Withdrawal Approval
Designate the corresponding personnel/roles directly through the for the withdrawal approval process, which is not controlled by other function permission points.
18.1.6 Permission Point Activation Dependencies
If you activate any non-inquiry permission under the fund account, the account inquiry permission will be bound and activated by default.
18.2 Acquiring Product
This module is only visible/available on the platform if you cooperate with PayerMax on acquiring business.
18.2.1 Acquiring Order Inquiry
Functions to be assigned to users: inquire about acquiring order information.
Corresponding permission points:
17.2.2 Refund Initiation
Corresponding permission points:
18.2.3 Refund Approval
Designate the corresponding personnel/roles directly through the for the refund approval process, which is not controlled by other function permission points.
18.2.4 Link Payment
- Inquire only link/transaction information
Corresponding permission points:
- Create Link
18.2.5 Settlement Management
Including settlement statement inquiry, download and pending settlement amount inquiry.
Corresponding permission points:
18.2.6 Permission Point Activation Dependencies
Activating the refund application permission will bind and activate the order inquiry permission by default;
Activating the link creation permission will activate the link payment inquiry permission by default.
18.3 Disbursement Products
This module is only visible/available on the platform if you cooperate with PayerMax on disbursement business.
18.3.1 Disbursement Transaction Inquiry
For users who need to inquire about transactions (including single and batch transactions).
Corresponding permission points:
18.3.2 Disbursement Initiation
For users who need to initiate disbursement transactions (including single and batch transactions).
Corresponding permission points:
18.3.3 Disbursement Approval
Designate the corresponding personnel/roles directly through the for the disbursement approval process, which is not controlled by other function permission points.
18.3.4 Permission Point Activation Dependencies
Activating the disbursement application permission will bind and activate the disbursement inquiry permission by default.
18.4 Collection Products
This module is only visible/available on the platform if you cooperate with PayerMax on collection business.
18.4.1 VA Collection Order Management
For users who need to inquire about collection accounts/orders and upload RFI documents for risk-controlled orders.
Corresponding permission points:
18.4.2 VA Collection Account Creation
For users who need to create VA collection accounts.
Corresponding permission points:
18.4.3 Permission Point Activation Dependencies
Activating the VA collection application permission will bind and activate the VA collection inquiry permission by default.
18.5 Forex Product
The free exchange rate inquiry service is available to you as long as you cooperate with PayerMax on any business. However, the acquiring exchange rate and disbursement exchange rate services are only provided after activating the corresponding products.
18.6 Risk Product
Permission points can be mapped to menu functions by their names, and details are not repeated here:
Permission Point Dependencies: The activation of all processing/editing permissions will definitely bind and activate the corresponding inquiry permissions by default.
18.7 Bill Management
18.7.1 Billing Export/Table Setting
Page:
Corresponding permission points:
18.7.2 Billing Scheduled Setting/Notification Method Setting
- Users only inquire about information
Corresponding permission points:
- Edit
Corresponding permission points:
18.7.3 Permission Point Activation Dependencies
Selecting billing configuration editing will bind and activate the account configuration inquiry permission by default.
18.8 Services Settings
Permission points can be mapped to menu functions by their names:
Special Permission Rules:
Only the ADMIN can have the permissions for role editing and user editing;
Only the ADMIN can have the permission for contract management (including online contract signing, quotation/rate sheet confirmation and inquiry).
18.9 Home Page Display
19. Platform Usage Data Permissions
In addition to the above function permissions, the data that users can inquire/use needs to be controlled separately.
19.1 Platform Fund Account Inquiry/Usage Permissions
Affected Module: Fund Account Module
Users must have the corresponding authorization relationship for the fund account to inquire about/use the fund account for disbursement. For management, go to → → → .
19.2 Platform Merchant ID Inquiry/Usage Permissions
Affected Modules:
Users need to have the permission for the merchant ID to view/initiate transactions for the corresponding merchant ID.
20. Fund Usage Permissions for Business Scenarios
You need to independently control and determine which fund account is used for acquiring, collection and disbursement businesses under a merchant ID. A pending task reminder will be sent if the authorization relationship is not established.
Key nodes to note:
Sign the first cooperation agreement with PayerMax and open the first merchant ID and business;
Add a new business to an existing merchant ID (e.g., Merchant ID 1 previously cooperated on acquiring business with an established fund relationship; a new fund relationship must be established by logging in to the merchant platform when cooperating on collection business subsequently);
Open a new merchant ID (e.g., cooperate on a new product, or open a separate merchant ID for an existing product when needed).
The authorization relationship can be established via → → → .