
Merchant Platform Operation Guide
1. Operation Guide
You can get your admin account from PayerMax, and your account information could be changed by PayerMax only as well.
You can create operator accounts by your admin account (or other operators with “Users” function). You will receive an activation email from PayerMax, please make sure that you have activated your account before starting to use.
The top right corner displays the bound merchant number, which can be switched.
1.1 Create Operator Account
You can create your operator accounts by your admin account (or other operators with “Users” function) as follows:
Enter → page.
Click the button in the upper right corner of this page.
Input a valid email address as login name.(Note: Please confirm that the email address is correct. The email address will be used as the member's login account.)
Choose the functions which will be authorized by the operator.
- Change or Delete Administrator Accounts:Super administrator accounts do not support self-modification of permissions by merchants. To request changes, please contact the PayerMax platform.Operators with administrative privileges can navigate to the → page to modify or revoke permissions for standard operator accounts. Deletion is allowed regardless of activation status.Upon deletion, the operator will receive a termination notification email.
2. Multi-currency fund management services
2.1 Top Up
PayerMax supports 2 ways for top-up: top-up directly and settle to top-up.
2.1.1 Top-up directly
Top-up directly is divided into two types: ordinary top-up and local collection account top-up.
Ordinary Top-up: Provide the merchant with the recharge master account information, and after the merchant has successfully transferred funds and submitted the transfer voucher, the payermax staff will operate the crediting;
Local Collection Account Top-up:When a merchant chooses the local collection top-up channel, the system will automatically open a local collection top-up account for the merchant during the first top-up, and the system will automatically credit the account for the merchant after a successful transfer.(No additional operation is required in MMC merchant platform)
Operation Path:
Go to the → page or → page of the merchant management platform, and click the → button in the upper right corner;
Select the currency you want to top up (supported currencies are as shown on the page);
Obtain payee account information;
Completing the offline payment;
Ordinary top-ups need to be submitted with a transfer voucher, but not if the top-up is made to a local payee account.
Some companies need to apply in advance for top-ups; top-up details can be generated in advance through requisitions, and the process of reimbursement or application can be carried out.
Wait for the financial audit;
Get the recharge result;
2.1.2 Settlement to Disbursement
Go to the → → ,select ,you can initiate a transfer of the acquiring amount to the disbursement account of either the same merchant or another merchant under the same entity.
Select the transfer merchant as well as the amount and currency


If all your currencies have enabled the automatic settlement to top-up function or automatic withdrawal to bank card function for acquiring account balances, the settlement to top-up button will be grayed out and cannot be operated.
If some of your currencies have enabled the automatic settlement to top-up function or automatic withdrawal to bank card function for acquiring account balances, you will not be able to select these currencies when performing settlement to top-up or withdrawal operations.

The tab currently displays all settlement to top-up transactions.
Status:
Pending: After the merchant has made a successful offline payment and uploaded the proof of bank transfer on PayerMax merchant platform, the top-up order is being reviewed by our company;
Success: The audit was approved and the funds have been credited to the merchant's available balance;
Failure: The top-up fails. You can check the reason for failure on the top-up order details page or contact PayerMax staff for enquiry.
2.2 Transfers
Go to the → → page, select button;or go to → page, select button to enter the transfer process;
Select the recipient merchant number;
Confirm the transfer information (outgoing currency/amount, incoming currency/amount);
Get the transfer result;


Status:
Pending: After the merchant initiates the transfer, the system carries out the intermediate process of processing. If this process is too long, please contact PayerMax staff to confirm;
Success: System processing is complete and funds flow successfully between sell/buy currencies;
Failure: The transfer fails. You can check the reason for the failure on this page or contact PayerMax staff to confirm.
2.3 Withdrawals
2.3.1 Withdrawal Operation
After entering the merchant platform, go to the → → page, click the button, or on the → page, click the button to enter the withdrawal process.
You can choose
Available Settled Payment AmountORAvailable Disbursement Amountto withdraw cash to the merchant bank card.At present, cash withdrawals are charged, but no charge for charging and transferring money.
Currencies supported:
USD:Standard withdrawal currency
The remaining special currencies are based on the configuration in the contract
When initiating a withdrawal, if you have balances in both the acquiring and issuing accounts and both are available for operation, you will be prompted to choose the account.
- If you choose to withdraw from the acquiring account balance, you can only withdraw in the same currency. If the settlement currency does not support withdrawal, you can convert the currency to recharge the issuing account and then withdraw through currency exchange.


- If you choose to withdraw from the disbursement account balance, you can initiate withdrawals in different currencies, and the currency exchange will be completed simultaneously. The funds in the designated payment account are usually obtained through settlement to top-up, top up, VA receipts and so on method.

Status:
Pending: After a merchant submits a withdrawal request, our company reviews the withdrawal order;
Success: Approved and funds reach the recipient's bank account;
Failure: The withdrawal transaction fails. You can check the reason for the failure on the withdrawal details page, or contact PayerMax staff to confirm.
2.3.2 Withdrawal Approval
If merchants wish to control and approve fund operations, they can enable the switch on the → page.
Enabling the switch will display the tab on the → page. All withdrawals based on acquiring account balances will require approval from administrators or operators with withdrawal approval permissions before the final withdrawal operation is triggered.
2.4 onversions
After entering the merchant platform, go to the → → page, click the button, or on the → page, click the button to enter the conversions process.
Select the currency and amount to sell/buy.
Confirm the information you have entered for the conversions.
Get the result of the conversions.


Status:
Pending: After the merchant initiates the conversion, the system carries out the intermediate process of processing. If this process is too long, please contact PayerMax staff to confirm;
Success: System processing is complete and funds flow successfully between sell/buy currencies;
Failure: The conversion fails. You can check the reason for the failure on this page or contact PayerMax staff to confirm.
2.5 Balance Inquiry
Go to the PayerMax Merchant Platform → menu to view your current account balance. The amount of each account is displayed in US dollars converted at the PayerMax exchange rate.
Note:
- The account amount is only used as a reference for viewing the amount and is not used as a basis for settlement;
- The USD unit amount of non-USD currency accounts is for display purposes only.
2.6 Amount Alerts
Go to → → → in the merchant platform to configure the balance alert rules. PayerMax will send an email notification when your account balance is less than or equal to the warning value. Regarding the , the alert amount only includes the available balance, and the alert is for each currency account amount, not for the total account balance.
3. Signing Management
3.1 Signing Operation
When PayerMax pushes the corresponding signing information to you, you will receive the message pop-up window in the lower right corner, click .
After jumping to the detail page:
Click and the Fee Table and Service Agreement go into effect.
By clicking , you can contact PayerMax to discuss and correct the nonconforming content.
3.2 View Signing Information
3.2.1 Signing List
The - section will display the fee table and service agreement name that need to be signed. Please click the button on the right side of the list to view details and accept.
3.2.2 Contract Details
Details of the contract can be seen the contract overview and corresponding fee information and agreement information.
- Overview
- Details of Fee Table
- Details of Service Agreement
3.3 View Contract Information (Settlement Cycle and Payment Method)
Enter → , Click for details.
3.4 4. Configure Callback Address
Enter → , set the callback address
4. Payment
4.1 Order Search
PayerMax supports three ways to check order status:
- You can enter → page to search the status. Click on details to view the order details.
You can check the order status by receiving Notification Callback .
You can get the transaction status by using Result Query .
4.1.1 Check orders across time zones
In → page, the time dimension of order search depends on the global time zone. If you need to search orders across time zones, you can change the global time zone. To avoid other search services being affected, please be careful to switch back to the original global time zone after you finish searching for orders across time zones.
4.2 Batch export orders
Go to → page, after filling in the filter items, click button, you can export the order information under the filter item into a summary table, which is convenient for statistics and analysis. When exporting orders, you can customise the desired time zone, and all the time in the order will be converted according to the selected time zone.
4.3 Pay by Link
PayerMax allows the creation of payment links through the Merchant Management Console (MMC) and API.
4.3.1 Create via Merchant Management Console (MMC)
Merchants can create one-time payment links and generate QR codes through the Merchant Management Console (MMC). The specific path is: → → ; complete the order information entry as prompted on the page to generate the link.
- Create Link
After creating the payment link, merchants need to enter order information, including acquiring country/region, order amount, order description, link validity period, link remarks, etc.
Order Amount: Unit price of goods * quantity of goods;
Order Description: Displayed to users on the link page, which can be product description information or payment purpose, etc.;
Link Remarks: Not displayed to users, and will be returned to merchants through callback information, corresponding to the API field
linkDescription.
- Generate Link/QR Code
- Send to users to complete payment.
4.3.2 Create Link via API
PayerMax also supports merchants to create/maintain link payments through API. For details, please refer to PaybyLink Integration.
5. Refund
5.1 Refund Initiation
PayerMax supports two refund initiation methods:
- Login to the merchant platform to initiate a refund. Please go to → channel, search for the transaction order that needs to be refunded, enter the detail page of the order, and click the button.
Note:
The merchant platform manually initiates a refund without callback notification by default. If you need to activate it, please contact our liaison personnel.
- You can initiate a refund request via a API. More Details.
5.2 Refund Search
Click on Details for detailed refund information
5.3 Refund Approval
As shown in the figure, you can reject/approve the refund approval and view the details.
6. Local Bank Collection
6.1 Initiate collection
- Go to → , view the list of local collection accounts opened, and click on the collection account
Note:
Only accounts with
Activestatus can receive payment normally;Accounts with the account status of
Processing/Closedmay fail to receive payment.
- Merchants click to provide account information to users for use as the "payee" of the transfer
The "Account Nickname" is only used to facilitate merchants to distinguish accounts and is not used as transfer information.
User completes offline payment
Payermax receives bank deposit notifications and confirms deposits
Merchants can check the order status through MMC - Local Bank Collection - Transaction Summary
If the risk control review passes, the merchant will be credited normally;
If the risk control review fails, the merchant will be required to provide additional risk control materials.
6.2 Supplementary Information on Risk Control Materials
If the risk control review fails, the merchant needs to click the button to supplement the risk control materials;
Merchants supplement risk control materials based on the payee type (this step is not required if risk control passes), and select the corresponding option for
Individual/Companybased on the payee role.After submitting the supplementary materials, the risk control department will review it again (until successful). You can check the Local Bank Collection payment results through →
In Merchant Platform (MMC) , you can view the fund details (the merchant's actual deposit amount = our bank deposit amount - handling fee)
PayerMax will push the transaction result to the merchant's email address via email;
Email setting path: → →
6.3 Payment status description
| Status | Description |
| Collection successful | Local collection funds have been successfully credited |
| Failed, refunded | If the local payment is rejected, PayerMax will return it to the payer |
| Risk control materials to be supplemented | This means that the funds need to be supplemented with additional materials to advance the funds into the account |
7. Disbursement
7.1 Single Disbursement
7.1.1 Initiate a Single Disbursement
- Log in to the Merchant Platform and enter the module. When a merchant needs to use this service, click to make a payment to a single payee.
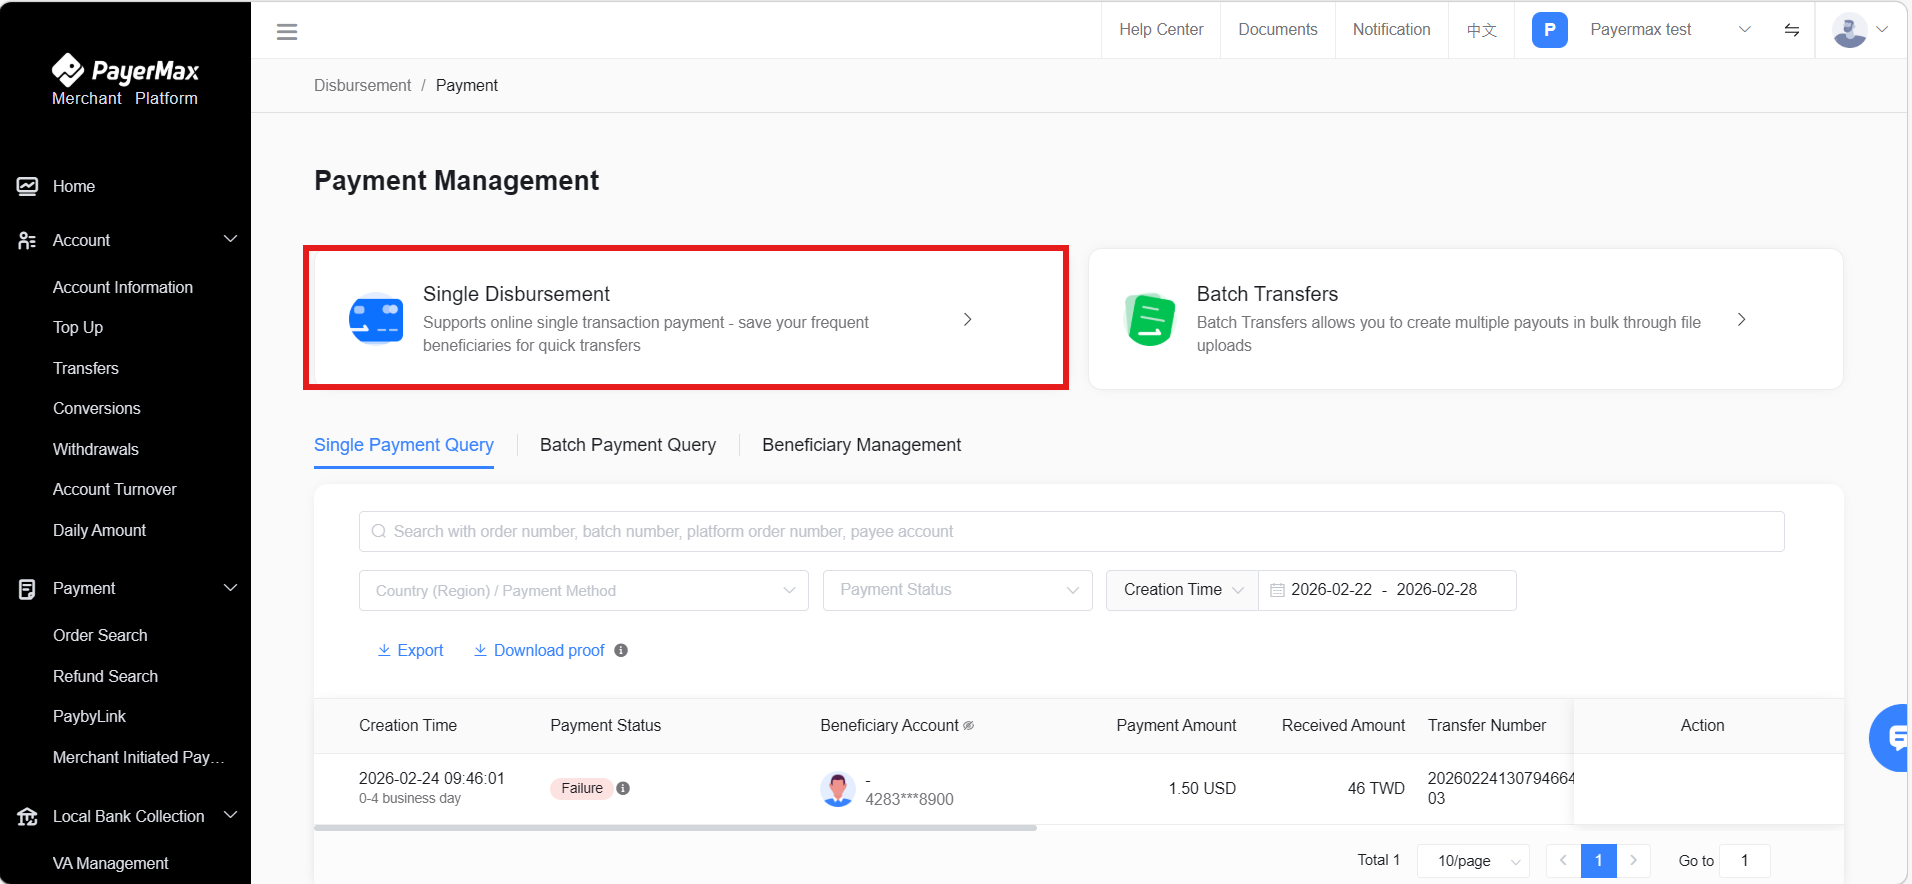
Alternatively, initiate a single disbursement via the payee account.

Enter the disbursement page, fill in the key information, and click Next.
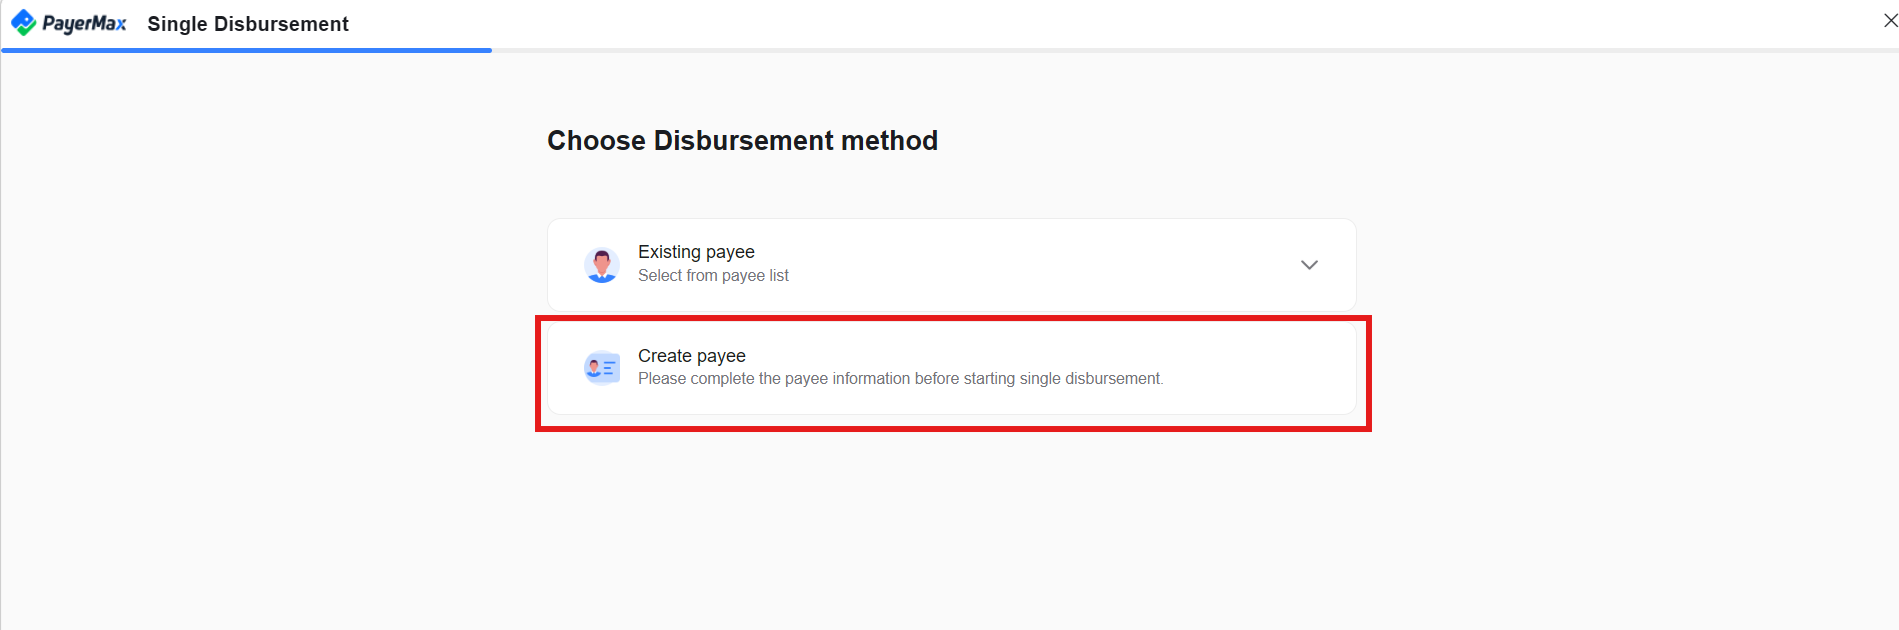
Select Payment Method
- If you have added a payee and saved them as a frequent payee, you can select them directly.

If no payee has been added, or you need to pay a new payee, you can complete this by creating a payee.
After filling in the country/region, credit currency, and payee type, select the payment method;
Taking SWIFT payment as an example, you need to fill in the payee's account number, name, and bank code;
You can choose whether to save this payee as a frequent payee account, then click Next to proceed with the payment.
Note:
If you enter via the payee account entry, you can proceed directly to the next step.

Fill in payment information and create a payment transaction.
Currency:
Debit Currency: Merchants can select a currency account with a balance under the authorized funding account for payment;
Credit Currency: Displays the payee's account currency and cannot be modified here.
Amount:
- Debit Amount refers to the actual amount deducted from the merchant's funding account balance. After filling in the debit amount, the credit amount below shows the actual amount received by the payee. Merchants can also fill in the credit amount to reverse-calculate the debit amount.
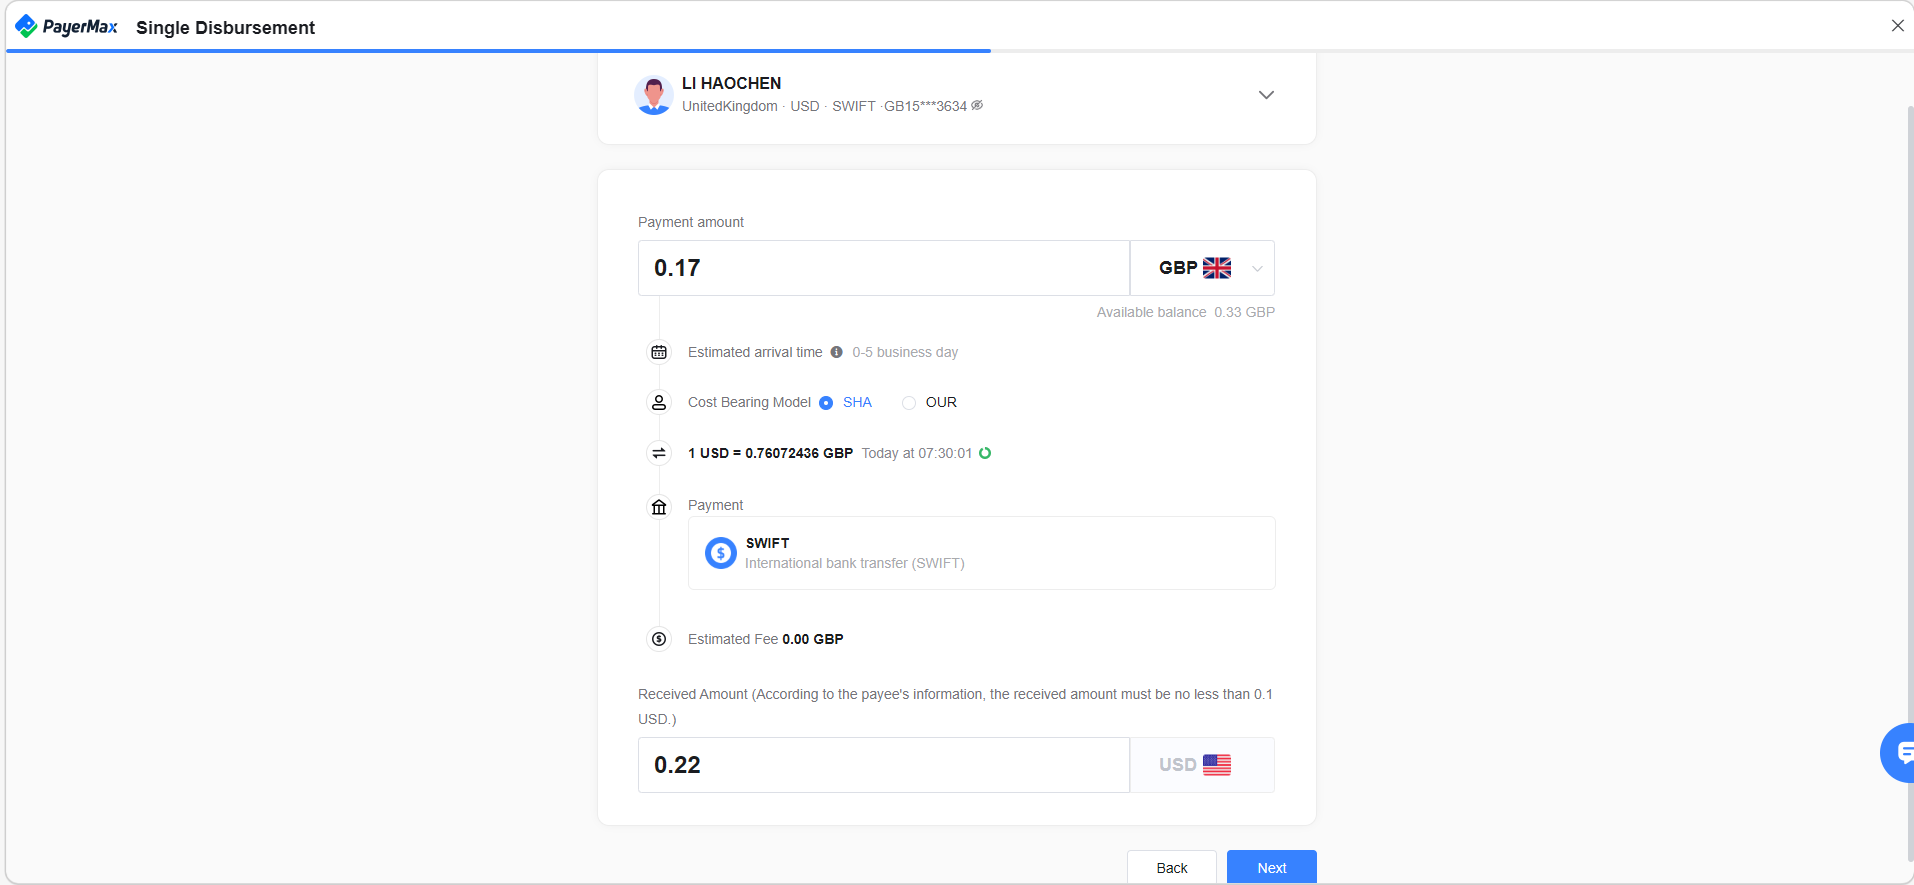
- Follow the prompts to confirm the information and complete the payment creation.
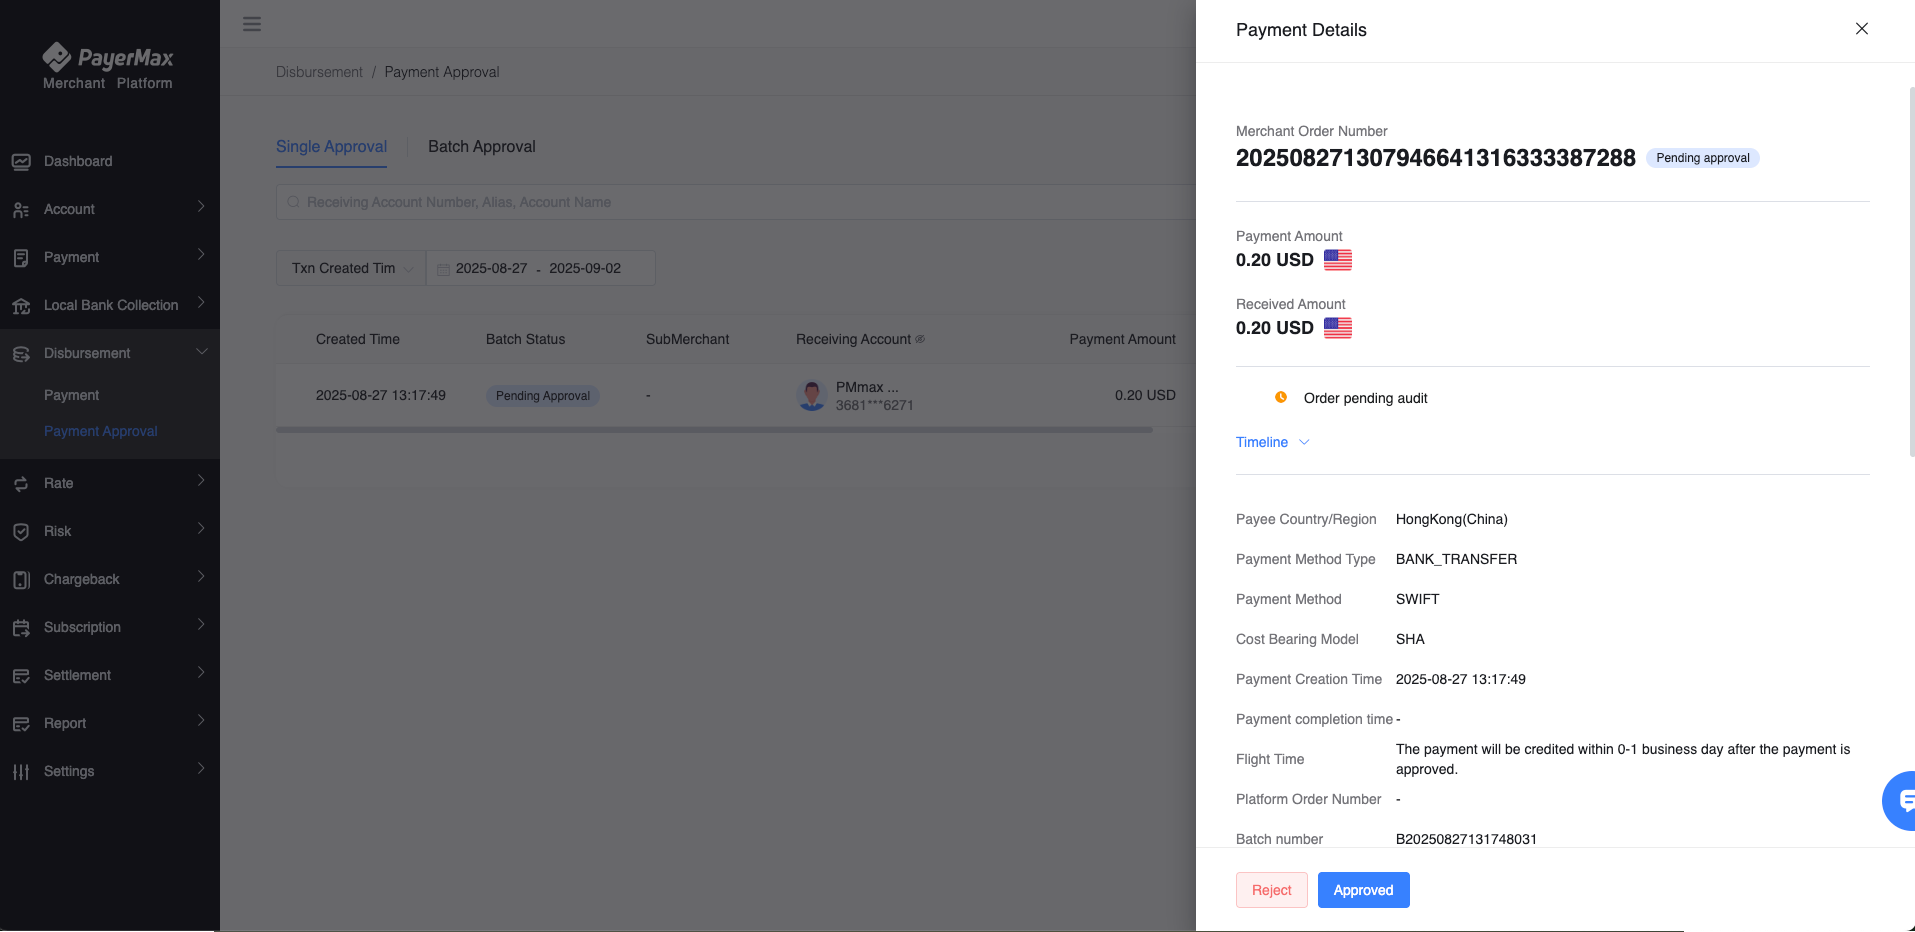
7.1.2 Payment Approval
- Open Approval Page: In the Payment Management section of the sidebar, open → , click , and view payment details.
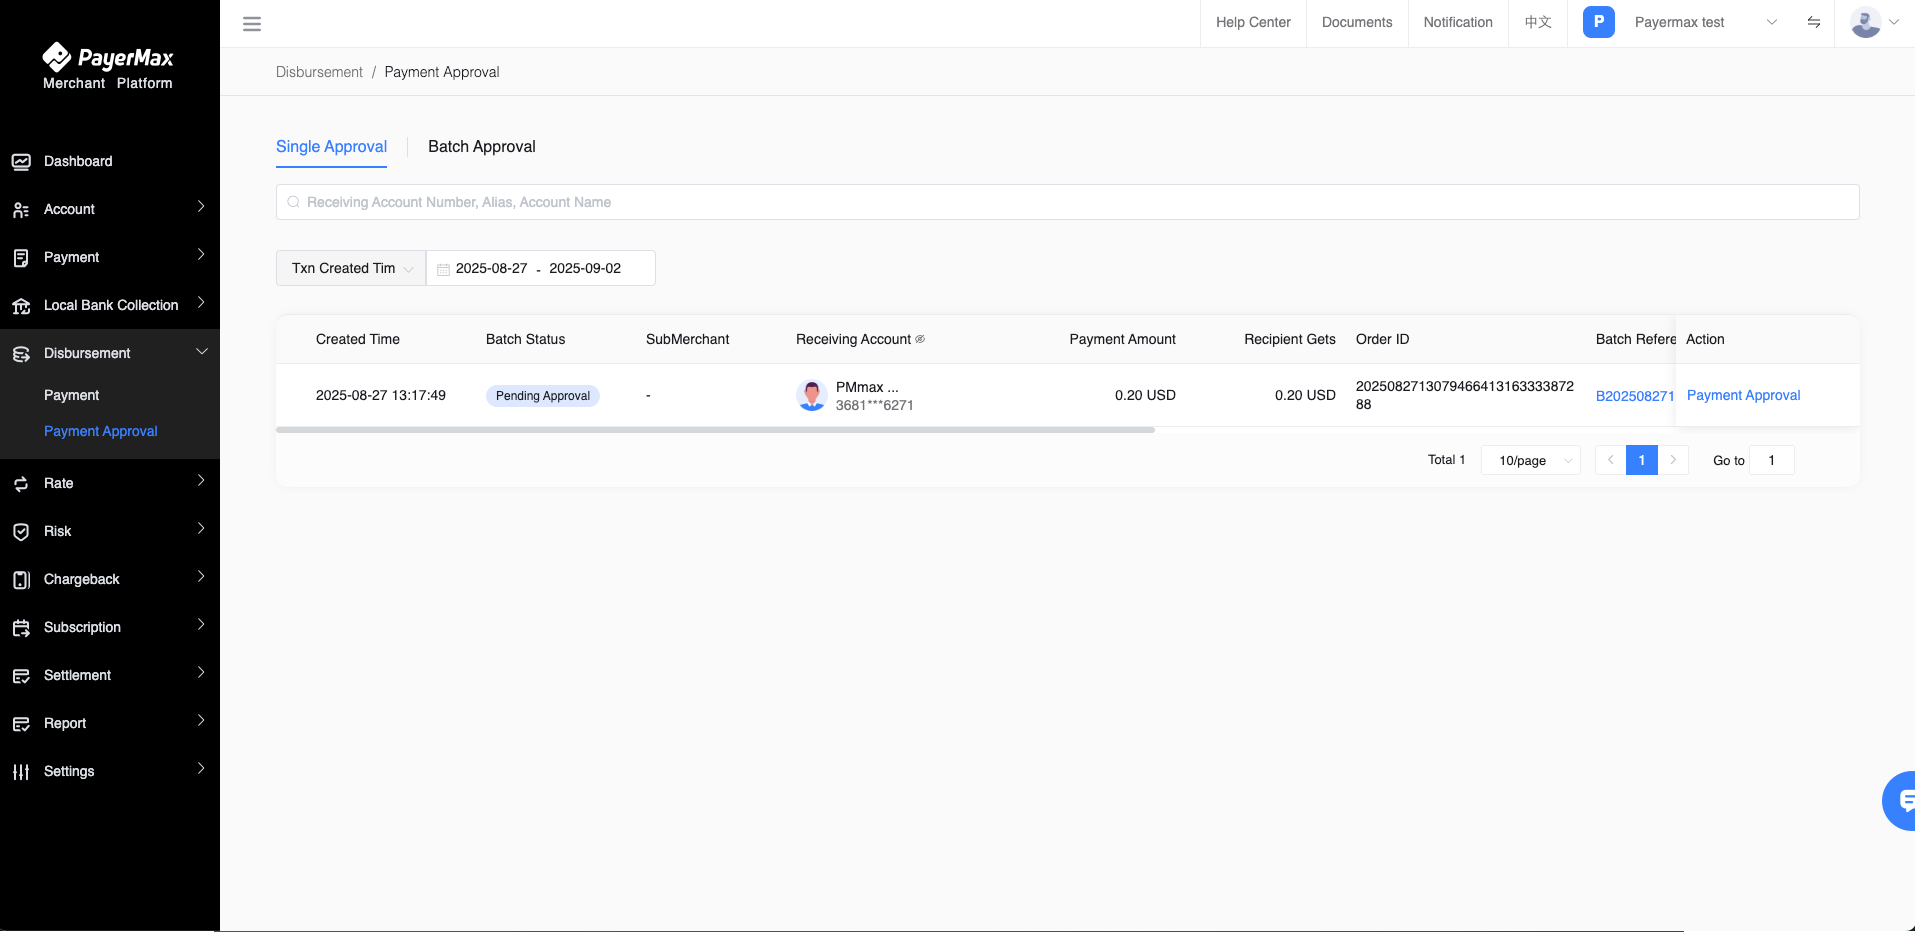
- View Details: The payment details page displays payee and transaction information, as well as the order timeline. After reviewing, the merchant can choose to approve or reject the payment.
7.1.3 Payment Query
- In Payment Management, open Payments and click . Merchants can view the payment status of initiated transactions and perform corresponding operations on transactions with statuses of "Awaiting Document Supplement" or "Awaiting Approval".
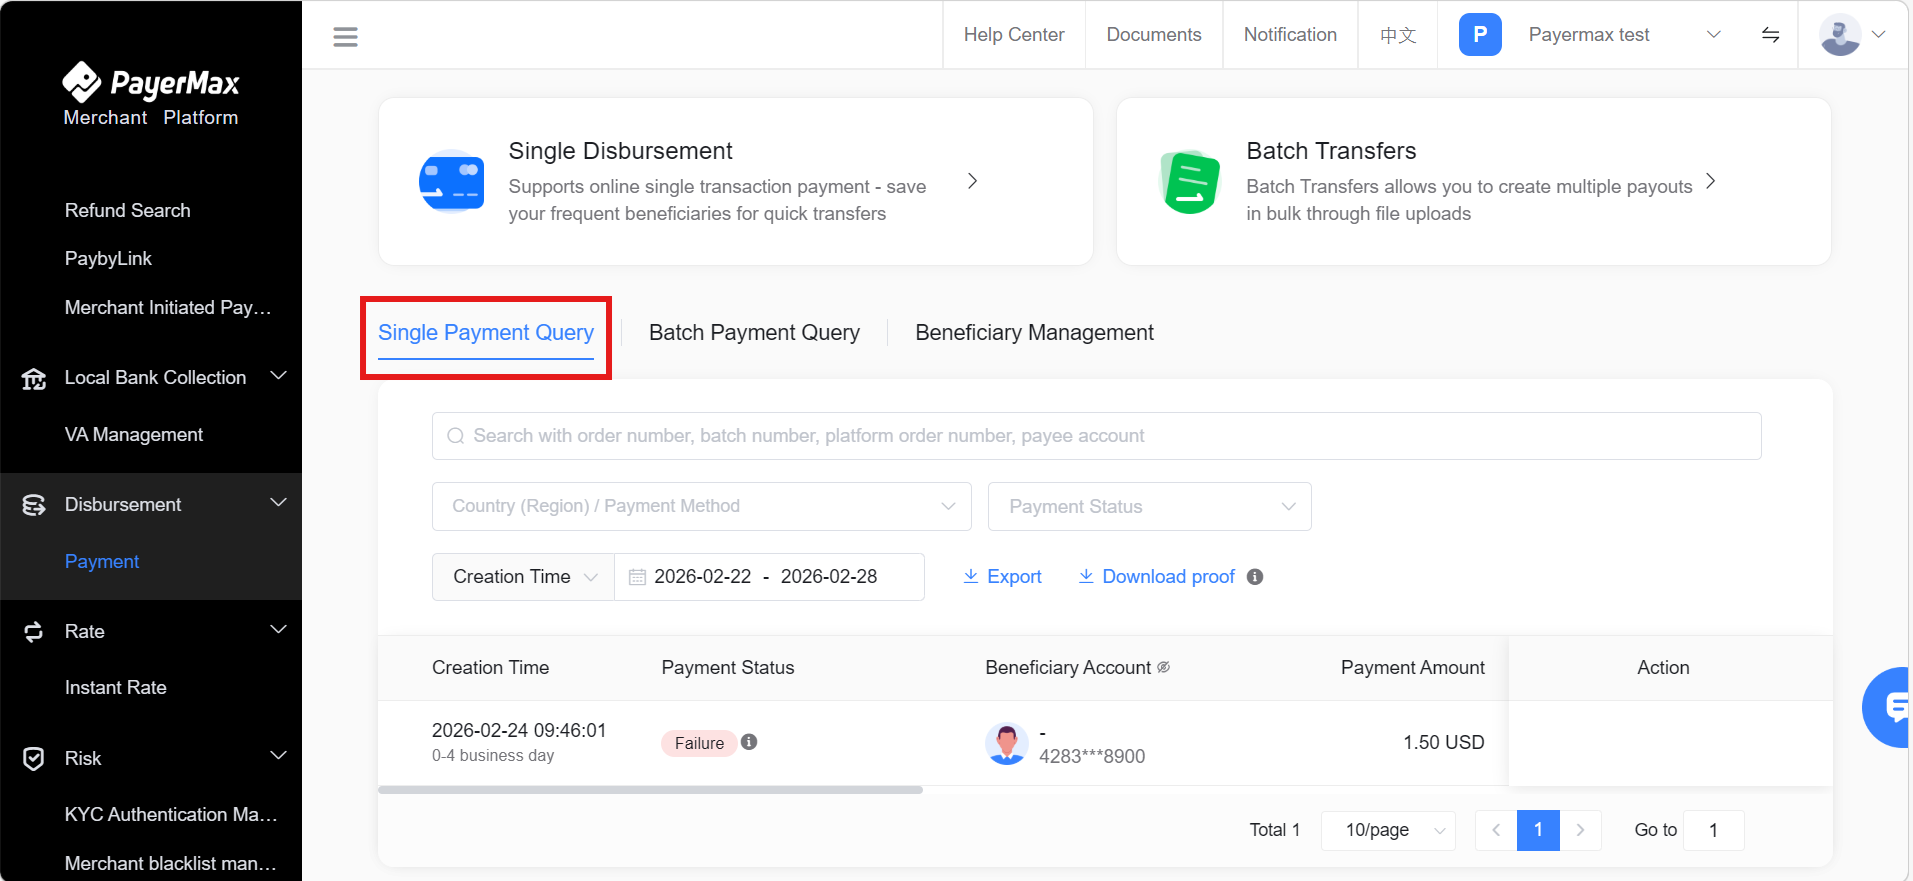
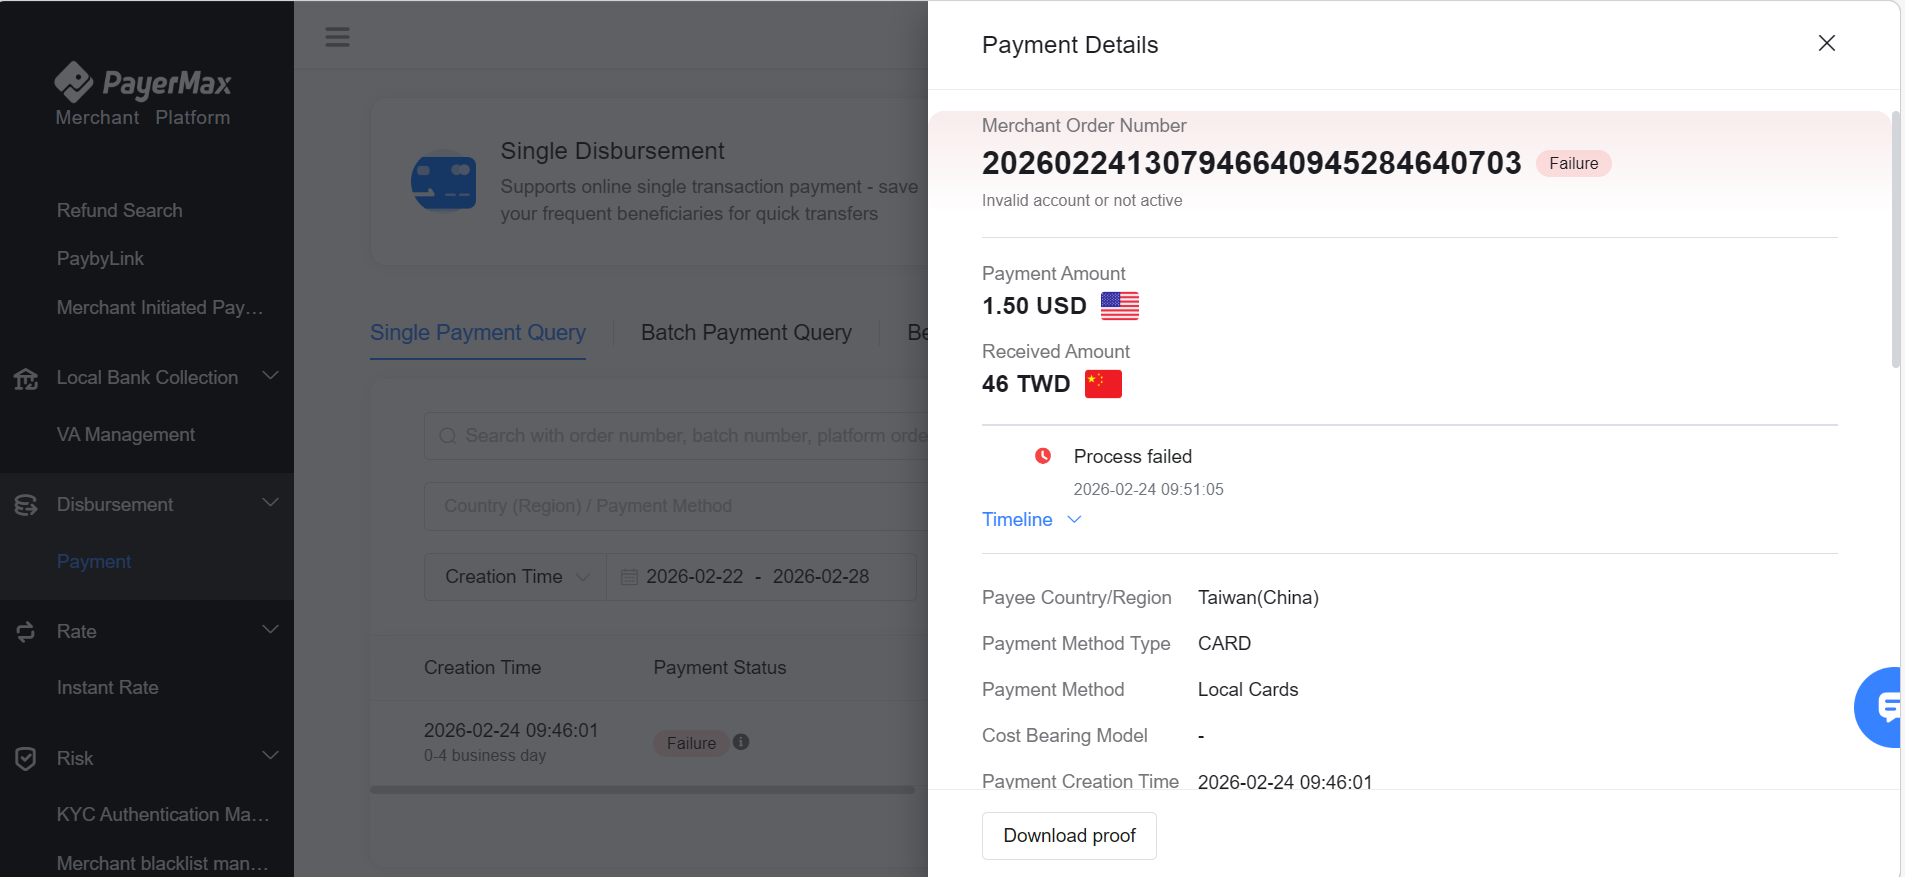
- Click on a payment order entry to access the payment details page, where you can view the timeline and transaction information.
7.1.4 Payment Proof
For single payments on the Merchant Platform, merchants can actively download proof to send to payees as proof of the transaction.
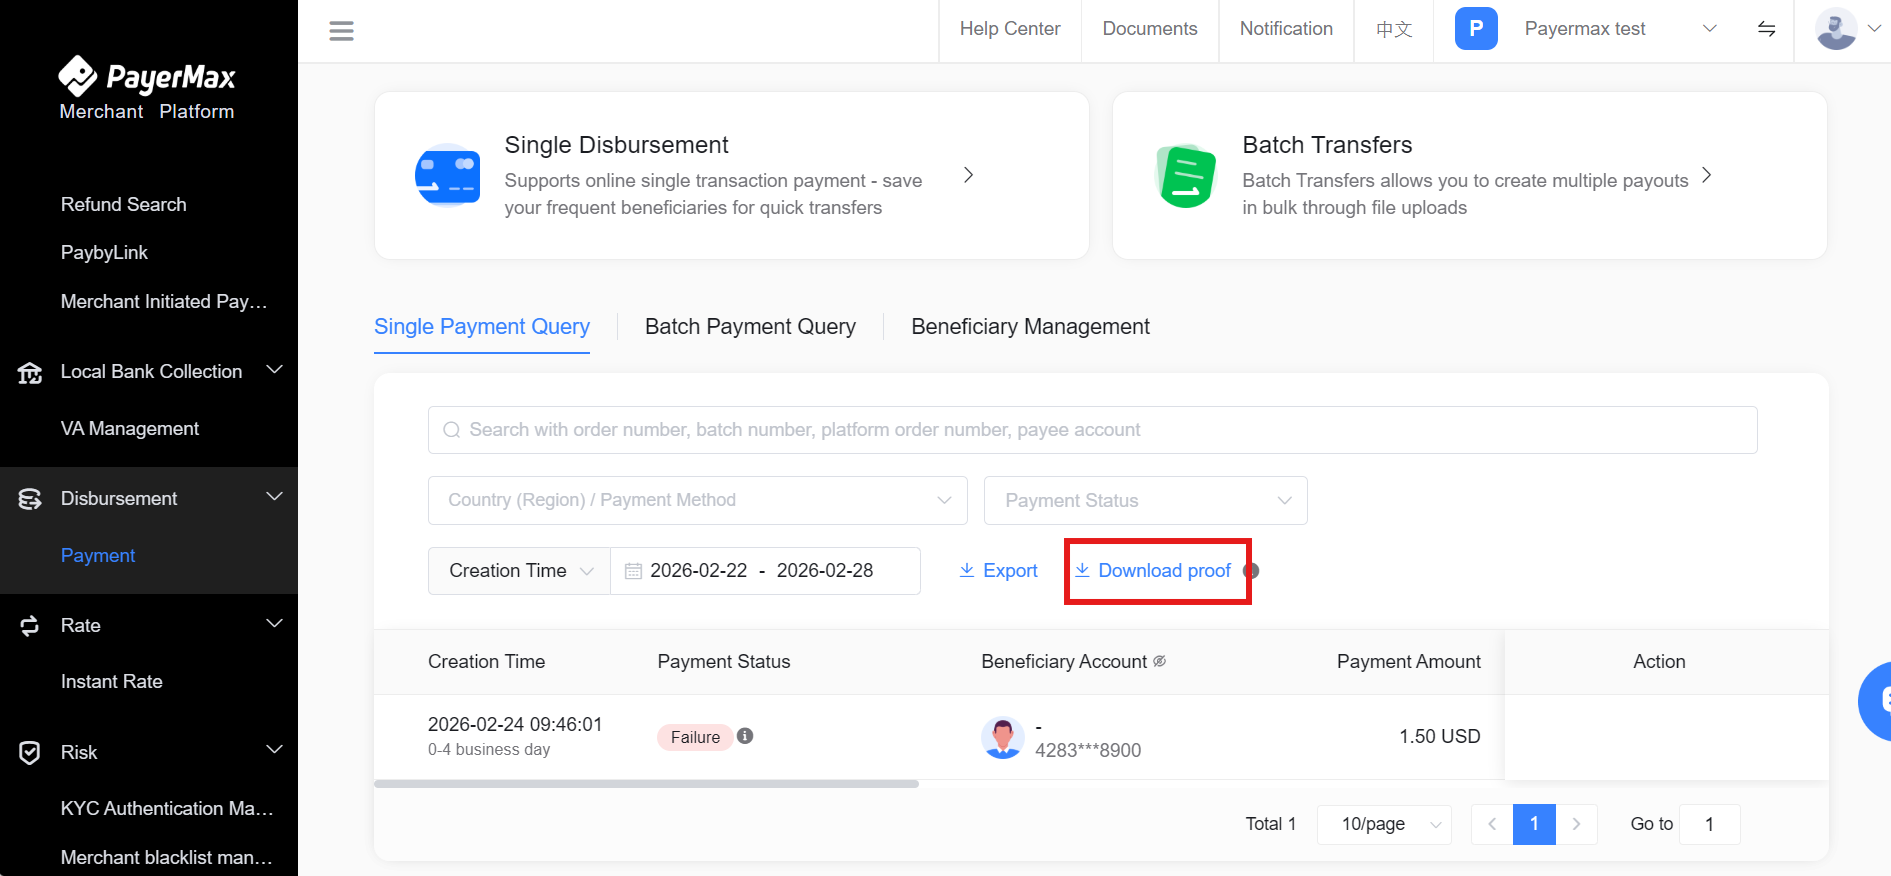
After downloading, the corresponding proof can be received via email.
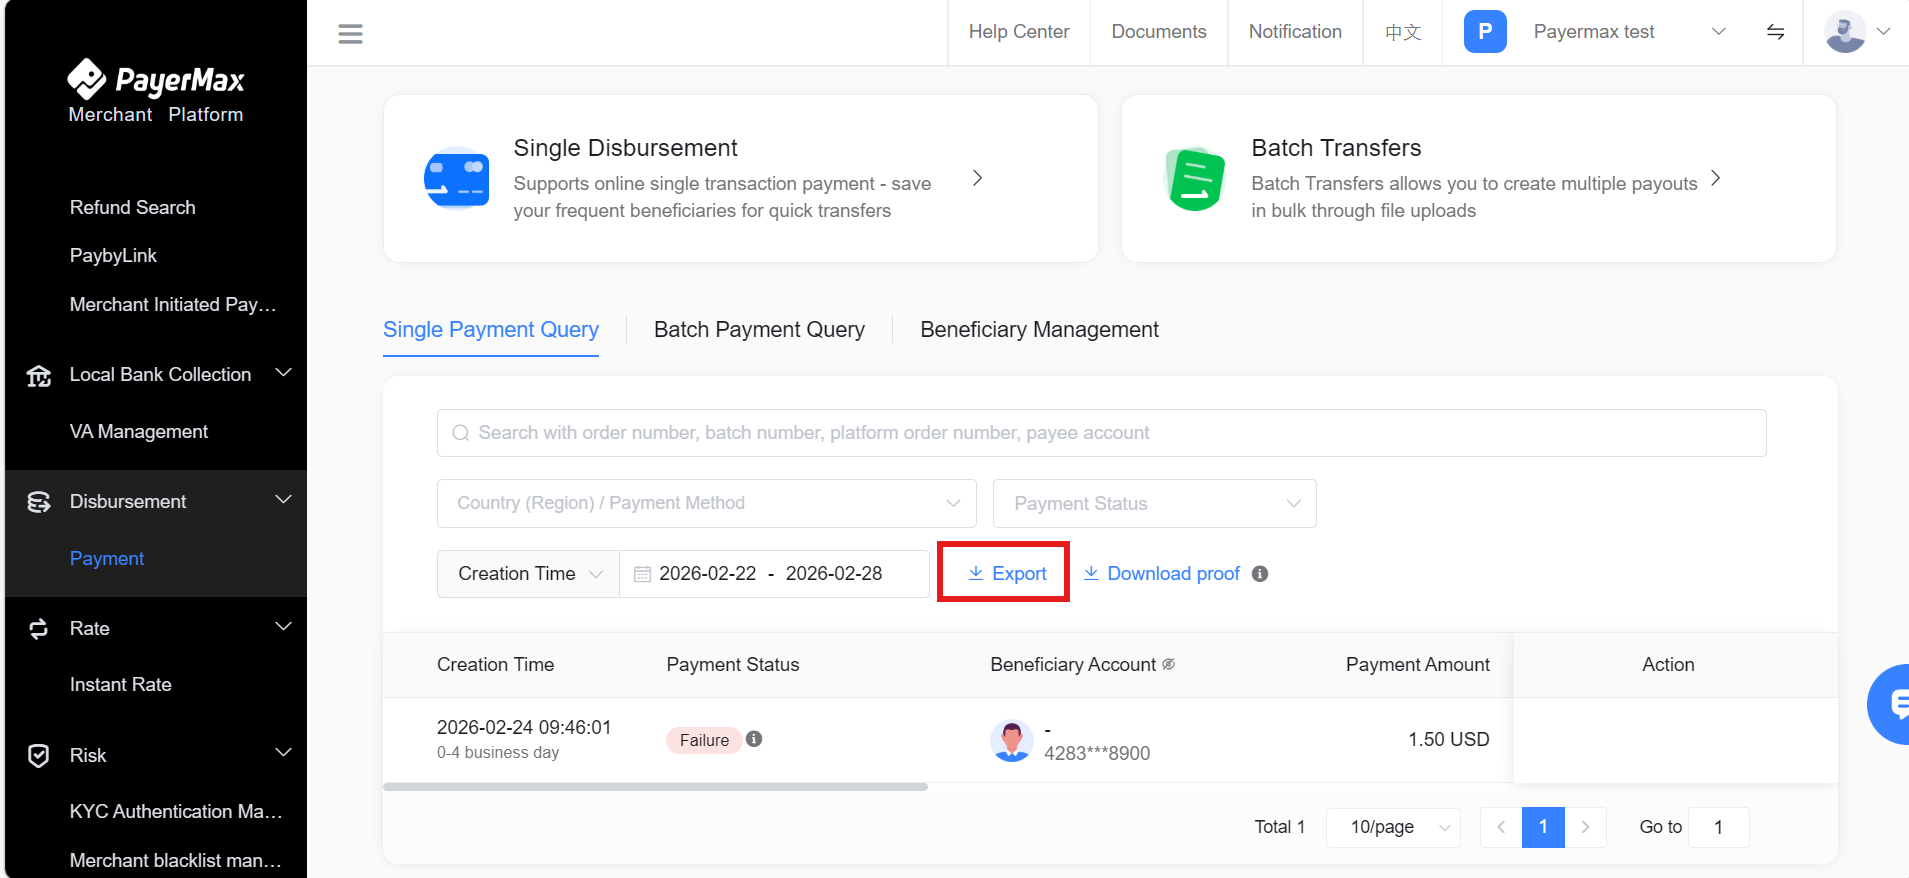
7.1.5 Transaction Export
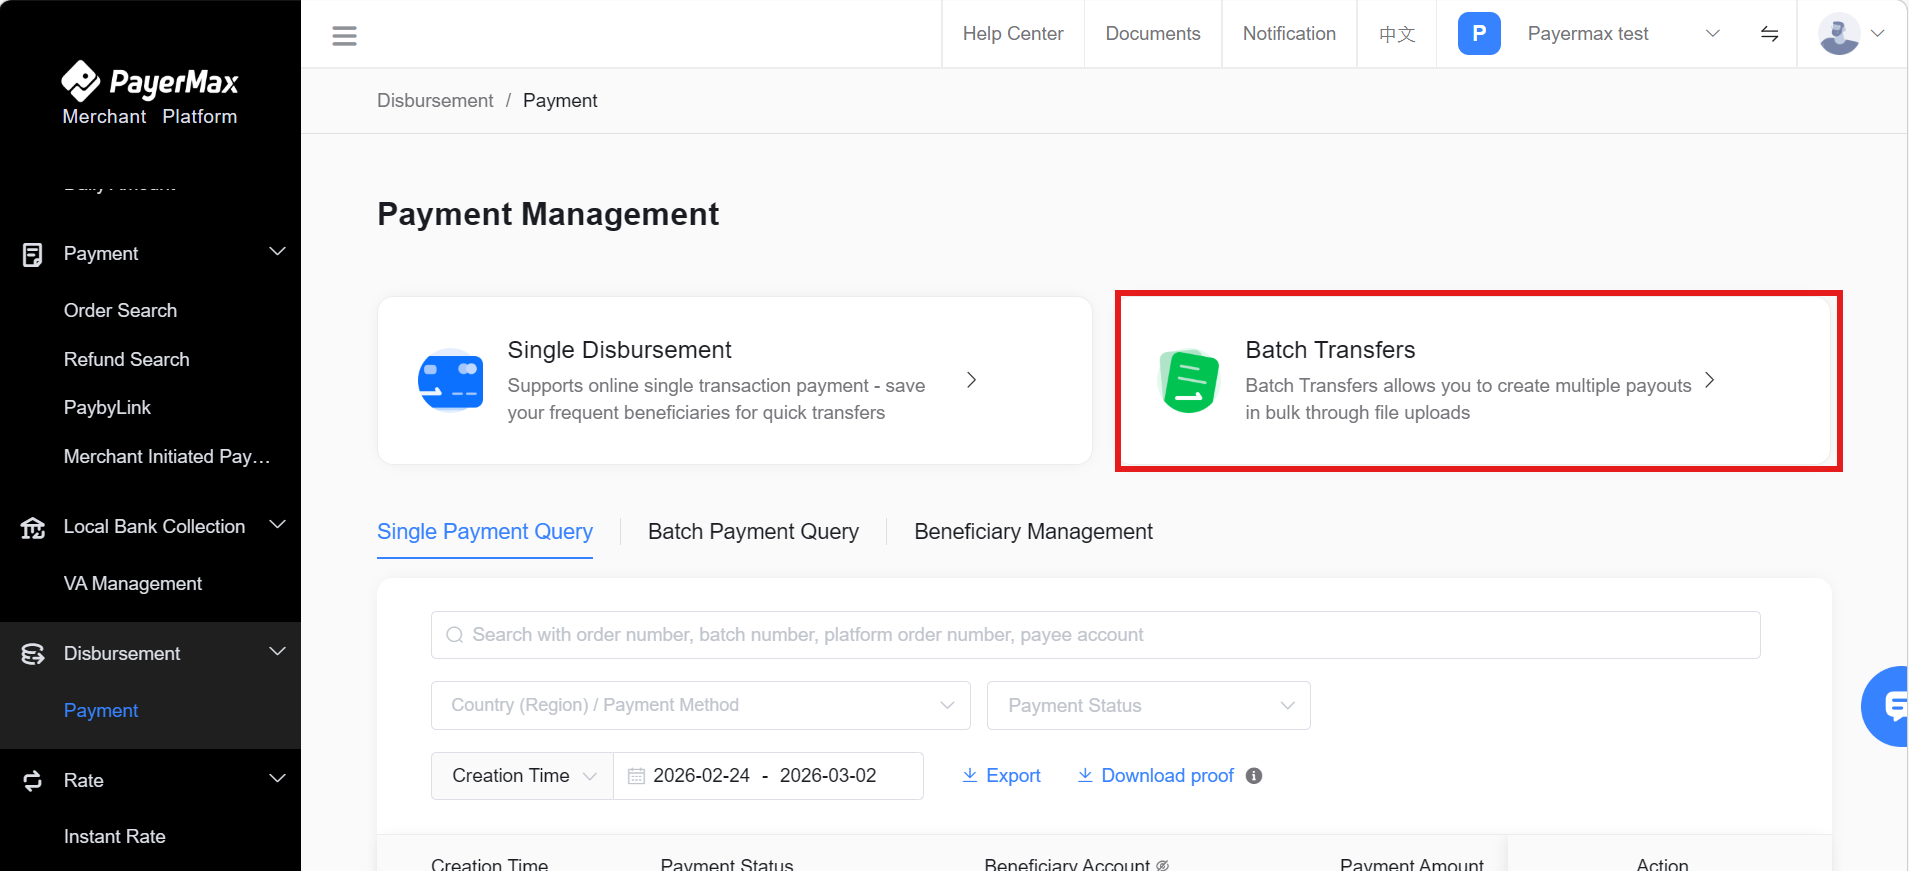
7.2 Batch Transfers
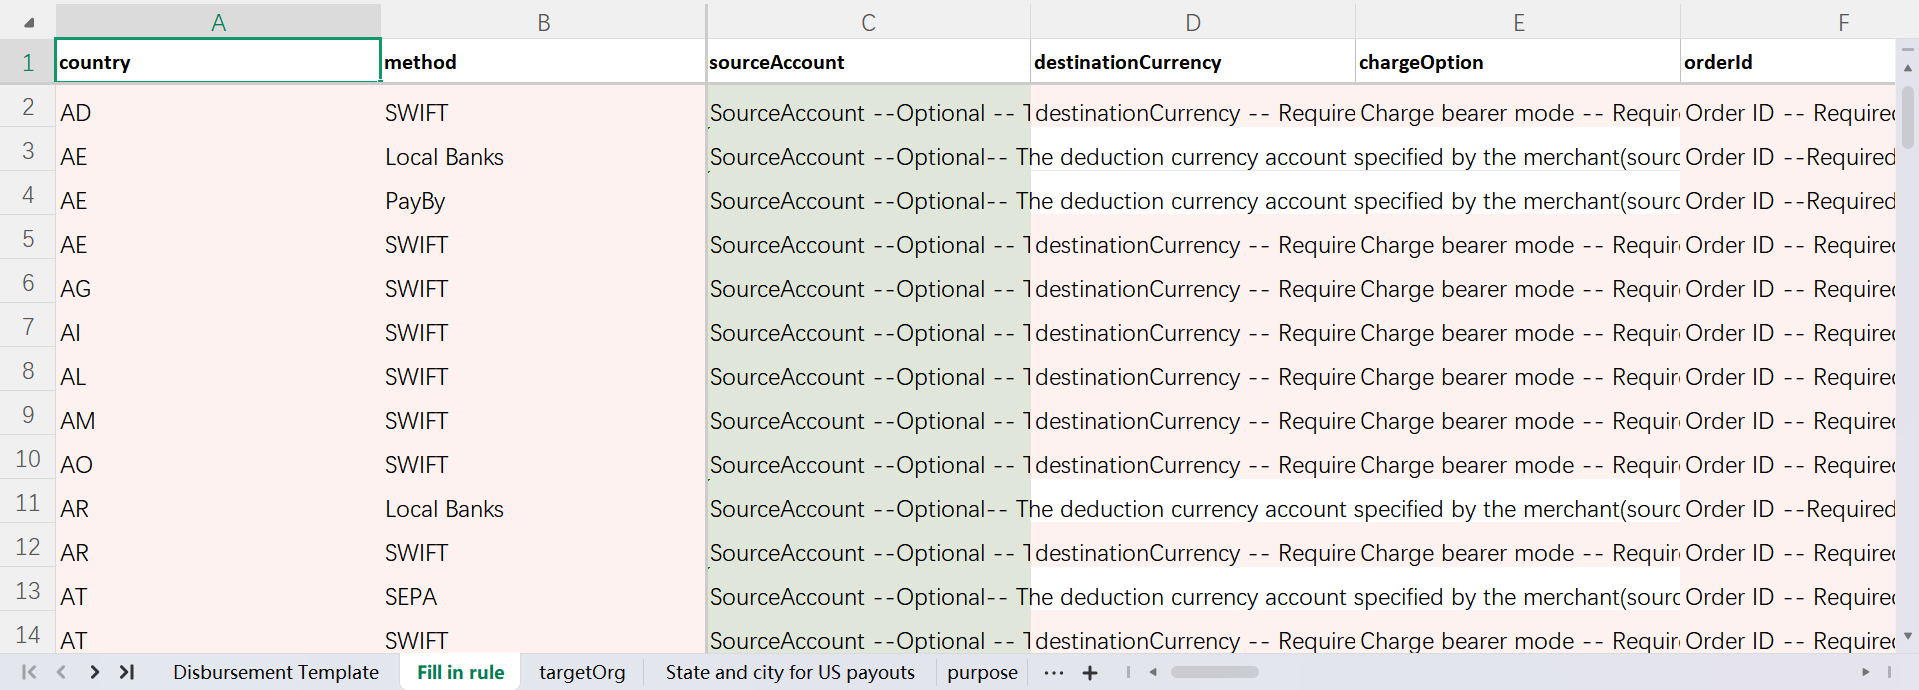
Before initiating payments, merchants need to log in to the PayerMax Merchant Platform. In the batch file payment process, click View Template, select the payment method for the payment, and download the corresponding template to collect relevant payee information and transaction information as required by PayerMax.
PayerMax provides all required information in the template (pink indicates mandatory fields, green indicates optional fields), information format requirements, and examples of corresponding information. Please fill in the template as required.
7.2.1 Initiate Batch Transfers
- Log in to the Merchant Platform, enter the Payments module, and when a merchant needs to use this service, click to start the payment process.
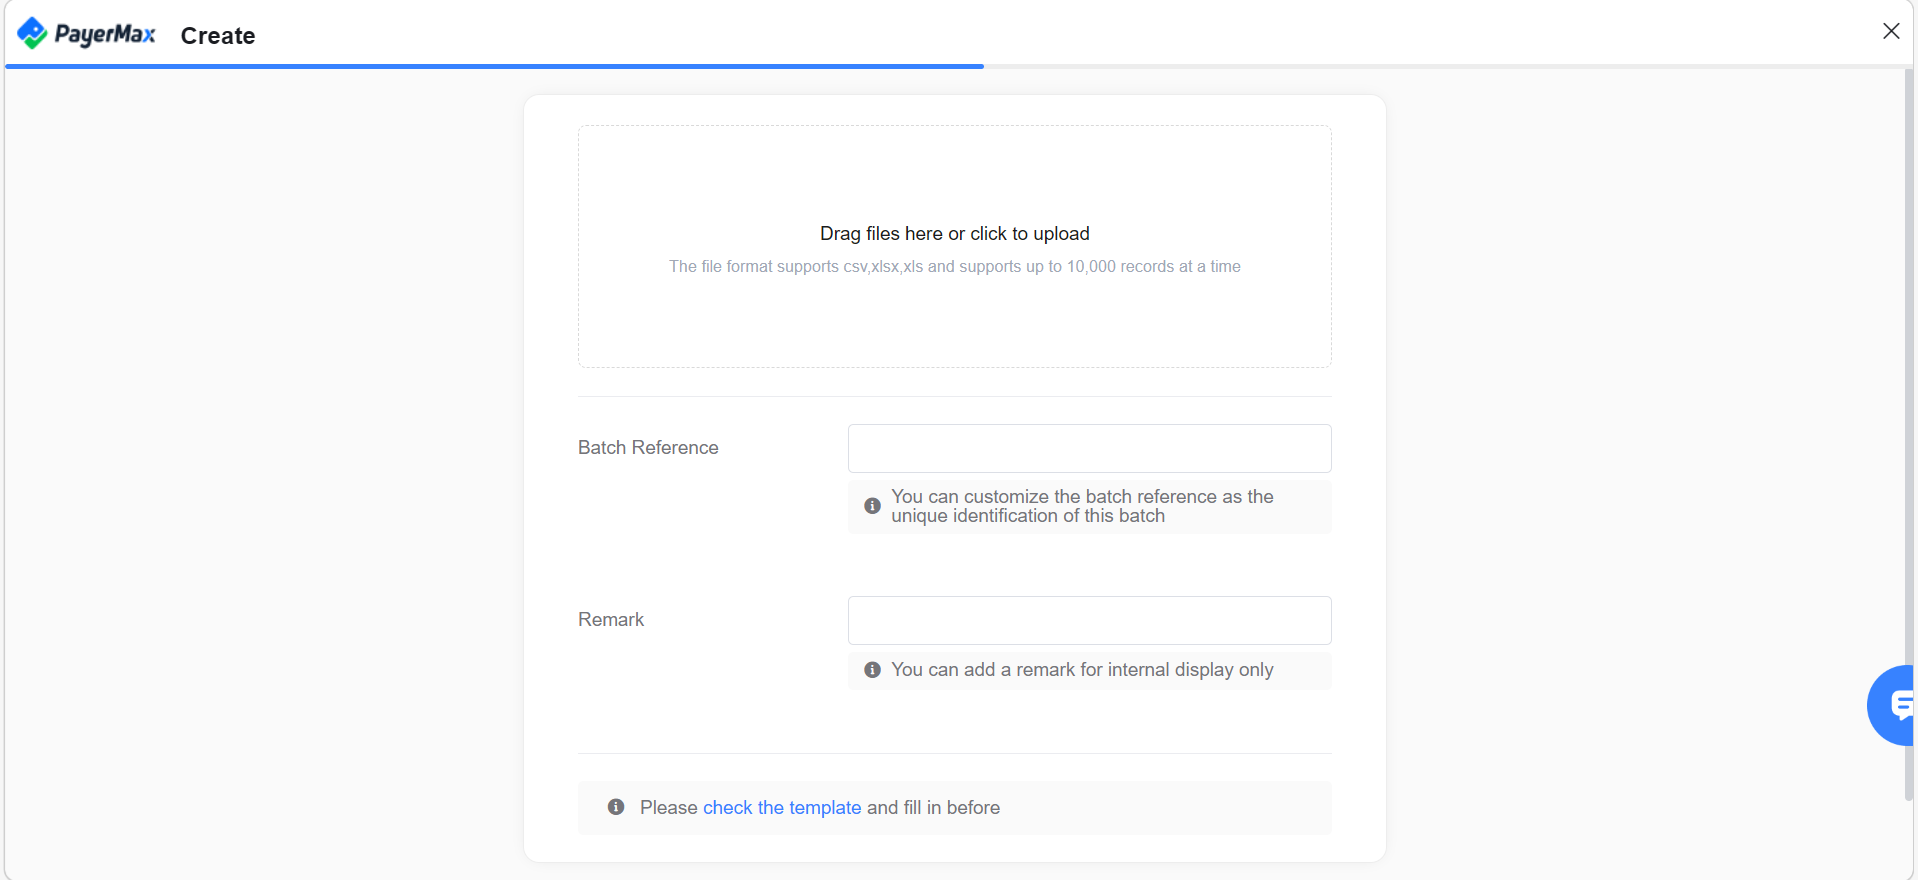
Create Payment Batch:
Click Check the Template to obtain the payment template (see next step);
After filling in all payee and payment information as required by the template, upload the completed payment template;
Customize a batch number, which serves as a unique identifier for the batch, used for approval and query retrieval. It cannot be duplicated; otherwise, the system will report an error;
Customize payment remarks for internal reviewers to view;
Click Create Batch to complete creation.
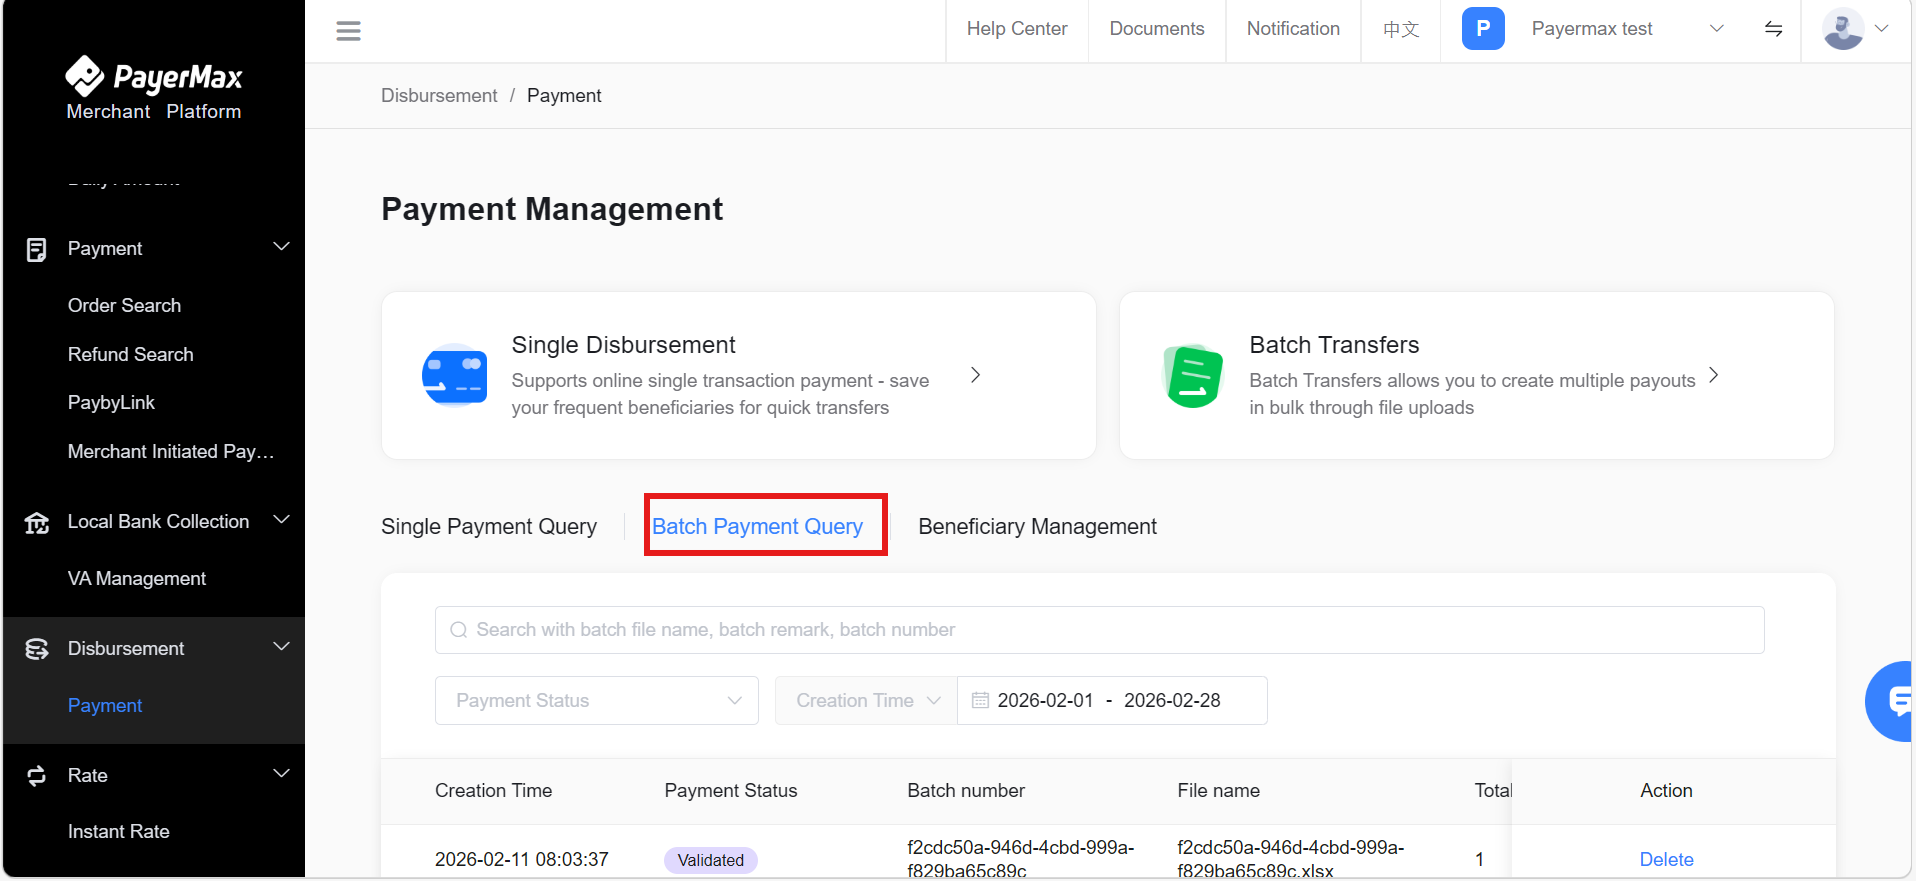
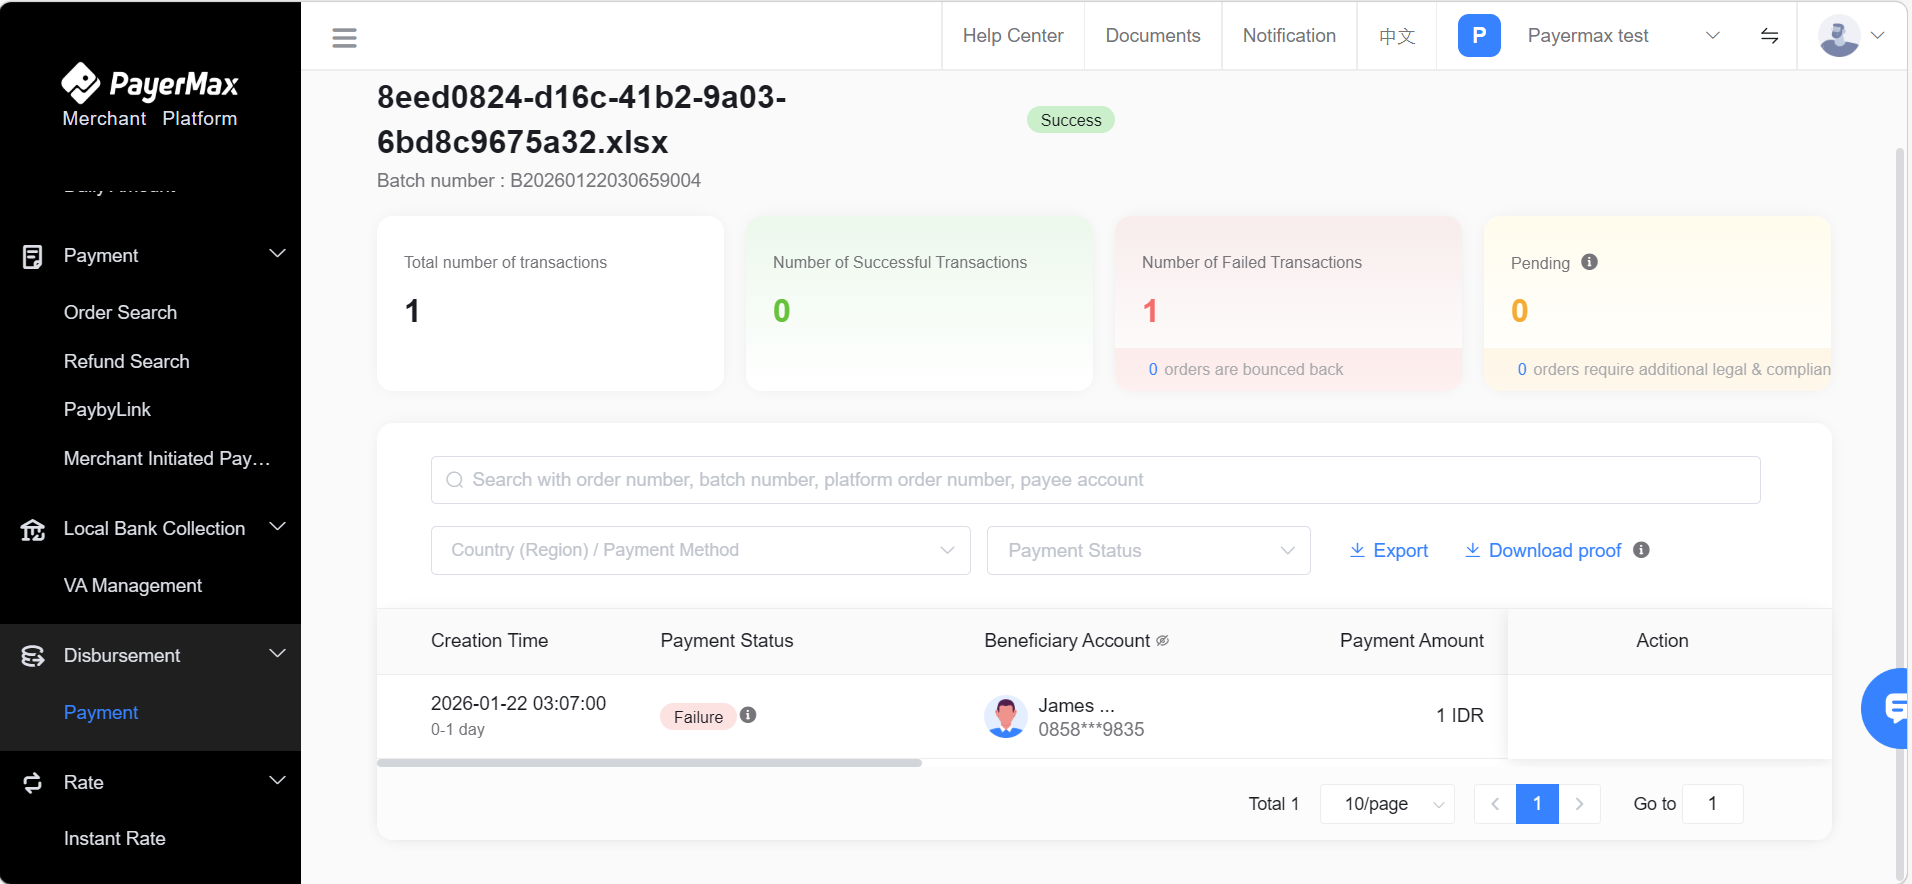
Batch Query and Submit Payment
- After completing batch creation, return to the payment interface and click to view the verification status of the batch.
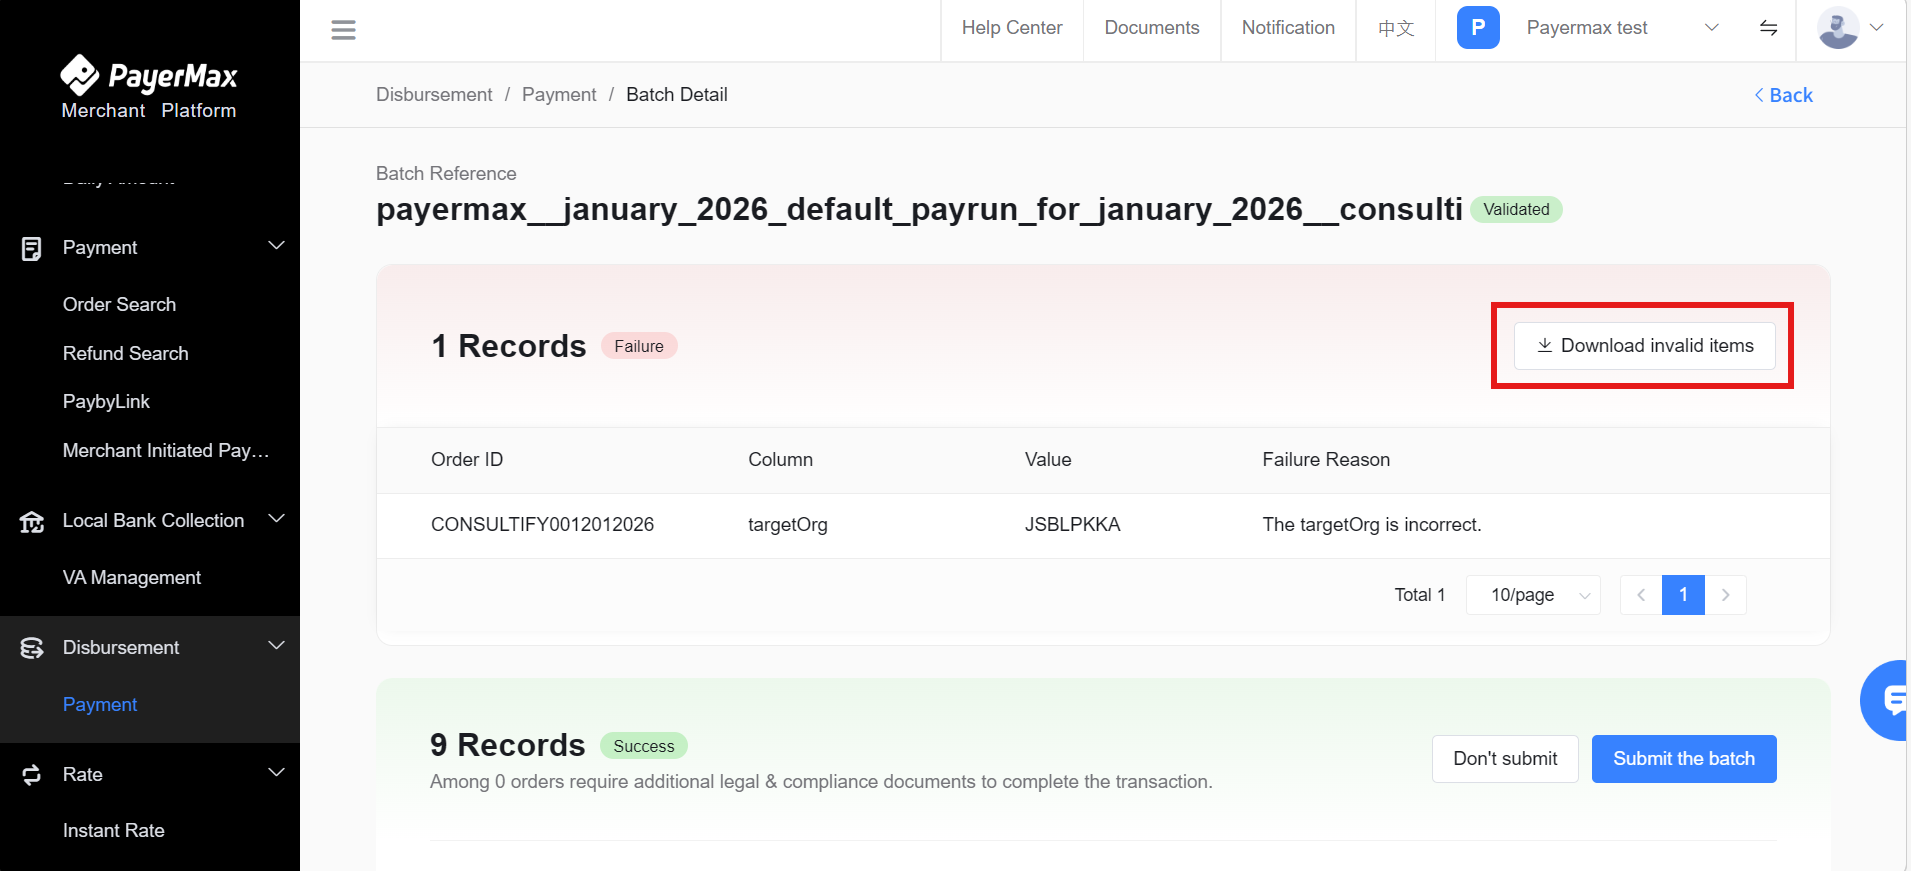
- When the status is "Verification Completed", click on the batch column to access batch details, view approved orders, and submit the verified transactions in the batch after confirmation. If you click , transactions with parsing failures will not be executed.
(a) Submit payments for verified documents in the file.

After successful submission, click on the batch entry to view specific overview and transaction details; the final transaction result is subject to the status in the details.
(b) Or via the submit button in batch details.
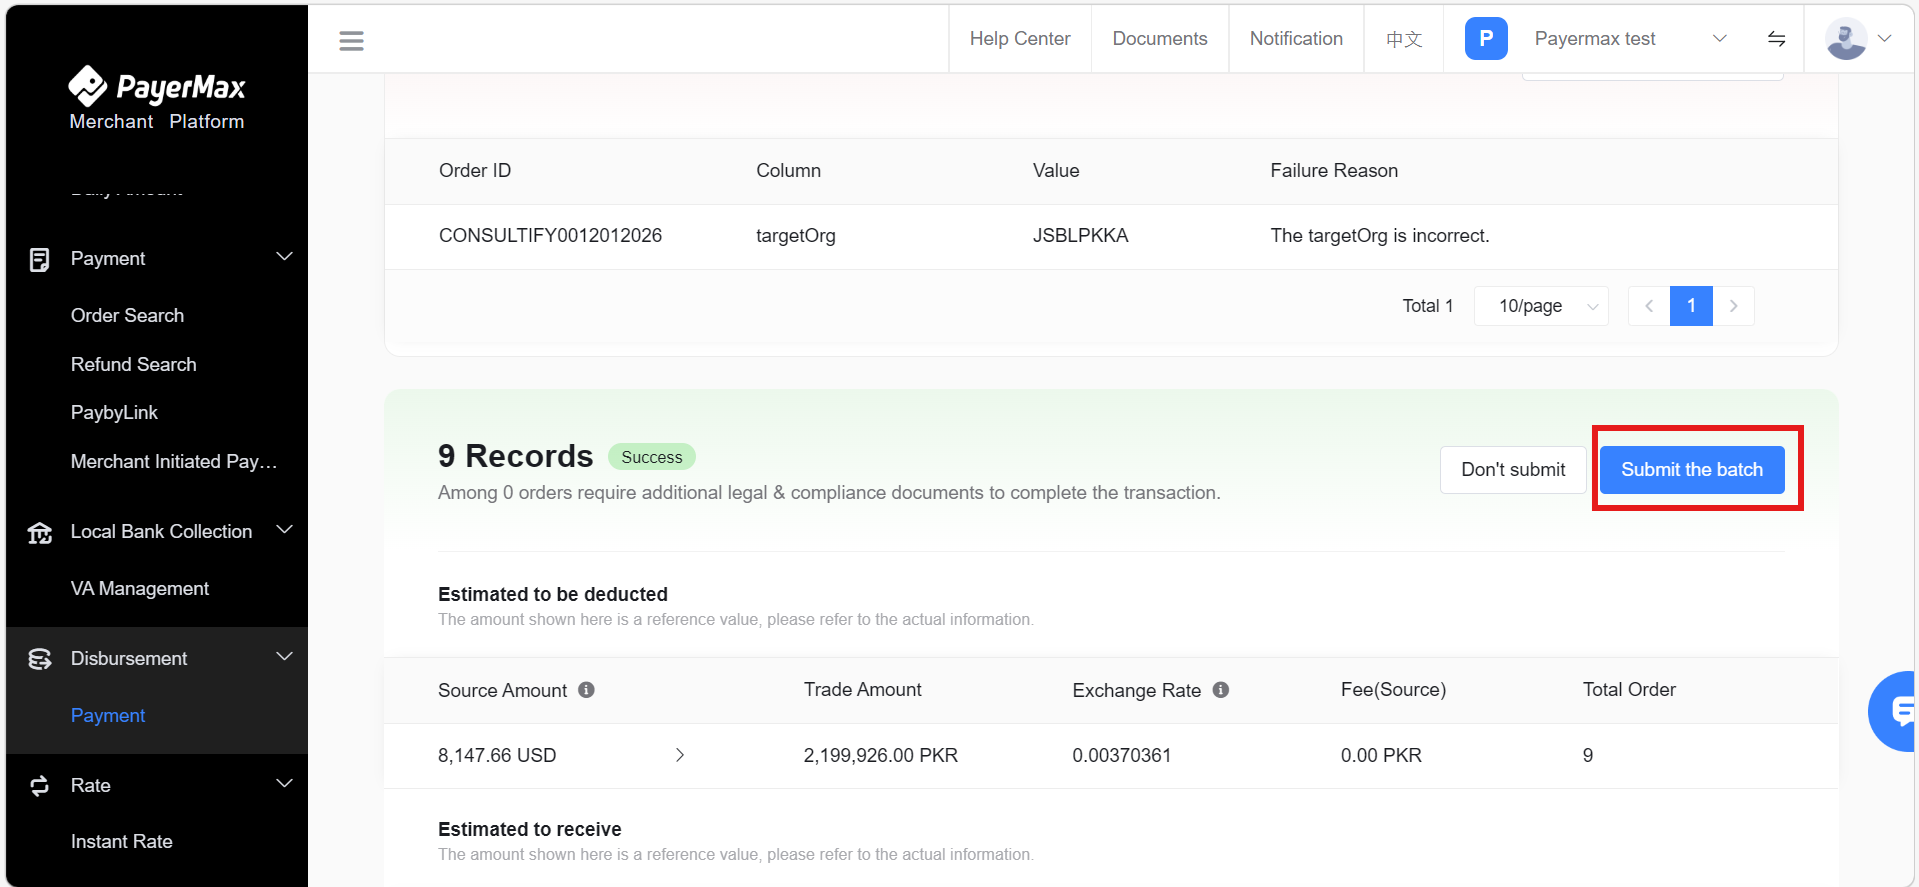
(c) For data with parsing failures, download the reason for failure, modify it, and re-upload.
7.2.2 Generate Payment Template
- Merchants can select a country as needed to generate a template containing only payee information fields for that country.
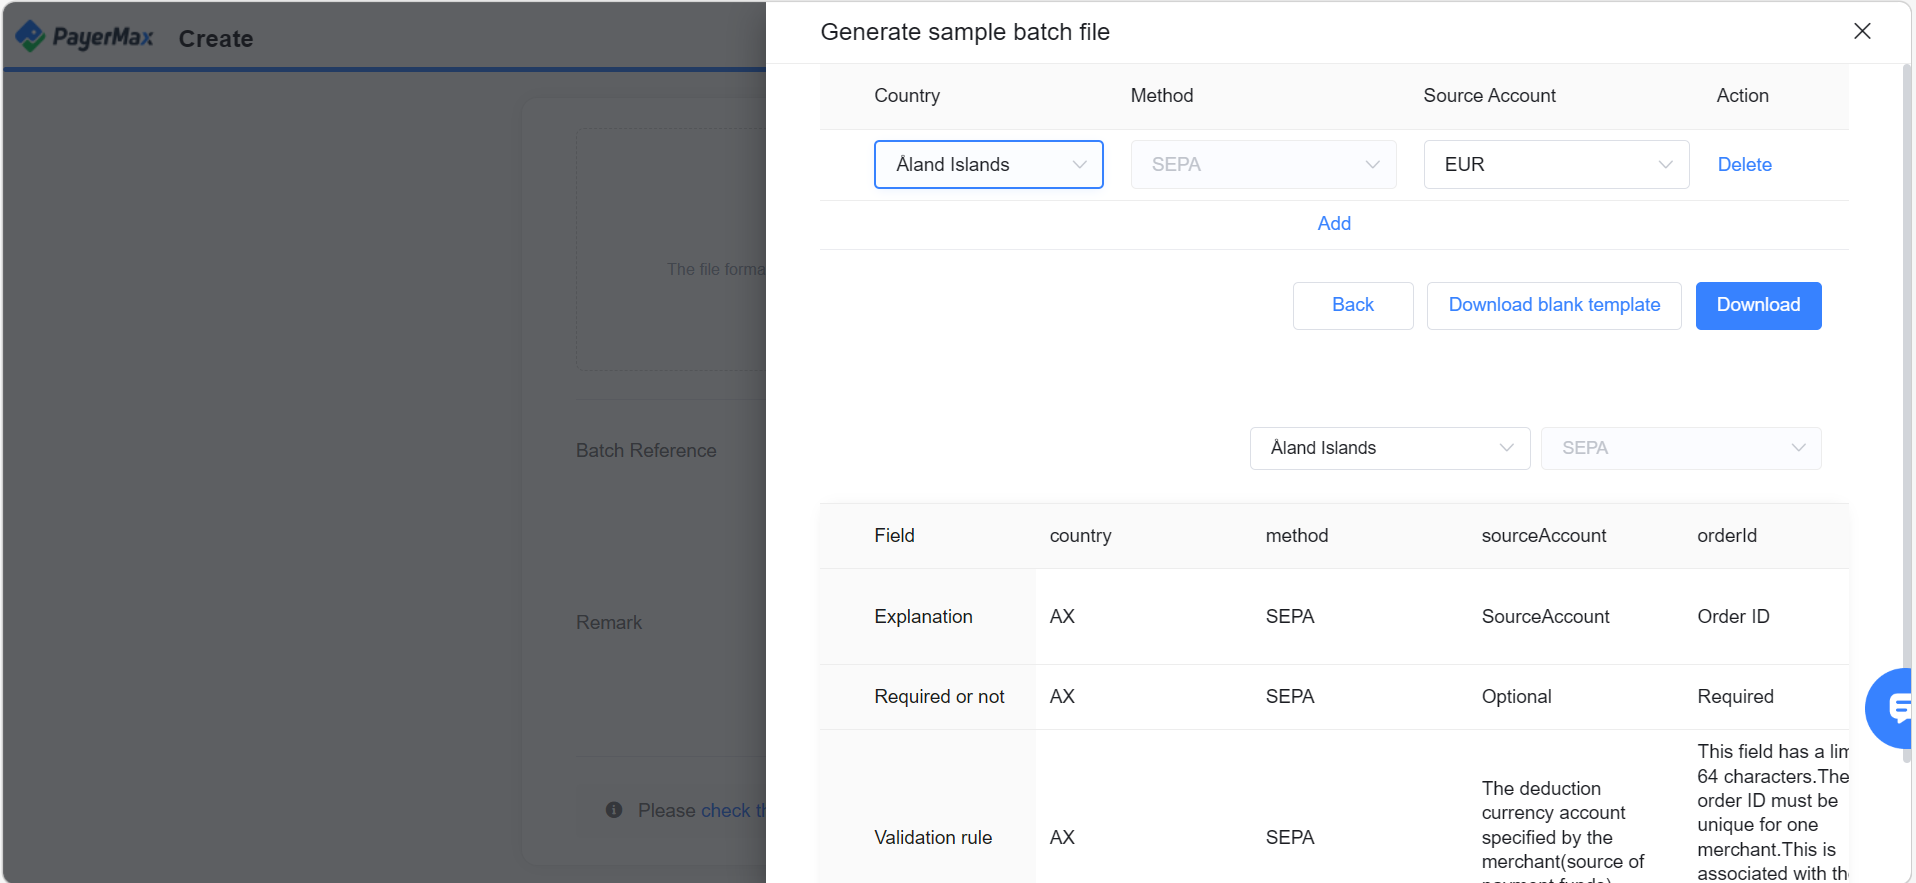
Merchants can also directly download a blank template containing all fields.
In the blank payment template, the "Payment Template" sheet only contains column headers;
For the information to be filled in for each payment method and corresponding rules, refer to the "Filling Specifications" sheet, collect payee information and fill in the corresponding fields. Pink fields are mandatory, green fields are optional;
Each row of the template only contains information for one payee. After upload, the system will verify it, and the results will be displayed on the Batch Query page.

7.2.3 Status Description
Batch Status: On the Batch Query interface, you can view the payment status of all batches.
Created: The batch has been uploaded successfully and is awaiting verification by PayerMax;
Validated: PayerMax has completed verification. You can click to view details of verified and unverified transactions; after verification is completed, if all or part of the transactions are verified, you can submit the batch (only verified transactions will be processed). If not submitted, the transactions in the batch will not be processed;
Pending Approval: Awaiting approval by the designated internal reviewer of the merchant. Transactions can only be processed after approval. Reviewers can approve transactions for a batch on the query interface;
Processing: Transactions have entered the processing state, and some orders in the batch have not yet reached a final state;
Success: All individual orders in the batch have reached a final state: Success/Failure/Refunded.
| Status Enumeration | Status Description | Available Operations |
|---|---|---|
| Created | Batch payment file uploaded, file under verification | / |
| Validated | Batch payment file verification completed, awaiting submission (not entire batch failed verification) | Submit Batch/Delete |
| Pending Approval | Operators with approval permissions to review the payment | Approve/Reject/Delete |
| Processing | Batch payment application accepted by the platform | / |
| Success | Accepted successfully by the channel (actual credit result shall prevail) | / |
| Failure | Payment rejected during review. The reason for rejection can be viewed on the payment details page | Download Original File/Delete |
- Order Status: Click on a specific batch to view the status of each payment in the batch.
| Status Enumeration | Status Description | Available Operations |
| Pending Approval | All orders in the batch have not been approved by the customer's internal reviewer and are not processed | Approve/Reject/Delete |
| Pending Recharge | The merchant's balance is insufficient to process the transaction; recharge is required to continue processing | / |
| Processing | Transaction has entered processing state and has not yet reached a final state | / |
| Pending materials | Transaction triggered risk control rules; supporting documents need to be submitted | Supplement Documents |
| Materials Under Review | PayerMax has received the documents and is conducting review | / |
| Success | Accepted successfully by the channel (actual credit result shall prevail) | / |
| Failure | Payment rejected during review. The reason for rejection can be viewed on the payment details page | / |
| Dishonored | Successfully processed transactions that were ultimately returned by the receiving institution, updated to failed (refunded) | / |
7.2.4 Payment Proof
- For batch payments on the Merchant Platform, merchants can also actively download vouchers to send to payees as proof of the transaction (the corresponding voucher can be received via email after download).
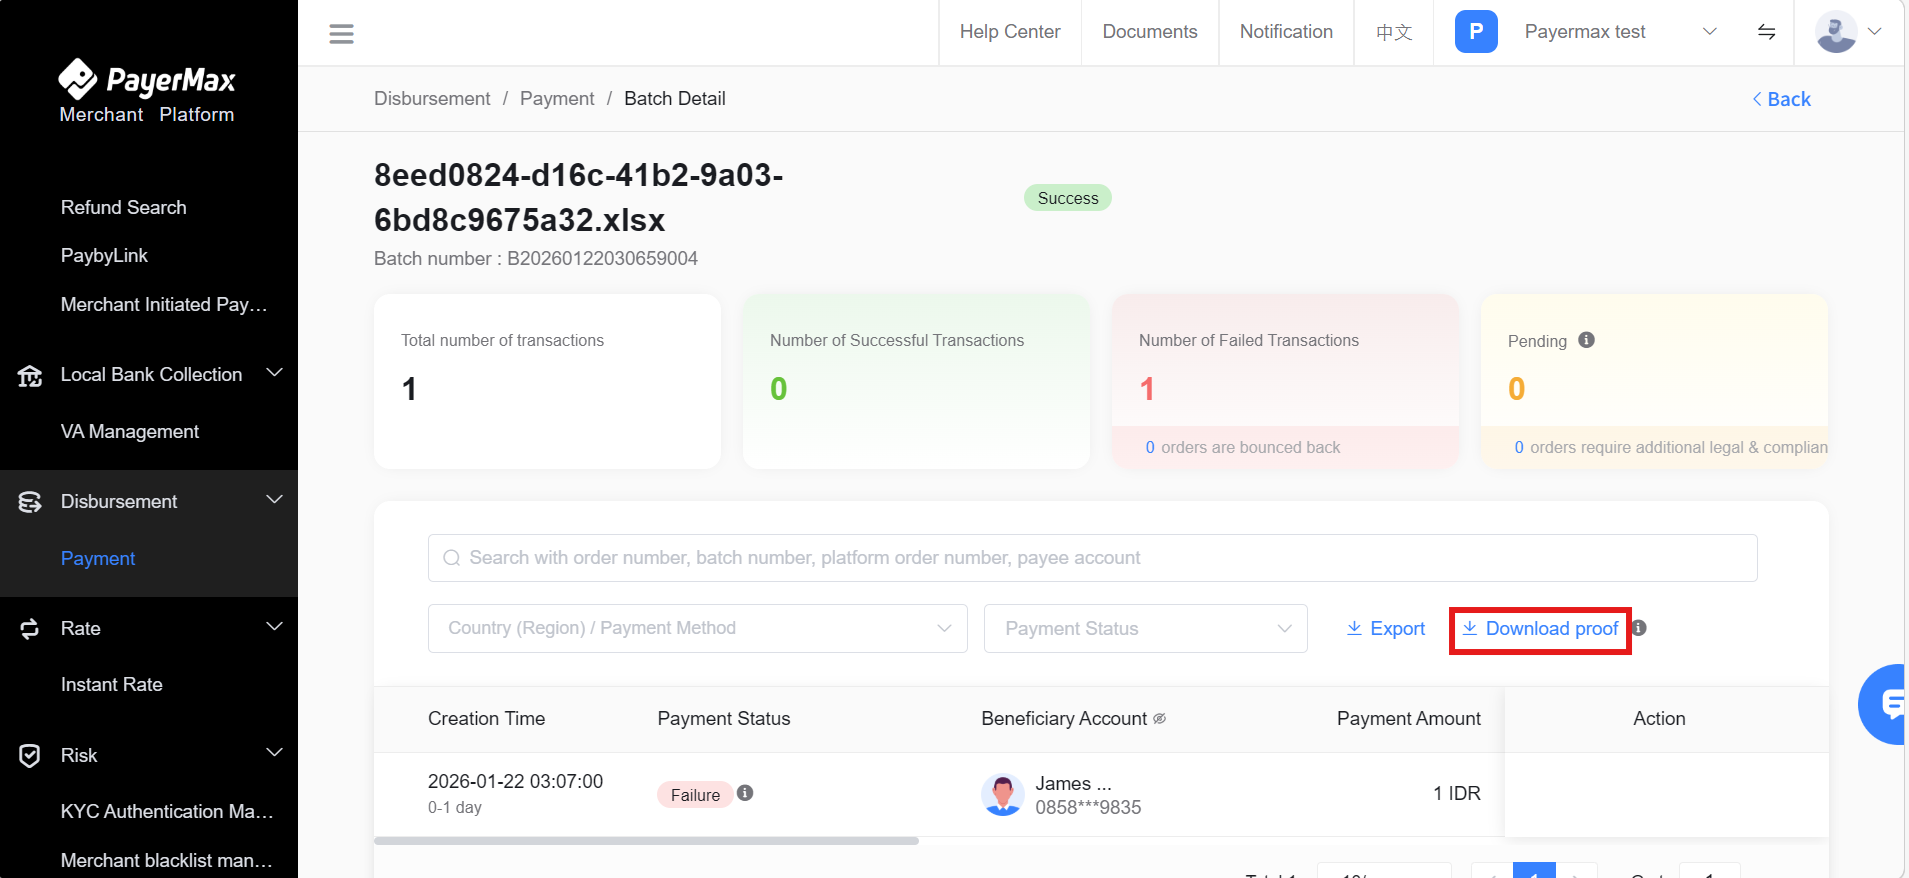
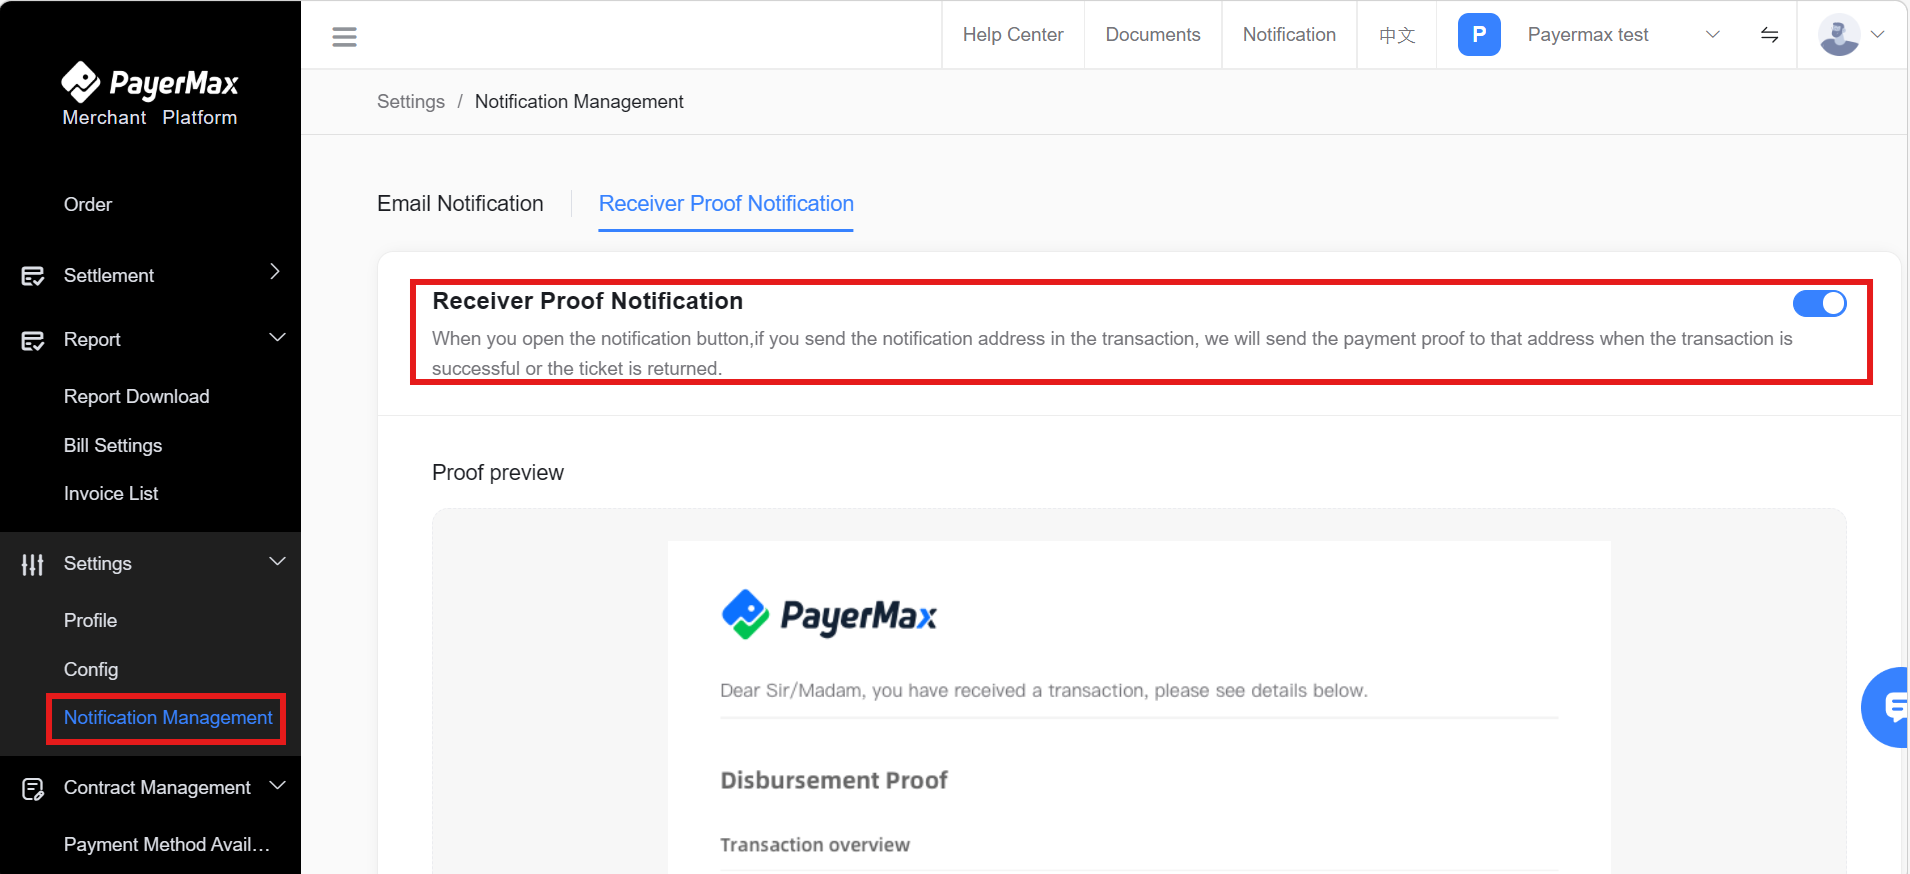
- In addition to the above method, automatic sending of vouchers to payees is also supported (settings need to be enabled, and the payee's notification email must be entered in the file).
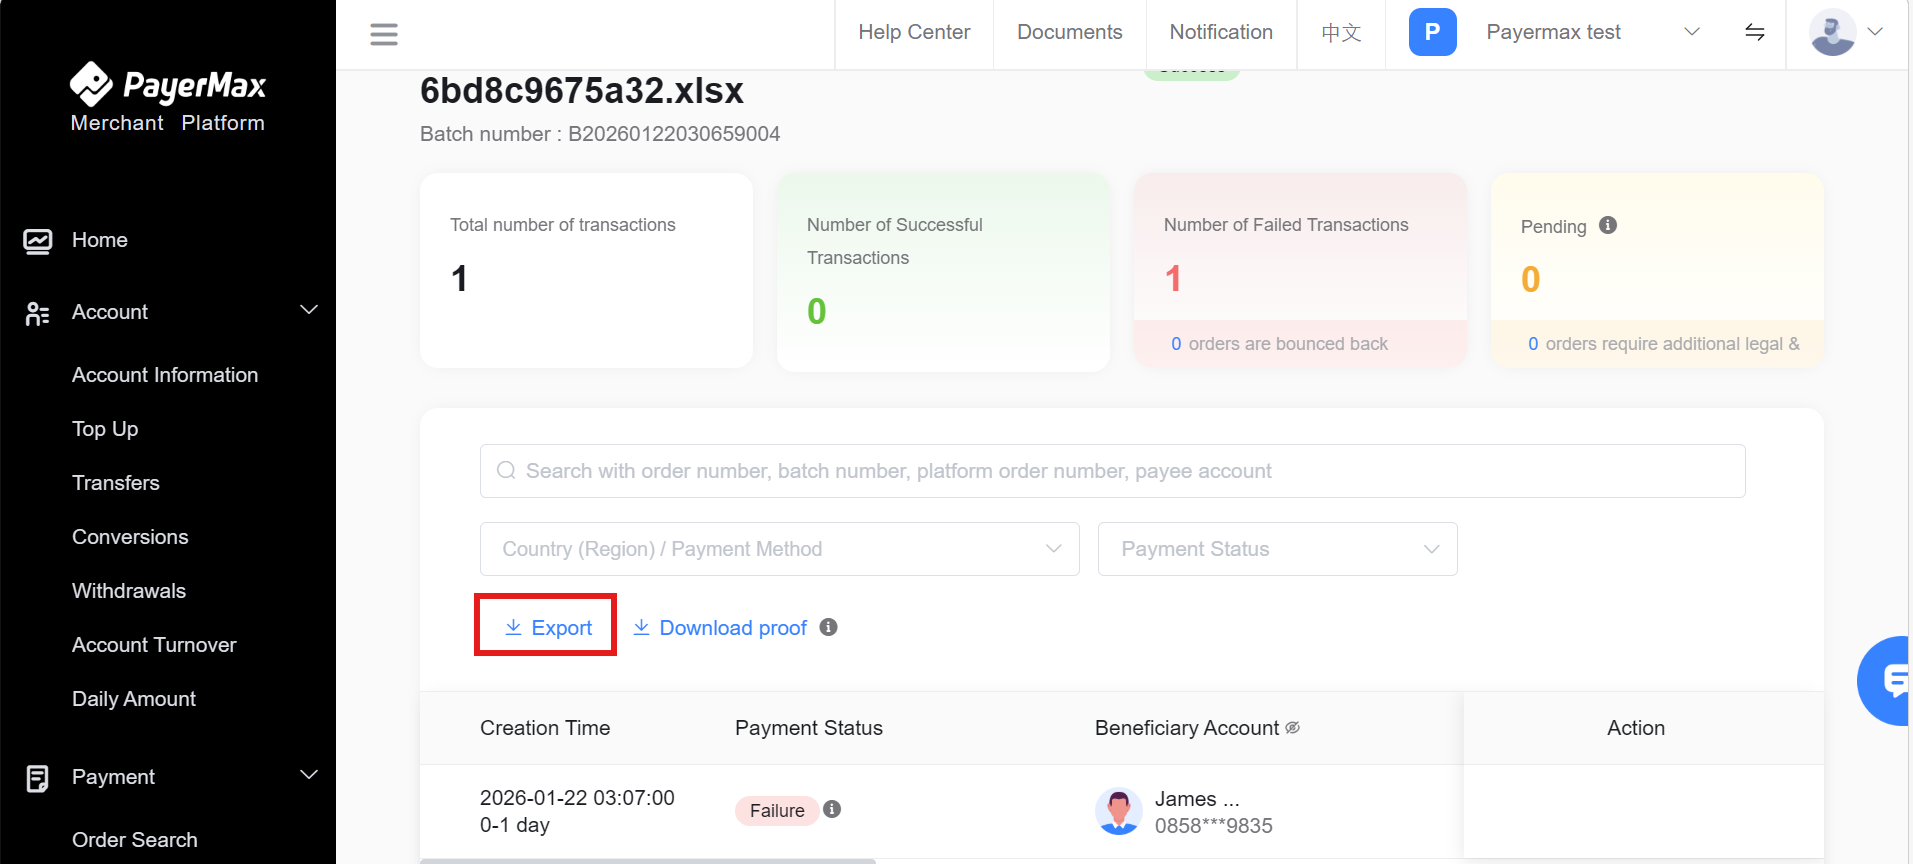
7.2.5 Batch Transaction Export
You can go to the → page, search for and access the details page of the batch to be exported, and click the button to export the selected transaction information in the batch.
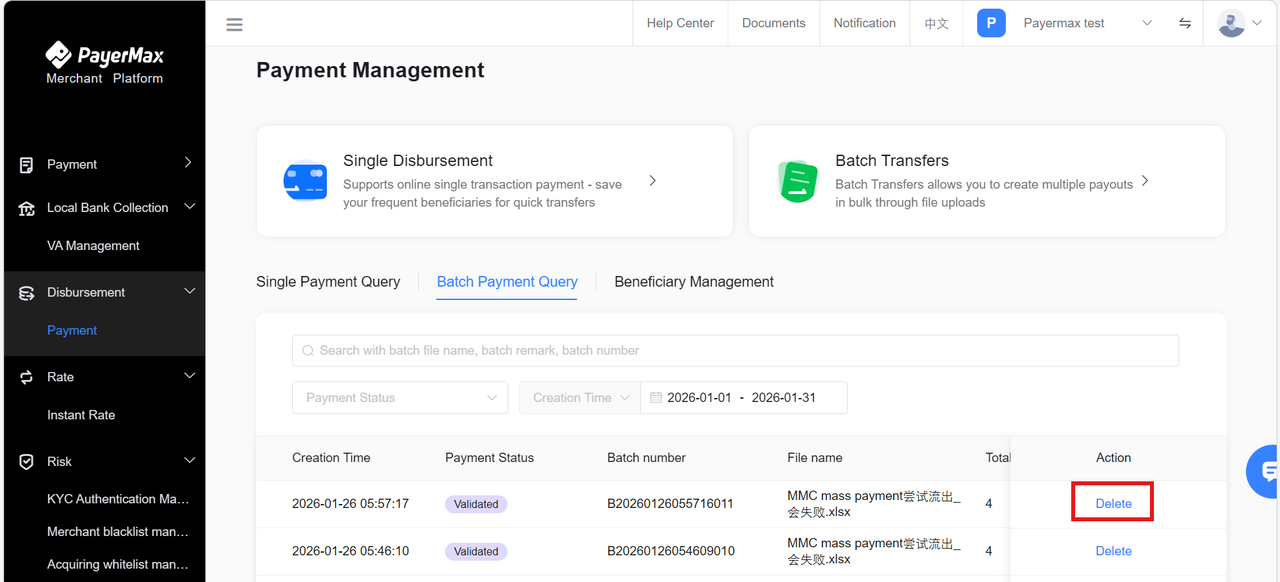
7.2.6 Batch Transaction Deletion
You can go to the → page, search by date to find the batch to be deleted, and click the button to delete the selected transaction information.
8. Risk Management
8.1 Merchant blacklist management
Risk control configurable blacklist, merchants can blacklist users (ToC consumers) and prohibit their transactions
- Blacklist Overview:This page mainly provides merchants can customize the blacklist blocking function in the platform and view the order blocking status.
- Blacklist Config:Supports merchants to upload or edit 5 types of blocking information: user number, card number (first 6 and last 4), IP, card BIN country, card BIN.
- Blocked Order:The specific records of interceptions support filtering by merchant order number, order status, country, etc.
8.2 Local Bank Collection List
After the merchant uploads the configuration on this page, it requires OMC review and approval by PayerMax's Risk Control Operations before it takes effect.
8.3 Acquiring whitelist management
The whitelist can only be configured with the card number OR the user ID.
- Acquiring whitelist overview TAB:
- Acquiring whitelist configuration TAB:
- Add whitelist:
9. Chargeback
9.1 Chargeback Search
Enter → ,filtering time, click to view the details of the dispute:
PayerMax also supports merchants to log in to the MMC to proactively configure callback addresses for receiving dispute transaction messages. The menu path is → , as shown below:
9.2 Uploading of defence materials
Upload Path: → , click to upload materials
Required uploads for disputes:Response materials are listed in the body of the dispute email and are usually:
User information (user registration information, such as name, UID, cell phone number, email, IP, etc.)
Order ticket (transaction content, quantity, payment amount, payment currency, user name, etc.)
Consumption information (detailed flow of recharge and consumption that has not been disputed in the user's history as well as the current recharge and consumption records)
Shipping records (if any) (logistics list, etc.)
Communication records (if any) (records of communication with users, etc.)
Any other materials that can prove that you have faithfully provided the goods/services on time
Depending on the reason for the initiation of the dispute, the materials to be submitted by the merchant may be more focused, as shown in the body of the dispute email/the template of the defense materials provided by the merchant platform.
9.3 Chargeback Alert Search
9.3.1 Privilege opening
Administrator: default open the permission of refusal to pay warning function;
Operator: not open by default, need to be visible in the menu after the administrator assigns the authority;
9.3.2 Search path
- Login to MMC, click → menu. When the merchant has not activated the chargeback alert function, enter the chargeback alert search will show the initialization page;
After the merchants open the Chargeback Alert function, click → menu, you can view the Chargeback Alert order.
- Support searching Platform Order Number, Platform Refund Order Number, Alert Order Number, User ID, and also support filtering Refuse Alert Orders according to Refund Status, Refund Processor, Country/Region, and Time.
- Click on the to view the original transaction order details of the rejected warning order;
- Click on the to quickly filter out the alerts to be processed by the merchant.
- After filtering the order, click to download the corresponding chargeback alert order detail file.
10. Settlement Service
10.1 Get the settlement cycle
You can go to the → page and check the contract details. Here are the settlement cycles based on different payment methods:
For wallets and bank-transfer type, the settlement cycle is typically T+2 weeks, starting from Monday.
For carrier-billing payment methods, the settlement cycle is usually T+2 months.
If you have applied for a special settlement cycle, the platform will settle according to the specific cycle. We will also update the settlement account period feature in the future to help you better understand the settlement situation on the Payermax platform.
10.2 Settlement Statement Generation
The system generates multiple settlement statements based on the dimensions of [settlement cycle × transaction country × settlement currency], you can go to → page to view the details. Support querying settlement overview based on transaction completion time/settlement time. The query includes settlement amount statistics, settlement date (billing date), settlement status, etc. You can select multiple settlement statements and export a summary of settlements and corresponding settlement details.
By clicking on the settlement statement details, you can also view the specific details of the settlement, including the settlement amount, exchange rate, transaction quantity, and the breakdown of the amount calculation.
- If you withdraw funds by amount, the Settlement view only displays the Settlement TAB.
- If you follow the statement to settle to top-up or settle to the card, the settlement view can provide the Settlement Payment Order TAB
10.3 Settlement Funds Inquiry
When the settlement statement is generated, funds are deposited into the acquiring account (for integrated merchants, it goes into the acquiring balance in the local currency, for non-integrated merchants, it is converted to USD and then deposited into the acquiring balance).
The funds are settled into the acquiring × currency account corresponding to each settlement statement based on the amount and currency of each statement.You can view the specific fund movements by accessing the Income and Expense Details page, as shown in the following figure:
Note:
To view the details of funds deposited into the balance, you can use the following filters: select Acquiring Account for the account, select All for the currency, and select Settlement for the business.
10.4 Settlement Fund Operations
Merchants can open the → page to view the actual amount in the Settled Payment account under the section (this amount is an estimated value in USD calculated based on real-time exchange rates for all currencies converted to USD, the actual amount is still in respective currency accounts). At the same time, merchants can perform Settlement to top-up or Withdrawal operations for this acquiring amount.
10.5 Settlement Report
View Settlement bill.
11. Reconciliation Service
11.1 Reconciliation File Retrieval
For various statements, PayerMax provides two ways to obtain statements:
Method 1: Download statements manually through the PayerMax Merchant Platform (MMC), or set up scheduled billing to automatically send statements on a recurring basis upon expiration.
Method 2: Obtain statements via SFTP access, set up scheduled billing, and automatically send the statement file package to the specified directory on a recurring basis upon expiration.
Method 3: Obtain statements via email, set up scheduled billing, and automatically send the statement file package to the designated recipient's email address on a recurring basis upon expiration.
Note:
To ensure the accuracy of billing data, we have enhanced the inspection and automated reconciliation capabilities for customer billing statements. However, this enhancement will result in a delay of the latest production time for customer billing statements. The new schedule will move the deadline from 12:00 PM to 2:00 PM within the UTC+8 time zone (UTC+8 time zone 2:00 PM = UTC+0 time zone 6:00 AM ).
Instructions for automatic bill parsing: PayerMax has more and more business types, and it is inevitable to add fields to the bill to distinguish different types of business. Therefore, we provide a bill header setting function. To ensure that after the merchant develops automatic bill reconciliation, the additional fields in the bill do not affect the merchant's daily reconciliation. The newly added fields need to be modified by the merchant through the MMC bill setting function according to their needs (Please refer to the rows of each new field in the statement under [Appendix - Reconciliation Service - Reconciliation File Content]).
11.1.1 Obtaining Reconciliation Files via MMC Platform
11.1.1.1 Downloading Reconciliation Files via MMC Platform
(a) Bill Download Request
On the MMC platform's → page, merchants can download three types of bills:【Settlement Report】【Balance Report】【Payin Transaction History Report】【Payout Transaction History Report】. You can download Reports for the past 2 years, and the maximum time range for a single download is 180 days.
Additionally, email delivery is supported. When submitting a download request, if an email is provided, the exported results will be sent as a compressed package to the specified email addresses (up to 5 emails separated by commas).
(b) Successful File Generation and Download
The generated bill files can be viewed on the list page. After clicking download, the compressed package can be downloaded locally.
11.1.1.2 Set up scheduled bill delivery to a designated recipient's email via MMC Platform
(a) Scheduled Billing Settings
Through the Merchant Manage Console (MMC) → → , select the type of bill you wish to be sent to you at regular intervals. Determine the scheduled period, either daily or monthly, and then choose the notification method via email to receive the bill.
(2) Enable email notifications in the bill notification settings
In the bill notification settings, enable email notifications and correctly maintain the email address of the bill recipient. Only in this way can you receive the bills that are automatically pushed by the system at regular intervals.
11.1.2 Retrieving Reconciliation Files via SFTP Access
To retrieve reconciliation files via SFTP, please follow the application and retrieval process below:
After SFTP is enabled, the file path, compressed package, and file type of the corresponding bill are as follows:
SFTP File Path:
/upload/#{[year]}/
(Example: /upload/2023/)
Compressed Package File Name:
{[member_id]}#{[start_date]}#{[end_date]}.zip
(Example: 203242353454634545_20230301_20230301.zip)
Note:
member_id is the unique identifier for the merchant entity - platform entity.
File Type:
| Report Type | Report Name | Description |
| Fund Detail Reconciliation Report | P010123456789_bill_20230301_20230301_0.csv P01010114310163 daily_fund_20241221202 41221_0.csv | For all merchants |
| Deposit Transaction Reconciliation Report | P010123456789_payin_20230301_20230301_0.csv | Required for merchants with acquiring business |
| Payment Transaction Reconciliation Report | P010123456789_payout_20230301_20230301_0.csv | Required for merchants with payment business |
| Settlement Detail Reconciliation Report | P010123456789_settlement_sum_20230301_20230301_0.csv P010123456789_settlement_detail_20230301_20230301_0.csv | Required for merchants with acquiring business and needing to reconcile according to settlement bills |
11.2 Bill Settings
11.2.1 Header Settings
You can customize the headers of all statements by using the → . The header settings will apply to the statements downloaded through the MMC platform or accessed via SFTP.
Standard Statement: PayerMax provides a default standard statement. You can use the header settings to delete or add standard header fields (except for required fields).
Custom Statement: For new business scenarios, you can use the header settings to add or delete extended header fields. Custom statements allow you to personalize the statements by adding or removing extended header fields based on specific business requirements.
Note:
- The header settings will be applied to all merchant numbers under your contract with PayerMax, so please be cautious.
- PayerMax allows you to set headers for all types of statements, including Balance Report(Fund Report,Daily Amount Report),Payin Transaction Report(Payin Transaction Report),Payout Transaction Report(Payout Transaction Report)and Settlement Report(Settlement Detail Report,Settlement Sum Report).
Operation Process:
(a) Log in to the MMC platform and go to → to access the statement header settings page. The list includes the statement type, statement name, last update time, and updater.
(b) Click on to view the explanation of statement fields.
(c) Click the button to open the sidebar for header editing.
- Search: You can enter the field name to search for the target field.
- Add/Delete: Click the checkbox on the left side of the header name to add or delete header fields.
- Sorting: Drag the header names to sort them. The statement headers will be displayed from left to right according to the sorting order.
(d) Click the button to submit the statement header settings. The changes will take effect in the next statement download. Click the button to close the popup and continue editing the headers.
(e) On the details page, you can view the history of operations, including the operation time, operator, and operation type.
11.2.2 Bill Notification Method Settings
Through the Merchant Platform (MMC) → function, merchant administrators can set the form of automatic notification after bill generation.
Note:
Bill notification method settings are only open to merchant administrators. You can contact the merchant administrator to log in to the merchant platform to set it up.
Operation Process:
(a) Log in to the Merchant Platform (MMC), follow the menu path of → , enter the setting operation interface, and switch to the tab.
(b) To determine the form of bill notification, you can choose the status of Merchant Platform(MMC) notification, Email notification, and SFTP notification;
- Switch on/off status: Switch on/off status to control whether the bill notification form is effective or not;
- Email notification method settings editing: In the email notification method settings area, click the button on the right to enter the editing sidebar, where you can adjust the email range of bill email notification recipients.
Note:
SFTP Notification Method Settings: Enable or disable according to the settings previously agreed between the merchant and the platform, and merchants do not support autonomous switching of states for the time being;
In the form of bill notification, at least one state should be kept open to avoid not receiving the bill.
11.2.3 Scheduled Billing Settings
Through the Merchant Platform (MMC) → function, merchant administrators can set the cycle of bill timing automatic generation according to the bill type, including daily or monthly bills. After setting, bills are automatically generated according to the bill cycle type.
Note:
Scheduled billing settings are only open to merchant administrators. You can contact the merchant administrator to log in to the merchant background for settings.
Operation Process:
(a) Log in to the Merchant Platform (MMC), follow the menu path of → , enter the setting operation interface, and switch to the tab.
(b) Click the in the upper right corner to enter the scheduled bill setting interface;
(c) Select bill type;
(d) Select Billing Cycle Type;
Note:
Select Monthly Bill: To select Monthly Bill, you need to additionally determine the date on which the monthly bill will be automatically generated.
(e) Select billing time zone;
Note:
Select time zone: Currently, only UTC + 0 or UTC + 8 time zones can be selected.
(f) Select notification method;
Note:
SFTP Notification Method: preset according to the form previously agreed between the merchant and the platform, and merchants do not support independent setting for the time being.
(g) Click the button to save your scheduled billing settings.
12. Statement Acquisition
12.1 Invoice Acquisition
VAT invoices are automatically sent to the Merchant Center (MMC) on a monthly basis and can be downloaded from the Merchant Center MMC by navigating to → .
12.2 Business Certificate Acquisition
Business certificates include payment collection fee certificates, payout fee certificates, settlement proofs, and top-up proofs.
These are automatically sent to the Merchant Center MMC on a monthly basis and can be downloaded from the Merchant Center MMC by navigating to → .